1. Introduction
This manual provides instructions for the ELECOM Automatic Pet Feeder, model PET-AF03WH. This device is designed to provide scheduled meals for cats and small to medium-sized dogs, supporting regular eating habits and promoting pet health. It features a timer function, voice recording, and a 2-way power supply for reliable operation.

Image 1: ELECOM Automatic Pet Feeder PET-AF03WH, showing the main unit with a single stainless steel bowl filled with dry food.
2. Setup
2.1 Initial Cleaning
Before first use, disassemble and thoroughly wash all removable parts with water. Ensure all parts are completely dry before reassembly.

Image 2: A person cleaning the food bowl and internal rotating fin, demonstrating the washable components.
2.2 Assembling the Feeder
- Insert the rotating fin into the food tank, aligning it with the grooves.
- Place the food tank vertically onto the main body.
- Rotate the lock knob on the bottom of the main unit to the left to secure the food tank.
2.3 Power Supply
The feeder supports a 2-way power supply: AC adapter and batteries. This ensures continuous operation even during power outages.
- Connect the USB Type-C connector to the USB port on the bottom of the unit.
- Plug the AC adapter into a power outlet.
- For backup power, insert four AAA batteries into the battery compartment on the bottom of the unit. This will preserve current time and feeding settings during power interruptions.

Image 3: Illustration of connecting the USB-C power cable and inserting AAA batteries for the 2-way power supply.
2.4 Attaching the Food Bowl and Tray
- Place the stainless steel food bowl onto the plastic tray.
- Align the protrusion on the tray with the recess on the main unit. Tilt the main unit slightly, attach the tray, and then gently lower the main unit to secure it.
2.5 Adding Dry Food
Open the lid and pour dry pet food into the food tank. The tank has a large capacity of approximately 4 liters (about 2.2 kg of dry food). You can check the remaining food level through the transparent window on the front.

Image 4: A person pouring dry pet food into the feeder's tank.
2.6 Inserting Desiccant
To keep the dry food fresh and prevent moisture, insert a desiccant packet into the desiccant pocket located on the underside of the lid. Close the lid securely using the lid lock mechanism.

Image 5: A hand inserting a desiccant packet into the designated compartment on the feeder's lid.
2.7 Safety Features
The feeder is designed with features to prevent tampering by pets, including a lid stopper and a mesh cable to deter chewing.
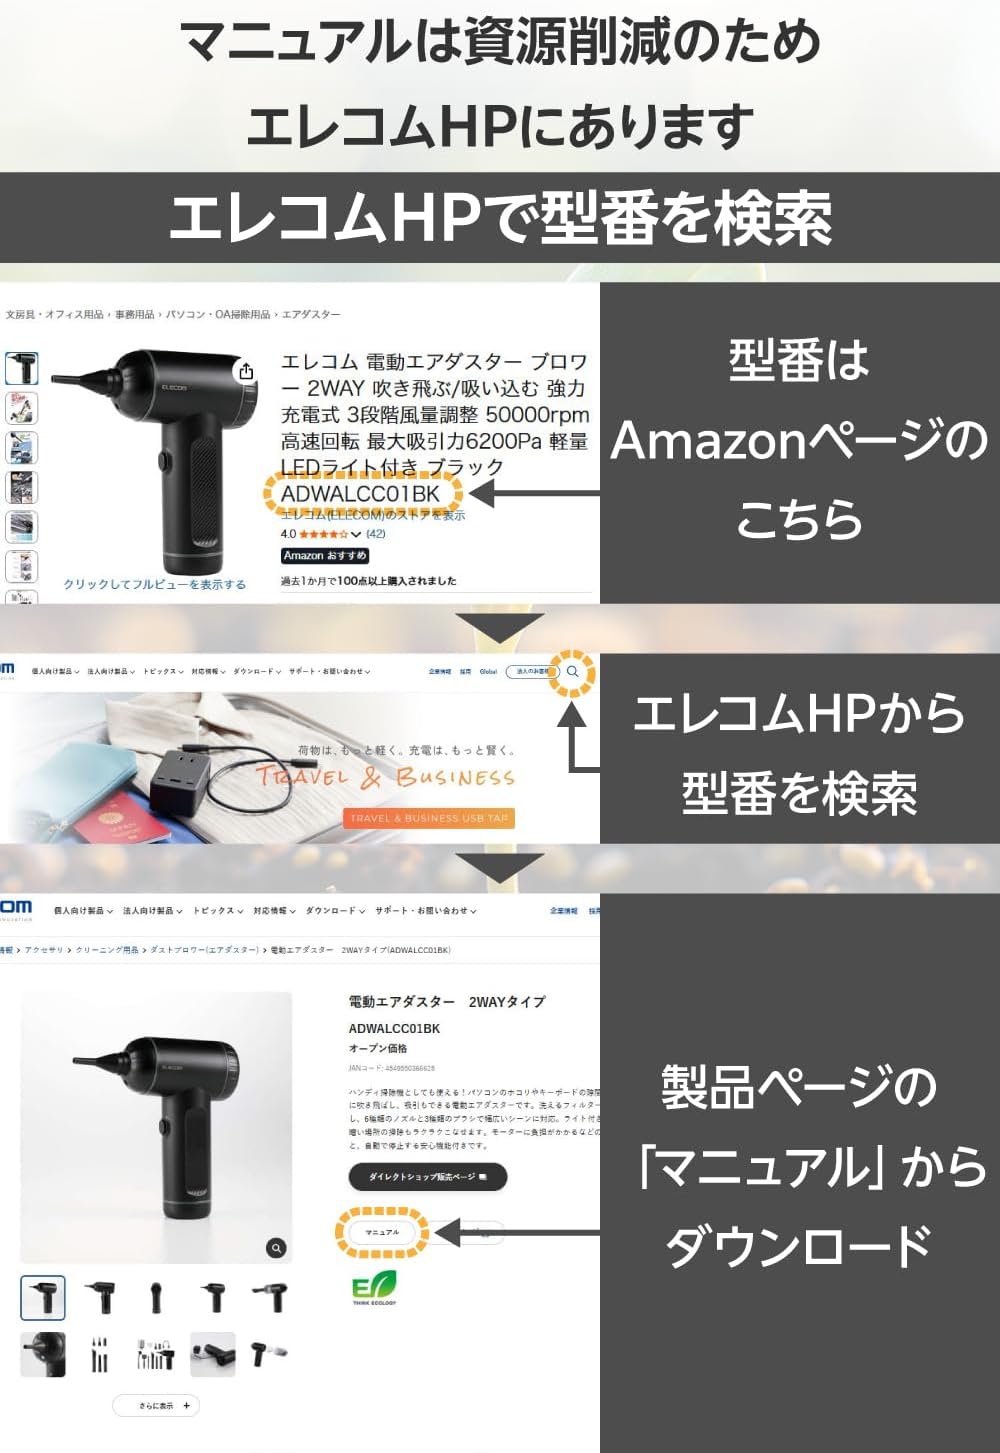
Image 6: A dog and cat near the feeder, highlighting the lid stopper and mesh cable designed to prevent pets from tampering with the device.
3. Operation
3.1 Setting Feeding Schedule (Time and Quantity)
The feeder allows you to set up to 6 meals per day. Each meal can be configured with a specific time and portion size (approximately 8g to 160g per meal).
- Unlock the panel: Press and hold the lock/unlock button for 3 seconds to unlock the control panel.
- Set Feeding Time: Press the settings button. The hour display for the first meal will flash. Use the up/down buttons to adjust the hour, then press the settings button to confirm. Repeat for the minutes.
- Set Feeding Quantity: After setting the time, the portion display will flash. Use the up/down buttons to select the desired portion size (P-01 to P-20), then press the settings button to confirm.
- Repeat steps 2 and 3 for up to 6 meals. The feeding quantity can be changed for each meal.

Image 7: Detailed view of the control panel showing how to set the feeding time and portion size for each meal.
3.2 Voice Recording
You can record a voice message of up to 10 seconds. This message will play at each feeding time, allowing your pet to hear your voice even when you are away.
- Unlock the panel: Press and hold the lock/unlock button for 3 seconds to unlock the control panel.
- Start Recording: Press and hold the microphone button for 3 seconds. You will hear a "beep" sound, indicating recording has started. Speak your message into the microphone.
- End Recording: Release the microphone button. The recorded message will play once to confirm.

Image 8: A cat looking towards the feeder, with a speech bubble indicating a recorded voice message, demonstrating the voice recording feature.
3.3 Manual Feeding
To dispense food manually, press the manual feed button (finger icon) once. This will dispense one portion of food immediately.
3.4 Double Bowl Splitter (for 2-bowl models or optional accessory)
If you have a double bowl splitter (sold separately or included with 2-bowl models), you can divide a single meal's portion into two bowls simultaneously. Attach the splitter to the center of the food tray.

Image 9: The feeder with a double bowl splitter attached, dispensing food into two separate bowls.
4. Maintenance
Regular cleaning is essential for hygiene and proper functioning of the feeder.
- Disassembly: Remove the food bowl and tray. Unlock the food tank by rotating the knob on the bottom of the main unit, then lift the food tank and rotating fin.
- Cleaning: Wash the food tank, rotating fin, tray, and food bowl thoroughly with water. Ensure all parts are clean of food residue.
- Drying: Allow all parts to air dry completely before reassembly to prevent moisture buildup.
- Reassembly: Reassemble the feeder by following the setup instructions in reverse order.

Image 10: A person disassembling the feeder, showing the removable food tank and rotating fin for easy cleaning.
5. Specifications
| Feature | Detail |
|---|---|
| Brand | ELECOM |
| Model Number | PET-AF03WH |
| Target Species | Dogs (Medium, Small), Cats |
| Life Stage | All life stages |
| Color | White |
| Capacity | 4 Liters (approx. 2.2 kg dry food) |
| Feeding Frequency | Up to 6 times per day |
| Portion Size | Approx. 8g to 160g per meal (1-20 portions, 1 portion = approx. 8g) |
| Special Features | Timer, Portion Control, Voice Recording, 2-Way Power (AC adapter, batteries) |
| Washable Parts | Food tank, rotating fin, tray, food bowl |
| Desiccant Included | Yes |
6. Additional Resources
For more detailed information, including advanced settings and troubleshooting, please refer to the official ELECOM website or the comprehensive web manual.
You can find the web manual by searching for the product model number (PET-AF03WH) on the ELECOM official website.

Image 11: Visual guide on navigating the ELECOM website to locate and download the product manual using the model number.
7. Video Guide
Watch the official product video for a visual demonstration of the setup and operation of the ELECOM Automatic Pet Feeder.
Video 1: Official ELECOM product video demonstrating the setup, features, and cleaning of the automatic pet feeder.


