Femitu Light Bulb Changer
Femitu 3-12FT Telescopic Light Bulb Changer for High Ceilings
Model: Light Bulb Changer
1. Introduction
This instruction manual provides detailed guidance for the safe and effective use of your Femitu Telescopic Light Bulb Changer. This tool is designed to assist in replacing light bulbs in high ceilings and hard-to-reach areas, offering a safer alternative to ladders. Please read this manual thoroughly before initial use and retain it for future reference.
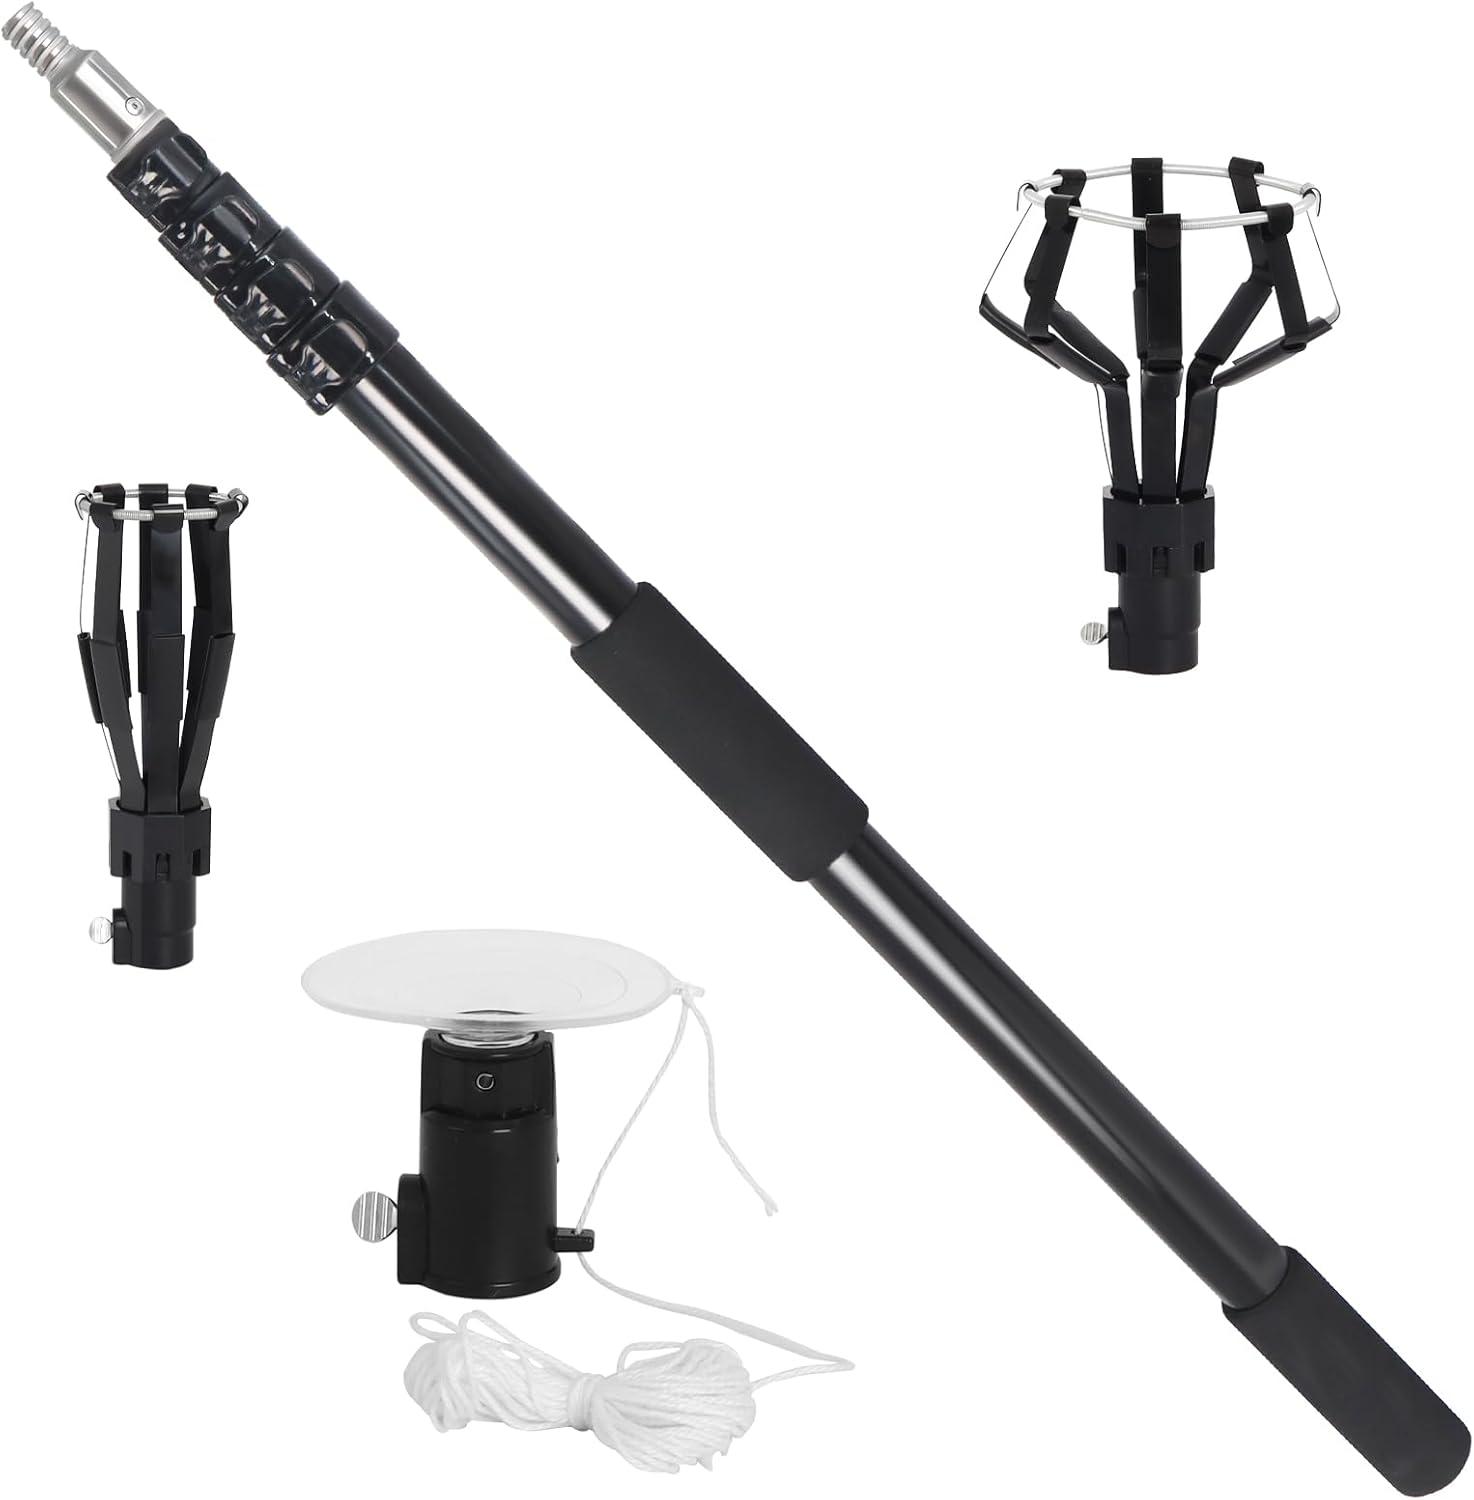
Image 1: Femitu Telescopic Light Bulb Changer with various attachments (large 8-finger cage, small 8-finger cage, suction cup head) and the telescopic pole.
2. What's in the Box
Verify that all components are present and undamaged upon unpacking:
- 1 x 3-12FT Telescopic Extension Pole with flipping cam locking mechanism
- 1 x Large 8-Finger Cage attachment
- 1 x Small 8-Finger Cage attachment
- 1 x Suction Cup Head attachment

Image 2: Product dimensions for the telescopic pole and the three bulb changer attachments.
3. Safety Information
- Always ensure the pole segments are securely locked using the flip cam locking mechanism before use.
- Tighten the thumb screw on the attachment head to prevent separation and bulb dislodging during operation.
- Do not use the suction cup attachment on curved or textured bulb surfaces; it is designed for flat, clean surfaces only.
- Avoid applying excessive force to the pole or attachments.
- Ensure a stable footing when operating the pole, especially at extended lengths.
- Turn off the power to the light fixture before attempting to change a bulb.

Image 3: Illustrates the safety benefit of using the extension pole compared to a ladder for changing high light bulbs.
4. Setup
4.1 Assembling the Pole
- Unpack the telescopic pole.
- Extend the pole to the desired length by opening the flip cam locks, pulling out the segments, and then securely closing the locks. Ensure each segment is firmly locked to prevent collapse during use.

Image 4: Detail of the flip cam lock for adjusting pole length.
4.2 Attaching a Bulb Changer Head
- Select the appropriate bulb changer head (large cage, small cage, or suction cup) for your bulb type.
- Screw the chosen attachment head onto the 3/4 inch ACME metal threaded tip of the telescopic pole.
- Once screwed on, tighten the integrated thumb screw on the attachment head to secure it firmly to the pole. This prevents the attachment from rotating or detaching during use.

Image 5: The universal threaded head for attaching various tools.
5. Operating Instructions
Always ensure the power to the light fixture is turned off before changing any bulb.
5.1 Using the Cage Attachments (Small and Large 8-Finger Cages)
These cages are suitable for standard incandescent, fluorescent, and floodlight bulbs.
- Select the cage size that best fits the bulb you intend to change.
- Position the cage around the bulb. The flexible fingers will gently grip the bulb.
- To remove a bulb: Gently twist the pole counter-clockwise to unscrew the bulb.
- To install a bulb: Insert the new bulb into the cage, align it with the socket, and gently twist the pole clockwise to screw in the bulb. Do not overtighten.

Image 6: Large 8-finger cage for floodlight bulbs.

Image 7: Small 8-finger cage for standard incandescent bulbs.
5.2 Using the Suction Cup Attachment
This attachment is specifically designed for recessed lights with flat, smooth bulb surfaces.
- Ensure the bulb surface is clean and dry for optimal suction.
- Press the suction cup firmly against the center of the bulb's flat surface until a secure seal is formed.
- To remove a bulb: Gently twist the pole counter-clockwise to unscrew the bulb.
- To install a bulb: Insert the new bulb into the suction cup, align it with the socket, and gently twist the pole clockwise to screw in the bulb. Do not overtighten.
- To release the bulb from the suction cup: Pull the string attached to the suction cup head.

Image 8: Suction cup attachment for recessed lights with flat surfaces.
5.3 General Usage Tips
- Maintain a firm grip on the anti-slip foam handle for better control.
- When extending the pole, ensure it is stable and balanced before reaching for the bulb.
- The 3/4 inch ACME thread head is compatible with other household accessories such as ceiling cleaning tools or fruit pickers, expanding the pole's versatility.

Image 9: Application scenarios for the light bulb changer, including recessed and flood lights.
6. Maintenance
- Cleaning: Wipe the pole and attachments with a damp cloth after use. Ensure the suction cup is clean and dry before storage for optimal performance.
- Storage: Collapse the telescopic pole to its shortest length and store all components in a dry, safe place away from direct sunlight and extreme temperatures.
- Inspection: Periodically check the flip cam locks and threaded connections for wear or damage. Replace any damaged parts immediately.
7. Troubleshooting
7.1 Pole Segments Not Locking Securely
Issue: Pole segments slide back in or feel loose after locking.
Solution: Ensure the flip cam locks are fully closed and engaged. Inspect the locking mechanism for any debris or damage that might prevent a secure lock. If damaged, discontinue use.
7.2 Attachment Head Becomes Loose or Detaches
Issue: The bulb changer head rotates or separates from the pole during use.
Solution: Always ensure the thumb screw on the attachment head is fully tightened after screwing it onto the pole. This screw is crucial for securing the attachment and preventing rotation or separation.
7.3 Suction Cup Not Gripping Bulb
Issue: The suction cup fails to create a secure seal with the bulb.
Solution: The suction cup is designed for flat, smooth bulb surfaces. Ensure the bulb surface is clean, dry, and free of dust or texture. Do not use on curved, textured, or frosted bulbs. Press the suction cup firmly against the bulb to create a vacuum seal.
8. Specifications
| Brand | Femitu |
| Model Name | Light Bulb Changer |
| Pole Extension Range | 3-12 feet (up to 18+ feet reach when standing) |
| Material | High-Quality Aluminum (1.2MM wall thickness) |
| Thread Type | 3/4 inch American ACME thread |
| Included Attachments | Large 8-Finger Cage, Small 8-Finger Cage, Suction Cup Head |
| Handle | Anti-slip EVA Foam Grips |
| Item Weight | 2.84 pounds |
| Product Dimensions | 4"W x 37"H (collapsed) |

Image 10: Features of the high-quality aluminum telescopic pole.
9. Warranty and Support
For warranty information or technical support, please refer to the product packaging or contact Femitu customer service through the retailer where the product was purchased. Keep your purchase receipt for warranty claims.
Related Documents - Light Bulb Changer
 |
12FT Light Bulb Changer Instructions and Precautions This document provides instructions and precautions for using the 12FT Light Bulb Changer, including assembly steps, compatibility information for the 8-finger cage, and guidelines for using suction cups. |
 |
Product Manual: Extendable Stainless Steel Rod for Light Bulb Changers Comprehensive product manual for an extendable stainless steel rod. Details include specifications, functions, usage instructions, safety warnings, maintenance tips, packaging contents, and FAQs for optimal use of this tool accessory. |
 |
480 LED Warm White Net Lights User Manual | Better Lighting Decorations Comprehensive user manual for Better Lighting Decorations' 480 LED Warm White Net Lights (12ft x 12ft). Features include 8 lighting modes, connectable design, timer function, IP44 water resistance, and detailed operation instructions for indoor and outdoor decorative use. |
 |
Felt Right Acoustic Beams Installation Guide for Flat, Drywall, and Grid Ceilings Comprehensive installation guide for Felt Right Acoustic Beams, covering flat, drywall, and ACT/grid ceiling types. Includes recommended tools, hardware, step-by-step instructions, and helpful tips for a successful installation. |
 |
EGO PPX1000 56V Lithium-Ion Telescopic Power Pole Operator's Manual Discover the EGO PPX1000 56V Lithium-Ion Telescopic Power Pole with this comprehensive operator's manual. Learn about safe operation, assembly, maintenance, and specifications for efficient outdoor power tool use. |
 |
Makita DUA301 300MM DC Telescopic Pole Saw Service Information and Parts List Comprehensive service information and parts list for the Makita DUA301 300MM DC Telescopic Pole Saw. Find detailed component descriptions, part numbers, and quantities for maintenance and repair. |
Ask a question about this manual
Ask about setup, troubleshooting, compatibility, parts, safety, or missing instructions. Manuals+ will review the question and use this page’s manual context to help answer it.