Introduction
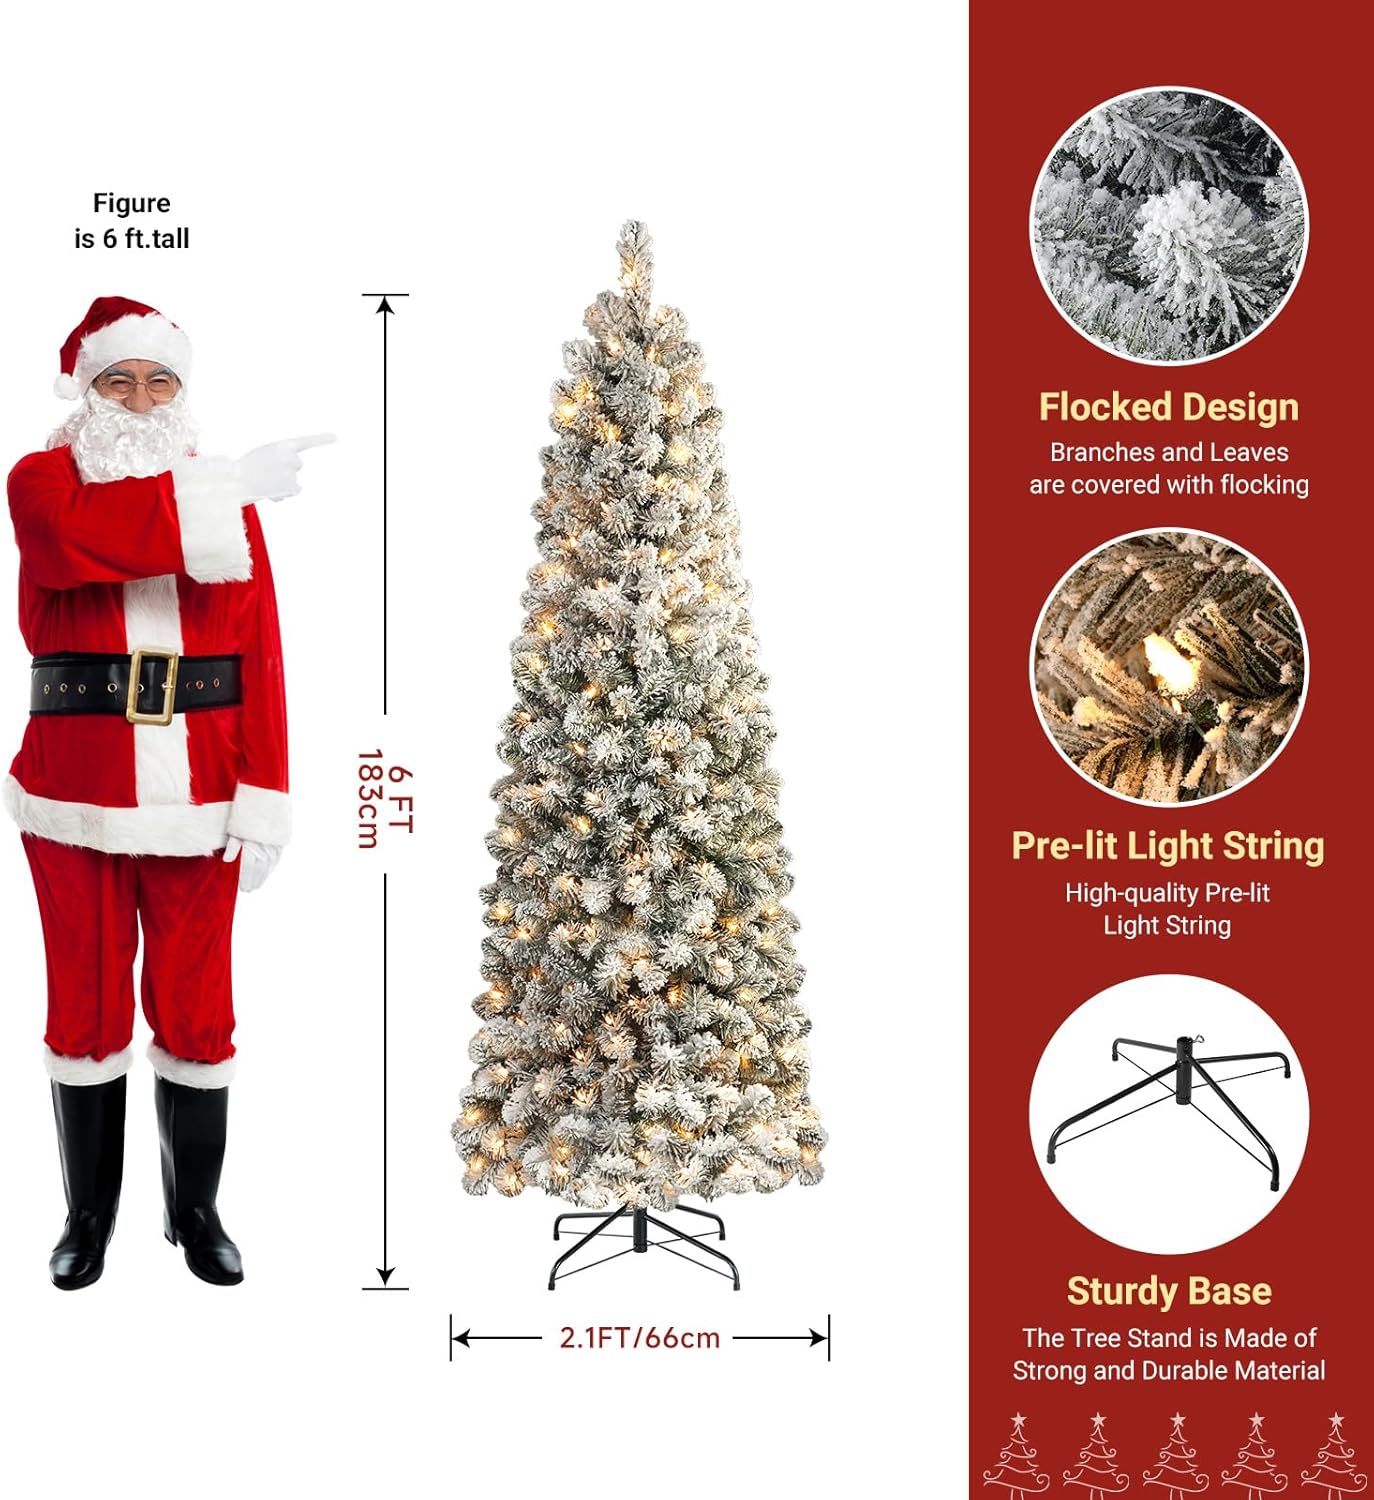
Thank you for choosing the SHareconn 6ft Prelit Snow Flocked Artificial Slim Pencil Christmas Tree. This manual provides essential information for the safe and proper assembly, operation, and maintenance of your new Christmas tree. Please read these instructions carefully before setup and retain them for future reference.
Important Safety Information
- Electrical Safety: Ensure the power outlet used for the tree lights is easily accessible and not overloaded. Do not connect the tree to a power supply while it is still in its packaging.
- Indoor Use Only: This Christmas tree is designed for indoor use only. Do not expose it to outdoor elements.
- Fire Hazard: Keep the tree away from open flames, heat sources, and flammable materials. The tree is constructed with flame-retardant materials, but it is not fireproof.
- Stability: Always ensure the tree stand is fully extended and stable on a flat, level surface before and after assembly.
- Children and Pets: Keep small children and pets away from the tree during assembly and ensure all electrical cords are secured to prevent tripping hazards or accidental damage.
- Light Bulb Replacement: If any lights fail, replace them with bulbs of the same type and voltage as indicated on the light string label.

Package Contents
Please verify that all components are present before beginning assembly:
- Tree Sections (typically 3 sections for a 6ft tree)
- Metal Tree Stand
- Spare Light Bulbs (if included)
- Instruction Manual
Assembly Instructions
Follow these steps to assemble your SHareconn Christmas tree:
- Step 1: Assemble the Tree Stand. Unfold the metal tree stand and place it on a flat, stable surface. Insert the bottom section of the tree into the stand and tighten the screws securely to ensure stability.
- Step 2: Connect Tree Sections. Insert the middle tree section into the bottom section. Ensure the pole aligns correctly. Connect the electrical plugs between the sections to power the pre-lit lights.
- Step 3: Attach Top Section. Insert the top tree section into the middle section. Connect the electrical plugs.
- Step 4: Fluff the Branches. Starting from the bottom section, gently pull and spread out each branch tip, working your way up the tree. This process helps to create a full and natural appearance. Take your time to shape each branch.
- Step 5: Connect to Power. Once all sections are assembled and branches are fluffed, plug the tree's main power cord into a suitable electrical outlet.


Operating Instructions
Your SHareconn Christmas tree comes pre-lit with warm white lights, simplifying your holiday decoration process.
- Power On/Off: Simply plug the tree's power cord into a standard electrical outlet to turn the lights on. Unplug to turn them off.
- Light Functionality: The lights are designed to provide a consistent warm white glow. There are no additional settings or modes for the lights.
- Bulb Replacement: If a bulb burns out, the remaining lights should stay lit. Replace faulty bulbs promptly using the spare bulbs provided or equivalent replacements to maintain optimal illumination.

Care and Storage
Proper care and storage will extend the life of your artificial Christmas tree:
- Cleaning: To clean the tree, gently dust the branches with a soft cloth or use a vacuum cleaner with a brush attachment on a low setting. Do not use liquid cleaners or solvents.
- Disassembly: Unplug the tree from the power outlet. Carefully disconnect the tree sections and fold the branches back towards the central pole.
- Storage: Store the tree in its original box or a dedicated tree storage bag in a cool, dry place, away from direct sunlight and extreme temperatures. This helps preserve the flocking and branch integrity.
- Flocking: Some minimal shedding of flocking material is normal during initial setup and disassembly. This will decrease over time.

Troubleshooting
| Problem | Possible Cause | Solution |
|---|---|---|
| Lights are not working. | Power cord not plugged in, loose connection between sections, or a faulty bulb. | Ensure the power cord is securely plugged into a working outlet. Check all connections between tree sections. Inspect individual bulbs for damage and replace any faulty ones. |
| Tree is unstable. | Stand not fully extended or screws not tightened. | Ensure the metal stand is fully spread out and placed on a level surface. Tighten all screws on the stand that secure the tree pole. |
| Branches appear sparse. | Branches not fully fluffed. | Spend additional time carefully separating and shaping each branch tip to achieve a fuller appearance. |
| Excessive flocking shedding. | Normal during initial setup. | Some shedding is expected. Gently shake the sections outdoors before assembly to remove loose flocking. This will reduce over time. |
Product Specifications
| Feature | Detail |
|---|---|
| Brand | SHareconn |
| Model Number | SH-6.5ft Pen Flock Warmlight Tree GY |
| Height | 6 feet (72 inches) |
| Product Dimensions | 25.2"D x 25.2"W x 72"H |
| Color | Flocked Green |
| Material | Polyvinyl Chloride (PVC) |
| Item Weight | 11.22 pounds (5.1 Kilograms) |
| Special Feature | Flocked, Prelit |
| Tree Type | Artificial Spruce, Pencil Slim |
| Base Type | Stand (Steel) |
| Built-in Light | Yes, Warm White Lights |
| Included Components | Steel Stand, Pre-lit Lights |

Warranty and Support
For warranty information or technical support, please refer to the product packaging or contact SHareconn customer service directly. Contact details can typically be found on the brand's official website or through your purchase platform.


