
1. Introduction
This manual provides detailed instructions for the safe and effective operation of your Hantek TO1112 Tablet Oscilloscope. The Hantek TO1112 is a 2-channel tablet oscilloscope featuring a 110MHz bandwidth, 250MSa/s real-time sampling rate, and 8M storage depth. It is equipped with a 7-inch multi-touch screen for intuitive control and a built-in rechargeable battery for portability. This device is designed for various applications including automotive testing and laboratory courses. Please read this manual thoroughly before using the instrument.
2. Product Overview
2.1 Key Features
- Channels & Bandwidth: 2-channel input with 110MHz bandwidth.
- Sampling Rate: 250MSa/s real-time sampling rate.
- Storage Depth: 8M memory depth for capturing long waveforms.
- Display: 7-inch multi-touch LCD screen for intuitive operation.
- Vertical Resolution: 8-bit vertical resolution.
- Trigger Types: Supports Edge-triggered, Pulse Width, Video, Slope, and Timeout Trigger.
- Integrated Functions: Includes data storage, frequency meter, FFT spectrum analyzer, math operations, 42 automatic measurements, and XY mode.
- Portability: Built-in detachable lithium battery (3.7V 2600mAh*2 in parallel) with 18W fast charging support.
- Durability: Adjustable suspension bracket with anti-falling and anti-seismic design.
2.2 Package Contents
The Hantek TO1112 package typically includes the following items:
- Hantek TO1112 Tablet Oscilloscope Unit
- Standard Oscilloscope Probe
- Extra Oscilloscope Probe (Note: The extra probe may have a lower bandwidth rating, e.g., 70MHz, compared to the oscilloscope's full bandwidth.)
- 18W Power Adapter
- Type-C USB Cable
- Crocodile Clip Cable
- Protective Carrying Bag

Figure 2.2.1: Hantek TO1112 Tablet Oscilloscope with its standard accessories, including probes, power adapter, USB cable, crocodile clip cable, and carrying bag.

Figure 2.2.2: A closer look at the included accessories: standard probe, extra probe, 18W charger & Type-C cable, and crocodile clip cable. A table comparing TO1112, TO1112C, and TO1112D models is also shown, highlighting that the TO1112 model does not support multimeter or signal generator functions.
2.3 Device Layout
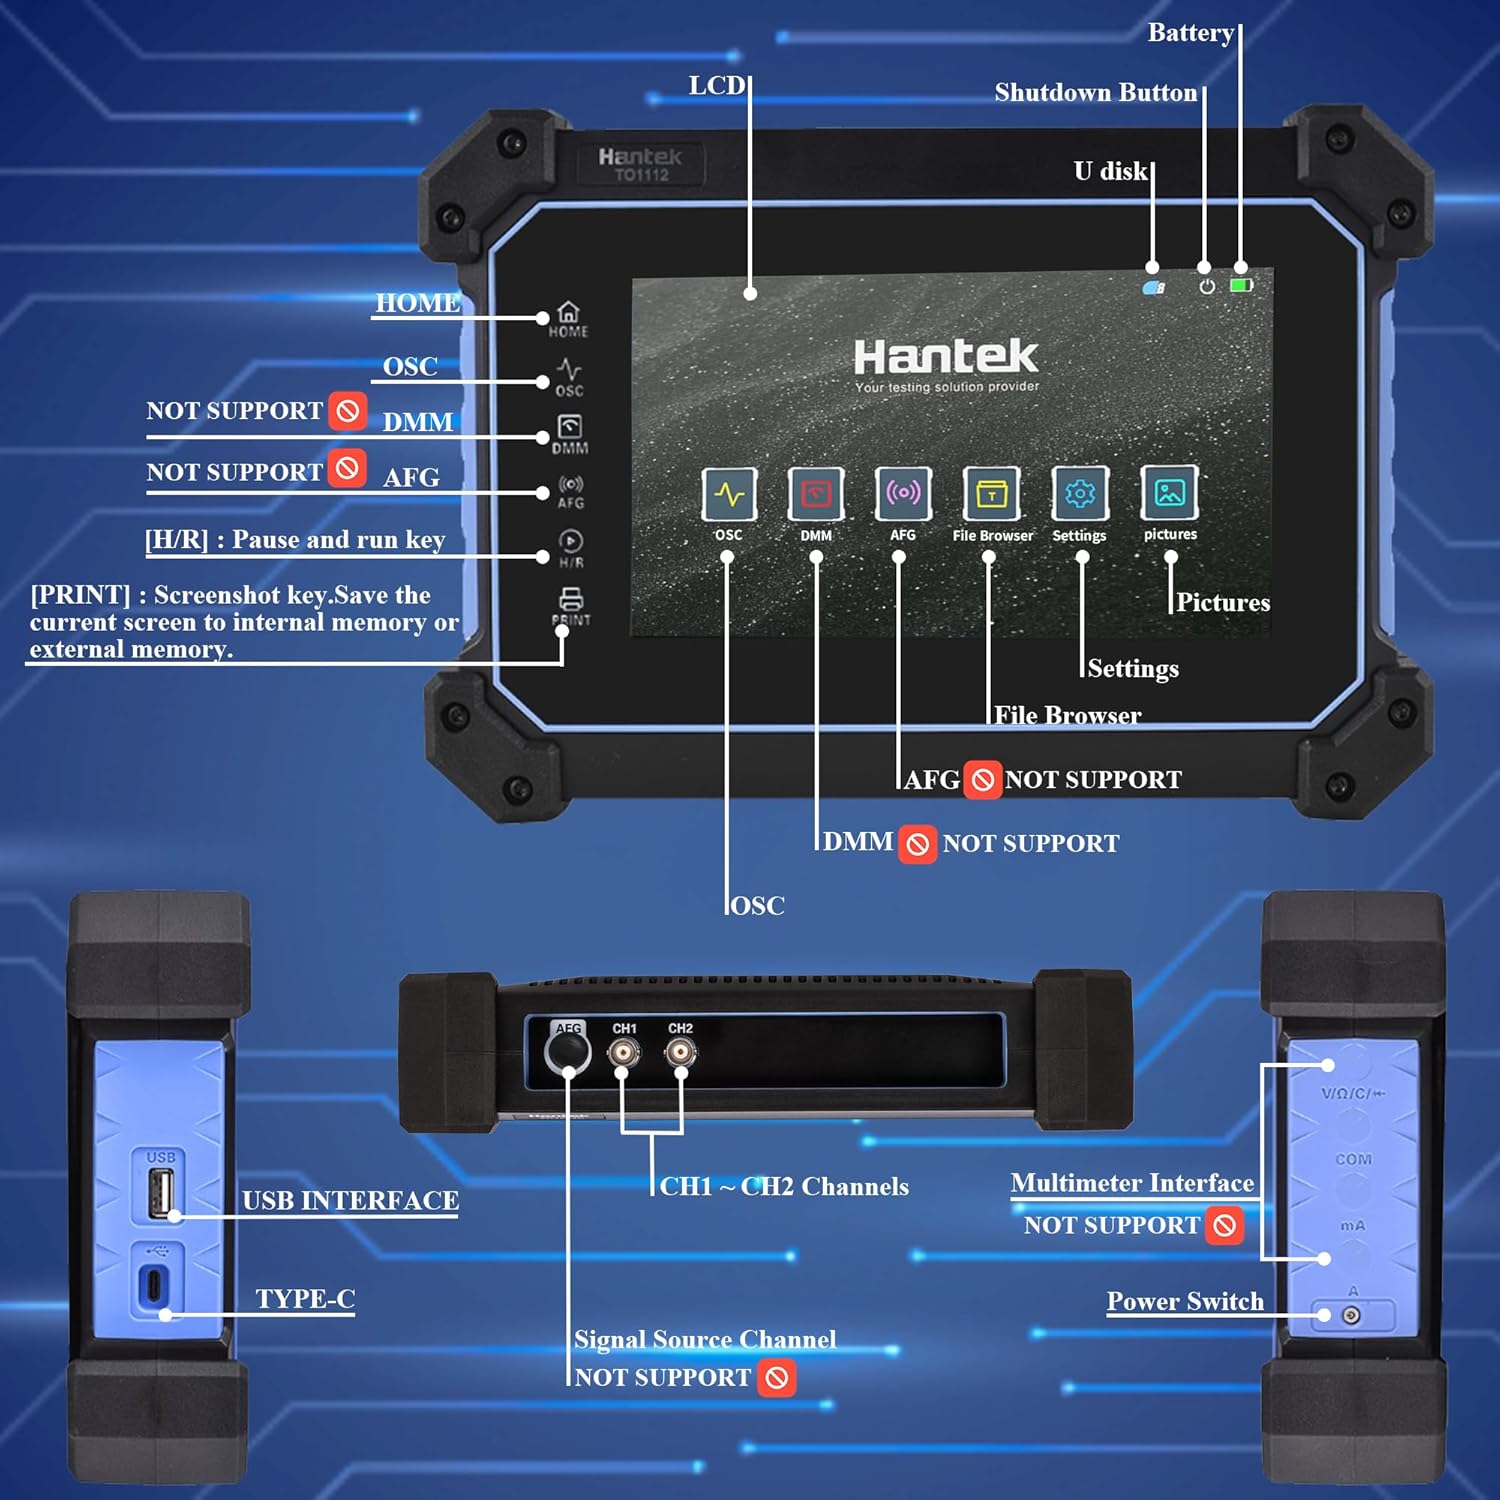
Figure 2.3.1: Diagram illustrating the various ports and buttons on the Hantek TO1112. Key features include the LCD screen, Shutdown Button, USB Disk port, USB Interface, Type-C charging port, CH1 and CH2 oscilloscope channels, and the Power Switch. Note that DMM (Digital Multimeter) and AFG (Arbitrary Function Generator) functions are not supported on this specific TO1112 model.
3. Setup
3.1 Initial Charging
Before first use, fully charge the Hantek TO1112. Connect the provided 18W power adapter to the Type-C port on the device and plug it into a power outlet. The device features a built-in detachable lithium battery (3.7V 2600mAh*2 in parallel) designed for extended endurance.

Figure 3.1.1: Illustration of the Hantek TO1112's built-in 5200mAh detachable lithium battery and its 18W fast charging capability.
3.2 Powering On/Off
To power on the device, press and hold the Power Switch located on the side (refer to Figure 2.3.1). To power off, press and hold the same button. The device also supports adjustable auto-lock and shutdown times, which can be configured in the settings.
3.3 Connecting Probes
Connect the oscilloscope probes to the CH1 and CH2 BNC connectors on the top of the device. Ensure a secure connection. Always use appropriate probes for your measurement requirements. Remember that the included "extra" probe may have a lower bandwidth rating than the oscilloscope itself.
4. Operating Instructions
4.1 User Interface Navigation
The Hantek TO1112 features a 7-inch multi-touch LCD screen. Navigate the interface by tapping icons and swiping. The main screen provides access to various functions such as Oscilloscope (OSC), File Browser, Settings, and Pictures.

Figure 4.1.1: The Hantek TO1112 screen showing an "Overload" condition with various voltage and current measurements. This illustrates the graphical user interface and measurement display capabilities.

Figure 4.1.2: A user interacting with the Hantek TO1112's 7-inch touch screen, demonstrating its touch-enabled interface.
4.2 Oscilloscope Functionality
Access the oscilloscope function by tapping the "OSC" icon on the home screen.
- Channel Settings: Adjust vertical scale (Volts/Div) and position for each of the two channels (CH1, CH2) using the on-screen controls.
- Time Base: Adjust the horizontal scale (Time/Div) to control the sweep speed of the waveform.
- Trigger Settings: Configure the trigger type (Edge, Pulse Width, Video, Slope, Timeout), source channel, and trigger level to stabilize waveforms.
- Measurements: The device supports 42 automatic measurements. Select desired measurements from the menu to display parameters like frequency, period, peak-to-peak voltage, etc.
- Math Operations: Perform waveform math functions such as addition, subtraction, multiplication, division, and FFT (Fast Fourier Transform) spectrum analysis.
- XY Mode: Use XY mode to display Lissajous figures for phase difference measurements between two signals.
Important Note: The Hantek TO1112 model exclusively supports oscilloscope functions. It does NOT include or support digital multimeter (DMM) or arbitrary function generator (AFG) capabilities.
4.3 Data Storage and Recall
The TO1112 allows for data storage. Use the "PRINT" function (screenshot key) to save the current screen to internal memory or an external USB disk. Saved data can be accessed and reviewed via the File Browser.
5. Maintenance
5.1 General Care
- Keep the device clean and free from dust and moisture. Use a soft, dry cloth for cleaning.
- Avoid exposing the device to extreme temperatures or direct sunlight.
- The adjustable suspension bracket and anti-falling/anti-seismic design provide protection, but avoid dropping the device.
- Ensure all connections are secure before operation.
5.2 Battery Care
- Charge the battery regularly, even if the device is not in frequent use, to maintain battery health.
- Use only the provided 18W power adapter for charging.
- If the device will be stored for an extended period, charge the battery to approximately 50% before storage.
6. Troubleshooting
- Device does not power on:
Ensure the battery is charged. Connect the device to the power adapter and attempt to power on. Verify the power button is fully pressed.
- Screen is unresponsive or inaccurate:
Perform a soft reset by holding the power button until the device restarts. If issues persist, check for firmware updates or contact support. Ensure the screen is clean and dry.
- No waveform displayed:
Check probe connections to the device and the circuit under test. Verify probe compensation and attenuation settings. Adjust vertical scale (Volts/Div), horizontal scale (Time/Div), and trigger level. Ensure the signal source is active.
- "Overload" message on screen:
This indicates the input signal exceeds the current vertical range. Increase the Volts/Div setting for the affected channel or use an attenuator if the voltage is very high.
- Difficulty with probe adapters:
Some probe adapters may have a tight fit. Apply firm, steady pressure when attaching or detaching. Avoid twisting excessively to prevent damage.
7. Specifications
| Parameter | Value |
|---|---|
| Model | TO1112 |
| Channels | 2 |
| Bandwidth | 110MHz |
| Sampling Rate | 250MSa/s |
| Storage Depth | 8M |
| Vertical Resolution | 8-bit |
| Display | 7-inch Multi-Touch LCD |
| Trigger Types | Edge, Pulse Width, Video, Slope, Timeout |
| Battery | Detachable Lithium Battery (3.7V 2600mAh*2 in parallel) |
| Charging | 18W Fast Charging (Type-C) |
| Product Dimensions | 7 x 10 x 2.2 inches |
| Weight | 2.7 Pounds |
| Functions Supported | Oscilloscope, Data Storage, Frequency Meter, FFT Spectrum Analyzer, Math Operations, 42 Measurements, XY Mode |
| Functions NOT Supported | Digital Multimeter (DMM), Arbitrary Function Generator (AFG) |
8. Warranty and Support
For warranty information, technical support, or service inquiries regarding your Hantek TO1112 Tablet Oscilloscope, please refer to the warranty card included with your product or contact Hantek customer service directly. Contact details can typically be found on the official Hantek website or through your point of purchase.