
1. Introduction
The Shahe Digital Mini Torque Wrench AWM-30 is a precision instrument designed for accurate torque measurement in various applications, including automotive and machinery industries. Its compact design makes it suitable for use in confined spaces. This manual provides essential information for the safe and effective operation, setup, and maintenance of your digital torque wrench.
This device features a digital display for clear readings and offers multiple operating functions to enhance user experience and reduce operational complexity.
2. Product Overview

Figure 1: Shahe Digital Mini Torque Wrench AWM-30 in its protective carrying case, alongside two AAA batteries.
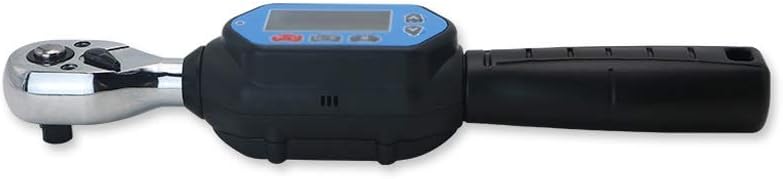
Figure 2: Front view of the Shahe Digital Mini Torque Wrench AWM-30, highlighting the digital display, control buttons, and the bidirectional ratchet head.
2.1. Key Features
- Large LCD screen with backlight for clear visibility.
- High accuracy: ±2% clockwise, ±2.5% counterclockwise (within 20% to 100% of full range).
- Bidirectional operation for both clockwise and counterclockwise torque measurement.
- Audible buzzer and LED indicators for reaching a predetermined torque value (in peak mode).
- Four selectable engineering units: N.m, kgf.cm, lbf.ft, lbf.in.
- Multiple measurement modes: Live-time mode, Peak mode, and Preset mode.
- Storage capacity for up to 999 sets of records.
- Automatic shutdown after 5 minutes of inactivity to conserve battery life.
- Compact, mini-design suitable for small and restricted workspaces.
2.2. Parts Identification

Figure 3: Labeled diagram of the torque wrench components.
- Quick release button
- Ratchet head
- Steering pad
- LED indicator
- LCD screen
- Up button
- Power / Clear button
- Confirmation button
- Menu button
- Down button
- Grip
3. Setup
3.1. Battery Installation
The torque wrench requires two AAA (No. 7) batteries for operation. Ensure correct polarity during installation.
- Locate the battery compartment cover on the underside of the wrench.
- Use a small screwdriver to remove the screws securing the battery cover.
- Carefully remove the cover.
- Insert two AAA batteries, observing the polarity markings (+/-) inside the compartment.
- Replace the battery cover and secure it with the screws.

Figure 4: Bottom view of the torque wrench with the battery compartment open, showing where to insert batteries.

Figure 5: Bottom view of the torque wrench with the battery compartment closed after installation.
3.2. Power On/Off
- To power on: Press the Power / Clear button (7). The LCD screen will illuminate.
- To power off: Press and hold the Power / Clear button (7) for a few seconds until the display turns off. The device will also automatically shut down after 5 minutes of inactivity.
4. Operating Instructions
4.1. Unit Setting
The wrench supports four engineering units: N.m, kgf.cm, lbf.ft, and lbf.in.
- Press the Menu button (9) to enter the unit selection mode.
- Use the Up button (6) or Down button (10) to cycle through the available units.
- Press the Confirmation button (8) to select the desired unit.
4.2. Torque Setting (Preset Mode)
To set a target torque value for the preset mode:
- Ensure the wrench is in Preset mode (Pre). If not, cycle through modes using the Menu button (9).
- Press the Menu button (9) to enter the setting interface.
- Use the Up button (6) or Down button (10) to adjust the torque value.
- Press the Confirmation button (8) to save the setting.
4.3. Measurement Modes
The wrench offers three measurement modes:
- Live-time Mode (T): Displays real-time torque values as force is applied.
- Peak Mode (P): Captures and displays the maximum torque value applied during an operation. When the set torque value is reached, the buzzer will sound, and the LED indicator (4) will light up.
- Preset Mode (Pre): Allows you to set a target torque value. The wrench will alert you when this value is reached.
To switch between modes, press the Menu button (9) repeatedly until the desired mode (T, P, or Pre) is displayed on the LCD screen (5).
4.4. Data Storage and Clearing
- Storage: The wrench automatically stores up to 999 sets of torque data.
- Viewing Data: Refer to the detailed instructions in the full product manual for navigating and viewing stored data.
- Clearing Data: To clear stored data, press and hold the Power / Clear button (7) while in the data viewing interface.
4.5. Using the Ratchet Head
The bidirectional ratchet head (2) allows for both clockwise and counterclockwise tightening. To change the direction, use the steering pad (3) located on the ratchet head.
- Attach the appropriate socket or bit to the ratchet head.
- Place the wrench onto the fastener.
- Apply steady force to the grip (11) until the desired torque is achieved or the preset alarm sounds.
- Use the quick release button (1) to easily remove sockets.
5. Maintenance
- Cleaning: Wipe the wrench with a soft, dry cloth. Do not use abrasive cleaners or solvents.
- Storage: Store the wrench in its protective case (Figure 6) in a dry environment, away from direct sunlight and extreme temperatures. Remove batteries if storing for extended periods to prevent leakage.
- Calibration: For continued accuracy, periodic calibration by a qualified service center is recommended.
- Avoid Impact: Protect the wrench from drops and impacts, as this can affect its accuracy and functionality.

Figure 6: The protective carrying case for the torque wrench.
6. Troubleshooting
- Wrench does not power on: Check battery installation and ensure batteries are not depleted. Replace if necessary.
- Inaccurate readings: Ensure the wrench is used within its specified operating range. Avoid dropping or impacting the tool. Consider professional calibration if issues persist.
- Display issues: If the display is dim or flickering, replace the batteries.
- Buzzer/LED not activating: Verify that the wrench is in Peak or Preset mode and that a target torque value has been set correctly.
7. Specifications
| Specification | Value (AWM-30) |
|---|---|
| Minimum Graduation Value | 0.01 |
| Maximum Operating Range | 30 N.m / 22.12 ft.lb / 265.5 in.lb / 3 kgf.cm |
| Connector Size | 1/4 inch |
| Buzzer Setting Range | 0.3 ~ 10 N.m |
| Length | 230 mm |
| Accuracy (Clockwise) | ±2% |
| Accuracy (Counterclockwise) | ±2.5% |
| Data Storage Capacity | 999 sets |
| Operating Modes | Peak (P), Live-time (T), Preset (Pre) |
| Engineering Units | N.m, kgf.cm, lbf.ft, lbf.in |
| Ratchet Head Type | Bidirectional Ratchet Head |
| Ratchet Teeth | 72 teeth |
| Buttons | 5 |
| Battery Type | 2 x AAA (No. 7) |
| Operating Temperature | -10°C ~ 60°C |
| Storage Temperature | -20°C ~ 70°C |
| Test Height of Falling | 1 m |
| Test Conditions for Vibration | 10 G |
| Life Test | 10,000 times |
8. Warranty and Support
For warranty information, technical support, or service inquiries, please refer to the contact information provided with your purchase documentation or visit the official Shahe website. Keep your purchase receipt as proof of purchase for warranty claims.
