1. Introduction
Welcome to the user manual for your WATMXAWAY Mini Sewing Machine Model 505. This machine is designed for beginners and sewing enthusiasts, offering 12 built-in stitches and a compact design. Please read this manual thoroughly before operation to ensure safe and efficient use of your sewing machine.
Important Safety Instructions
- Always unplug the sewing machine from the electrical outlet immediately after using and before cleaning.
- Never use the AC adapter and batteries simultaneously. Using both power modes at the same time can damage the motor.
- Keep fingers away from all moving parts. Special care is required around the sewing machine needle.
- Use only accessories recommended by the manufacturer.
- Do not operate if the machine has a damaged cord or plug, if it is not working properly, or if it has been dropped or damaged.
- Always turn off the machine when making any adjustments in the needle area, such as threading the needle, changing the needle, or changing the presser foot.
2. Product Overview
Familiarize yourself with the components of your WATMXAWAY Mini Sewing Machine and the included accessories.
Package Contents

Figure 2.1: WATMXAWAY Mini Sewing Machine and Accessories.
This image displays the WATMXAWAY Mini Sewing Machine in white and purple, accompanied by its full accessory kit. The kit includes two spare needles, a thread spool, a needle threader, a buttonhole presser, pre-filled bobbins, a comprehensive accessories pouch (containing items like scissors, thimble, measuring tape, and various colored threads), a foot pedal, and an AC/DC power adapter. These components are essential for immediate use and maintenance of the sewing machine.
- WATMXAWAY Mini Sewing Machine
- Foot Pedal
- AC/DC Power Adapter
- 2 Spare Needles
- Thread Spool
- Needle Threader
- Buttonhole Presser
- Pre-filled Bobbins
- Accessories Pouch (with assorted threads, scissors, etc.)
Machine Components

Figure 2.2: Top View of Machine Components.
This diagram highlights the key components visible from the top of the sewing machine. These include the Take Up Lever, Upper Thread Tension Dial, Thread Cutter, LED Light, Needle Clamp Screw, Bottom Bobbin compartment, an 18CM Dividing Rule, the Pattern Selection Dial for choosing stitches, the Hand Wheel for manual needle movement, the Reverse Sewing button, and the Power Off & Speed Switch (OFF/L/H).

Figure 2.3: Bottom View of Machine Components.
This diagram illustrates the components located on the side and bottom of the sewing machine. These include the Bobbin Winder, Spool pin, Bobbin Winder Tension Disk, AC/DC Input port, Foot Pedal Input port, a storage Drawer, the Presser Foot Lifter, and the Replaceable Presser Foot assembly.
3. Setup
Before you begin sewing, follow these steps to properly set up your machine.
3.1 Power Supply
- AC Adapter: Insert the AC adapter into the AC/DC Input port on the machine and plug it into a wall outlet.
- Batteries: For portable use, insert 4 AA batteries into the battery compartment. Ensure correct polarity.
- Caution: Never use the AC adapter and batteries at the same time. This can cause severe damage to the machine's motor.
3.2 Winding the Bobbin
- Place an empty bobbin onto the bobbin winder pin.
- Place a spool of thread onto the spool pin.
- Guide the thread through the bobbin winder tension disk.
- Wind the thread clockwise around the empty bobbin a few times.
- Push the bobbin winder pin to the right.
- Turn on the machine (ensure the needle is not threaded). The bobbin will start winding.
- Once the bobbin is full, turn off the machine, cut the thread, and push the bobbin winder pin back to the left.
3.3 Threading the Machine (Upper Thread)
Follow the numbered threading indications printed on the machine body for easy guidance.

Figure 3.1: Threading Tips and Trick for Upper Thread.
This image provides a visual guide for threading the upper thread. It shows the thread path from the spool, through the tension dial, down and up through the take-up lever, and finally down to the needle. The image also includes a tip to turn the handwheel to raise the needle to its highest position before threading and to pull out 3.94 inches of thread after threading the needle.
- Ensure the machine is turned OFF.
- Raise the presser foot lifter.
- Turn the hand wheel towards you to raise the needle to its highest position.
- Place a spool of thread onto the spool pin.
- Guide the thread through the first thread guide.
- Pass the thread through the upper thread tension dial.
- Guide the thread down through the groove, then up through the take-up lever.
- Thread the needle from front to back. Use the needle threader if needed.
- Pull about 10-15 cm (4-6 inches) of thread through the needle eye and place it under the presser foot.
3.4 Inserting the Bobbin (Lower Thread)
- Open the bobbin cover plate.
- Insert the wound bobbin into the bobbin case, ensuring the thread unwinds in the correct direction (usually counter-clockwise).
- Guide the bobbin thread through the tension spring slot.
- Hold the upper thread with one hand, and slowly turn the hand wheel towards you with the other hand. The needle will go down and pick up the bobbin thread.
- Pull both the upper and lower threads under the presser foot and towards the back of the machine.
- Close the bobbin cover plate.
4. Operating Instructions
Once your machine is threaded, you are ready to begin sewing.
4.1 Stitch Selection
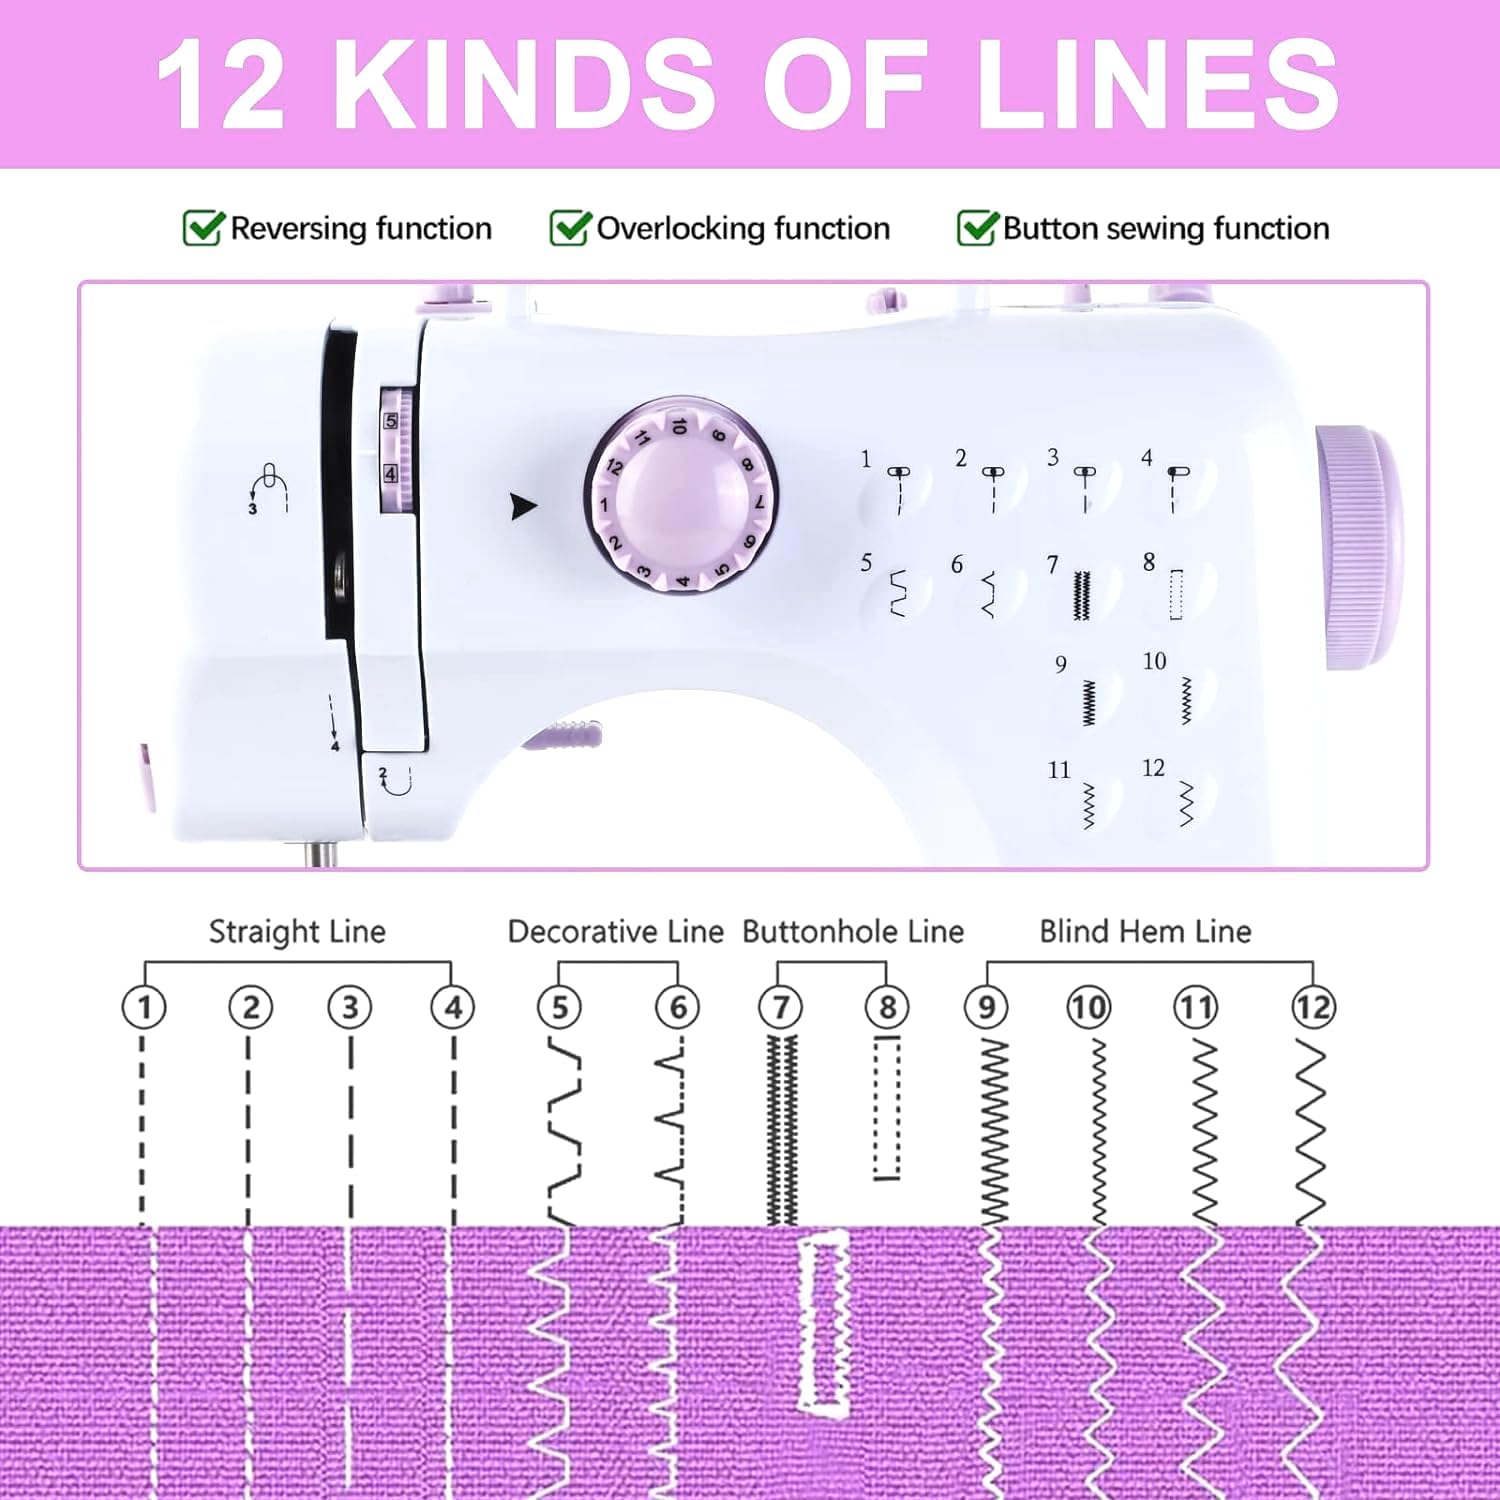
Figure 4.1: 12 Kinds of Stitches.
This image illustrates the 12 built-in stitch patterns of the sewing machine. It categorizes them into Straight Line (1-4), Decorative Line (5-6), Buttonhole Line (7-8), and Blind Hem Line (9-12). A rotary knob on the machine allows users to select the desired stitch by aligning it with the corresponding number.
- Your machine offers 12 built-in stitches.
- Rotate the Pattern Selection Dial to choose your desired stitch (1-12).
- Stitches 1-4 are for adjusting stitch length (straight stitches).
- Stitches 5-6 are pattern stitches.
- Stitches 7-8 are lock stitches (buttonhole).
- Stitches 9-12 are curve stitches (blind hem).
4.2 Speed Control and Power Switch
- The Power Off & Speed Switch (OFF/L/H) controls the machine's power and sewing speed.
- Slide the switch to 'L' for low speed or 'H' for high speed.
- To stop sewing, slide the switch to 'OFF'.
4.3 Using the Foot Pedal
- Plug the foot pedal into the Foot Pedal Input port.
- Ensure the Power Off & Speed Switch is in the 'OFF' position when using the foot pedal.
- Press the foot pedal to start sewing and release to stop. The foot pedal provides variable speed control based on pressure.
4.4 Reverse Sewing
- Press and hold the Reverse Sewing button to sew in reverse. This is useful for securing stitches at the beginning and end of a seam.
- Release the button to resume forward sewing.
4.5 Starting to Sew
- Place your fabric under the presser foot.
- Lower the presser foot lifter.
- Select your desired stitch pattern.
- Choose your sewing method:
- Manual: Slide the Power Off & Speed Switch to 'L' or 'H'.
- Foot Pedal: Ensure the Power Off & Speed Switch is 'OFF', then press the foot pedal.
- Guide the fabric gently as it feeds through the machine. Do not pull or push the fabric forcefully.
- When finished, raise the needle to its highest position, lift the presser foot, and pull the fabric out.
- Use the Thread Cutter located on the side of the machine to cut the threads.
5. Maintenance
Regular maintenance ensures the longevity and optimal performance of your sewing machine.
5.1 Cleaning
- Always unplug the machine before cleaning.
- Use a soft brush to remove lint and dust from the bobbin area and under the needle plate.
- Wipe the exterior of the machine with a soft, dry cloth. Do not use liquid cleaners.
5.2 Needle Replacement
- Turn off and unplug the machine.
- Loosen the Needle Clamp Screw.
- Remove the old needle.
- Insert a new needle with the flat side facing the back of the machine, pushing it up as far as it will go.
- Tighten the Needle Clamp Screw securely.
5.3 Presser Foot Replacement
- Turn off and unplug the machine.
- Raise the presser foot lifter.
- Press the black button at the back of the presser foot holder to release the current presser foot.
- Align the new presser foot with the holder and lower the presser foot lifter until it snaps into place.
6. Troubleshooting
Refer to this section for solutions to common issues you might encounter.
| Problem | Possible Cause | Solution |
|---|---|---|
| Machine not turning on | No power supply; AC adapter and batteries used simultaneously. | Check power connection. Ensure only one power source (AC adapter or batteries) is used. |
| Thread jamming or breaking | Incorrect threading; improper tension; dull or bent needle; poor quality thread. | Re-thread the machine carefully, following all steps. Adjust tension dial. Replace needle. Use good quality thread. |
| Skipped stitches | Needle inserted incorrectly; wrong needle type for fabric; bent needle. | Re-insert needle correctly (flat side to back). Use appropriate needle for fabric. Replace bent needle. |
| Uneven stitches | Incorrect tension; pulling fabric while sewing. | Adjust upper and lower thread tension. Allow the machine to feed the fabric naturally. |
| Needle breaking | Pulling fabric; wrong needle size; needle hitting presser foot. | Do not pull fabric. Use correct needle size. Ensure needle is inserted correctly and not bent. |
If you continue to experience issues, please refer to the support section or contact customer service.
7. Specifications
| Feature | Detail |
|---|---|
| Brand | WATMXAWAY |
| Model Number | 505 |
| Built-in Stitches | 12 |
| Speed Modes | 2 (Low, High) |
| Power Supply | AC Adapter or 4 x AA Batteries (not included) |
| Control Options | Foot Pedal, Button Switch |
| Product Dimensions | 10.8 x 10.2 x 4.7 inches (27.4 x 25.9 x 11.9 cm) |
| Item Weight | 4.5 pounds (2.04 kg) |
| Color | White |
| UPC | 765053613798 |
8. Warranty and Support
For warranty information, technical support, or customer service inquiries, please refer to the contact information provided with your purchase or visit the official WATMXAWAY website.
Always retain your proof of purchase for warranty claims.


