Introduction
This manual provides detailed instructions for the proper setup, operation, and maintenance of your QUANSHENG UV-5R Plus Tri-Band Ham Radio. Please read this manual thoroughly before using the device to ensure safe and optimal performance.
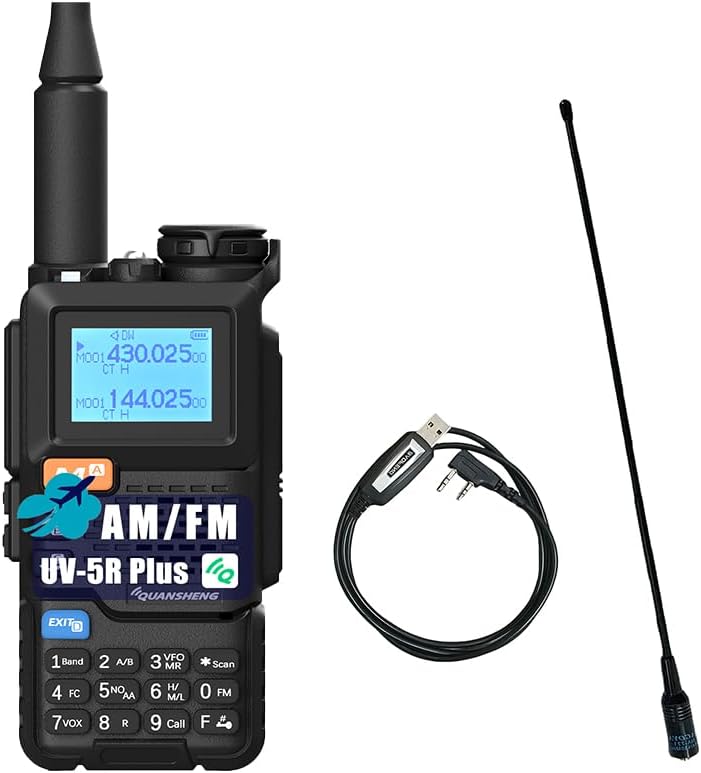
Image: The QUANSHENG UV-5R Plus radio, its included antenna, and a programming cable. This image provides an overview of the main components.
Package Contents
Verify that all items listed below are included in your package:
- QUANSHENG UV-5R PLUS Radio Unit
- High Gain Antenna
- 2200mAh Li-ion Battery
- Desk Dock Charger
- Belt Clip
- Hand String (Lanyard)
- User's Manual (this document)
- 771 Antenna
- Programming Cable

Image: A visual representation of the standard package contents, including the radio, battery, antennas, charger, and accessories.
Product Overview
Familiarize yourself with the components and controls of your UV-5R Plus radio.

Image: A detailed diagram labeling the various parts of the QUANSHENG UV-5R Plus radio, including the antenna, indicator, jack light, power/volume switch, LCD screen, menu key, up/down keys, speaker, exit key, microphone, keypad, transmitting key, side keys, programming jacks, and Type-C charging port.
- Antenna: For transmitting and receiving signals.
- Indicator: LED light for status indications.
- Jack Light: Illumination for the jack area.
- Power/Volume Switch: Rotates to power on/off and adjust volume.
- LCD Screen: Displays frequency, channel, and status information.
- Menu (Confirm Key): Accesses and confirms menu selections.
- Up Key: Navigates up in menus or increases frequency/channel.
- Speaker: Outputs audio.
- Down Key: Navigates down in menus or decreases frequency/channel.
- Exit Key: Exits menus or functions.
- Microphone: For voice input during transmission.
- Keypad: Numeric and function keys for input and control.
- Transmitting Key (PTT): Press to transmit, release to receive.
- Side Key 1: Programmable function key.
- Side Key 2: Programmable function key.
- Microphone Programming Jacks: For connecting external microphone or programming cable.
- Type C Charging Port: For direct USB-C charging.
Setup
1. Battery Installation and Charging
The UV-5R Plus uses a 2200mAh Li-ion battery. Ensure the battery is fully charged before first use.
- Installation: Align the battery pack with the grooves on the back of the radio and slide it upwards until it clicks into place. To remove, press the release latch and slide the battery downwards.
- Charging via Desk Dock: Place the radio (with battery installed) into the charging cradle. Ensure the charging contacts align. The indicator light on the dock will show charging status.
- Charging via USB-C: Connect a USB-C cable to the Type-C charging port on the side of the radio and to a compatible USB power source (e.g., USB wall adapter, computer, power bank, car charger). The radio supports direct USB-C charging.

Image: The QUANSHENG UV-5R Plus radio alongside its high-capacity battery, emphasizing its long standby time capability.

Image: The QUANSHENG UV-5R Plus radio demonstrating various Type-C charging methods, including USB charging, computer charging, power bank charging, and car charger use. It also shows the Type-C interface cable.
2. Antenna Attachment
Screw the desired antenna (High Gain or 771 Antenna) clockwise onto the antenna connector on top of the radio until it is finger-tight. Do not overtighten.
3. Programming Cable Connection
To program the radio via computer, connect the programming cable to the microphone/programming jacks on the side of the radio and to your computer's USB port. Refer to specific programming software instructions for detailed steps.
Operating Instructions
1. Power On/Off and Volume Adjustment
- Power On: Rotate the Power/Volume switch (04) clockwise until a click is heard.
- Power Off: Rotate the Power/Volume switch (04) counter-clockwise until a click is heard.
- Volume Adjustment: Continue rotating the Power/Volume switch (04) clockwise to increase volume, or counter-clockwise to decrease volume.
2. Channel Mode and Frequency Mode
The radio operates in two main modes: Channel Mode (Memory Mode) and Frequency Mode (VFO Mode).
- Switching Modes: Press the F+3 button on the keypad to toggle between Channel Mode and Frequency Mode.
- Channel Mode: Allows selection of pre-programmed memory channels (up to 200). Use the Up/Down keys (07, 09) to navigate through channels.
- Frequency Mode (VFO): Allows direct frequency input and tuning. Use the keypad to enter frequencies or the Up/Down keys (07, 09) to step through frequencies.

Image: The QUANSHENG UV-5R Plus radio's display showing channel information, illustrating its capability to store up to 200 memory channels for convenient use.
3. Tri-Band Operation (VHF/UHF/Air Band)
The UV-5R Plus supports VHF and UHF dual-band transmission and reception, and Air Band receiving. The LCD screen displays both A and B bands simultaneously. Use the A/B key (2 on keypad) to switch the active band for transmission.

Image: The QUANSHENG UV-5R Plus radio's display showing active frequencies, with an overlay indicating its broad frequency range capabilities for 136-174MHz, 350-390MHz, 400-470MHz, and FM: 76.000-108.000MHz.
4. NOAA Weather Forecast
The radio can receive 10 USA NOAA weather forecast channels. Access this feature through the menu or a dedicated function key (if programmed).
5. FM Radio
To listen to FM broadcast radio, activate the FM radio function. The radio supports 16 FM radio channels. Use the keypad or Up/Down keys to tune to desired FM frequencies (76-108MHz).
6. Wireless Frequency Copy
The UV-5R Plus features wireless frequency replication, allowing it to copy frequencies from other compatible radios, including Quansheng UV-K6/UV-K5/UV-K5(8) models. Consult the menu for the "Wireless Copy" function.

Image: Two QUANSHENG UV-5R Plus radios, one transmitting and the other receiving, illustrating the one-touch frequency copy feature for quick and easy replication of frequencies between devices.
7. Emergency Alert
The radio includes an auto/manual emergency alert feature. This can be activated to send out an alert signal in emergency situations. Refer to the menu for configuration and activation details.
8. VOX (Voice Operated Transmission)
VOX allows hands-free transmission. When enabled, the radio will automatically transmit when it detects your voice. Adjust VOX sensitivity in the menu to prevent accidental transmissions or missed voice activation.
9. Other Functions
- Cross-band Communication: Allows communication between different frequency bands.
- 10-Group Scrambler: Encrypts voice transmissions for privacy.
- Frequency/DCS/CTCSS Scan: Scans for active signals or specific tones.
- Digital Signal CTCC/DCS: For advanced tone squelch functions.
- DTMF and 1750 Tone: For repeater access and other signaling.
- Built-in High Light Torch: Activates the LED flashlight for illumination.
Maintenance
1. Cleaning
Clean the radio's exterior with a soft, damp cloth. Do not use harsh chemicals or abrasive cleaners. Ensure the charging port and battery contacts are free of dust and debris.
2. Battery Care
- Avoid fully discharging the Li-ion battery frequently.
- Store the battery in a cool, dry place when not in use for extended periods.
- Do not expose the battery to extreme temperatures.
3. Storage
When storing the radio for a long time, remove the battery and store both in a dry, temperature-controlled environment. Protect the radio from dust and moisture.
Troubleshooting
If you encounter issues with your radio, refer to the following common problems and solutions:
| Problem | Possible Cause / Solution |
|---|---|
| Radio does not power on. | Battery is not installed correctly or is discharged. Ensure battery is properly seated and charged. |
| Cannot transmit or receive. | Antenna not attached, incorrect frequency/channel selected, or squelch level too high. Check antenna connection, verify frequency/channel, and adjust squelch. |
| Poor audio quality. | Low battery, antenna issue, or interference. Charge battery, check antenna, move to a different location. |
| Radio not charging. | Charger not connected properly, faulty cable/adapter, or dirty battery contacts. Ensure connections are secure, try a different cable/adapter, clean contacts. |
| Keypad unresponsive. | Keypad lock may be active. Refer to the manual for keypad lock/unlock procedure. |
If the problem persists, contact customer support.
Specifications
Detailed technical specifications for the QUANSHENG UV-5R Plus radio:
| Feature | Specification |
|---|---|
| Model Number | UV-5R Plus |
| Number of Channels | 200 |
| Frequency Stability | ±1ppm |
| Working Temperature | -20°C to +60°C |
| Antenna Impedance | 50Ω |
| Modulation Mode (FM) | 11KOF3E (12.5KHz), 16K0F3E (25KHz) |
| NOAA Channels | 10 |
| Battery Capacity | 2200mAh Li-ion (included) |
| Audio Power | ≥0.5W |
| Transmitting Power | ≤5W |
| Emission Current | ≤1.5A |
| Maximum Frequency Deviation | ≤5KHz (25KHz), ≤2.5KHz (12.5KHz) |
| Modulation Distortion | ≤5% |
| Stray Power | ≤7.5uW |
| Adjacent Channel Power | 70dB (25KHz), 60dB (12.5KHz) |
| Frequency Range (Transmit/Receive) | VHF: 136-174MHz, UHF: 350-390MHz, 400-470MHz |
| Frequency Range (Receive Only) | Air Band, FM Broadcast: 76.000-108.000MHz |
| Voltage | 7.4 Volts (DC) |
| Water Resistance Level | Not Water Resistant |
| Dimensions (Radio Unit) | Approx. 11.5cm (H) x 5.5cm (W) x 3.9cm (D) (excluding antenna) |
| Weight (Radio Unit) | Approx. 487g / 17.17 ounces (with battery and antenna) |

Image: A diagram illustrating the physical dimensions of the QUANSHENG UV-5R Plus radio, showing its height (28cm/11.02inch including antenna), body height (11.5cm/4.53inch), width (5.5cm/2.17inch), and depth (3.9cm/1.54inch).
Warranty Information
A 3-month warranty is provided exclusively through "Shiqun Electronics Co., Ltd". Please retain your proof of purchase for warranty claims.
Support
For further assistance, technical support, or warranty inquiries, please contact the seller or manufacturer directly. Refer to your purchase documentation for specific contact information.


