1. Introduction
The Eoxsmile 12000mAh NOAA Emergency Weather Radio is a versatile and essential device designed for emergency preparedness, outdoor activities, and daily use. It integrates multiple functions including AM/FM/Shortwave radio reception, NOAA weather alerts, a powerful LED flashlight, a reading lamp, and a portable power bank. With its robust design and multiple power options, this radio ensures you stay informed and connected in various situations.
2. Product Features
- NOAA Weather Alert: Automatically scans 7 NOAA Weather Stations and provides loud siren and red light alerts for local hazards, even when the radio is off (with timer preset).
- Multiple Power Sources: Features a 12000mAh rechargeable battery, with recharging options via solar panel, hand crank, 5V/2A power adapter (included), and USB-C cord (included). Also supports 3x AAA backup batteries (not included).
- Portable Power Bank: Built-in 12000mAh battery allows charging of mobile phones and other USB-powered devices during emergencies.
- Integrated Lighting: Equipped with a 2.5W/3W bright LED flashlight (up to 70 meters range) and a 2W/2.5W reading lamp (covers 20㎡ room), both with adjustable brightness.
- Digital Display: LCD backlight screen shows time, frequency, battery level, WX alert, and lock icons for intuitive operation.
- SOS Alarm: A dedicated SOS button activates a super loud siren and red strobe light for emergency signaling.
- Radio Bands: Supports AM (520-1710 KHz), FM (87-108 MHz), and Shortwave (2.3-22.00 MHz) bands, along with 7 NOAA Weather Bands.
- Additional Features: 3.5mm earphone jack for private listening, 16-level volume control, extended telescopic antenna, and a lock function to prevent accidental operation.
3. Package Contents
Please check the box for the following items:
- Eoxsmile 12000mAh NOAA Emergency Weather Radio
- 1* 5V/2A Adapter
- 1* USB-C Charging Cable
- 1* Carabiner
- 1* Portable Hand Strap
- 1* User Manual (this document)
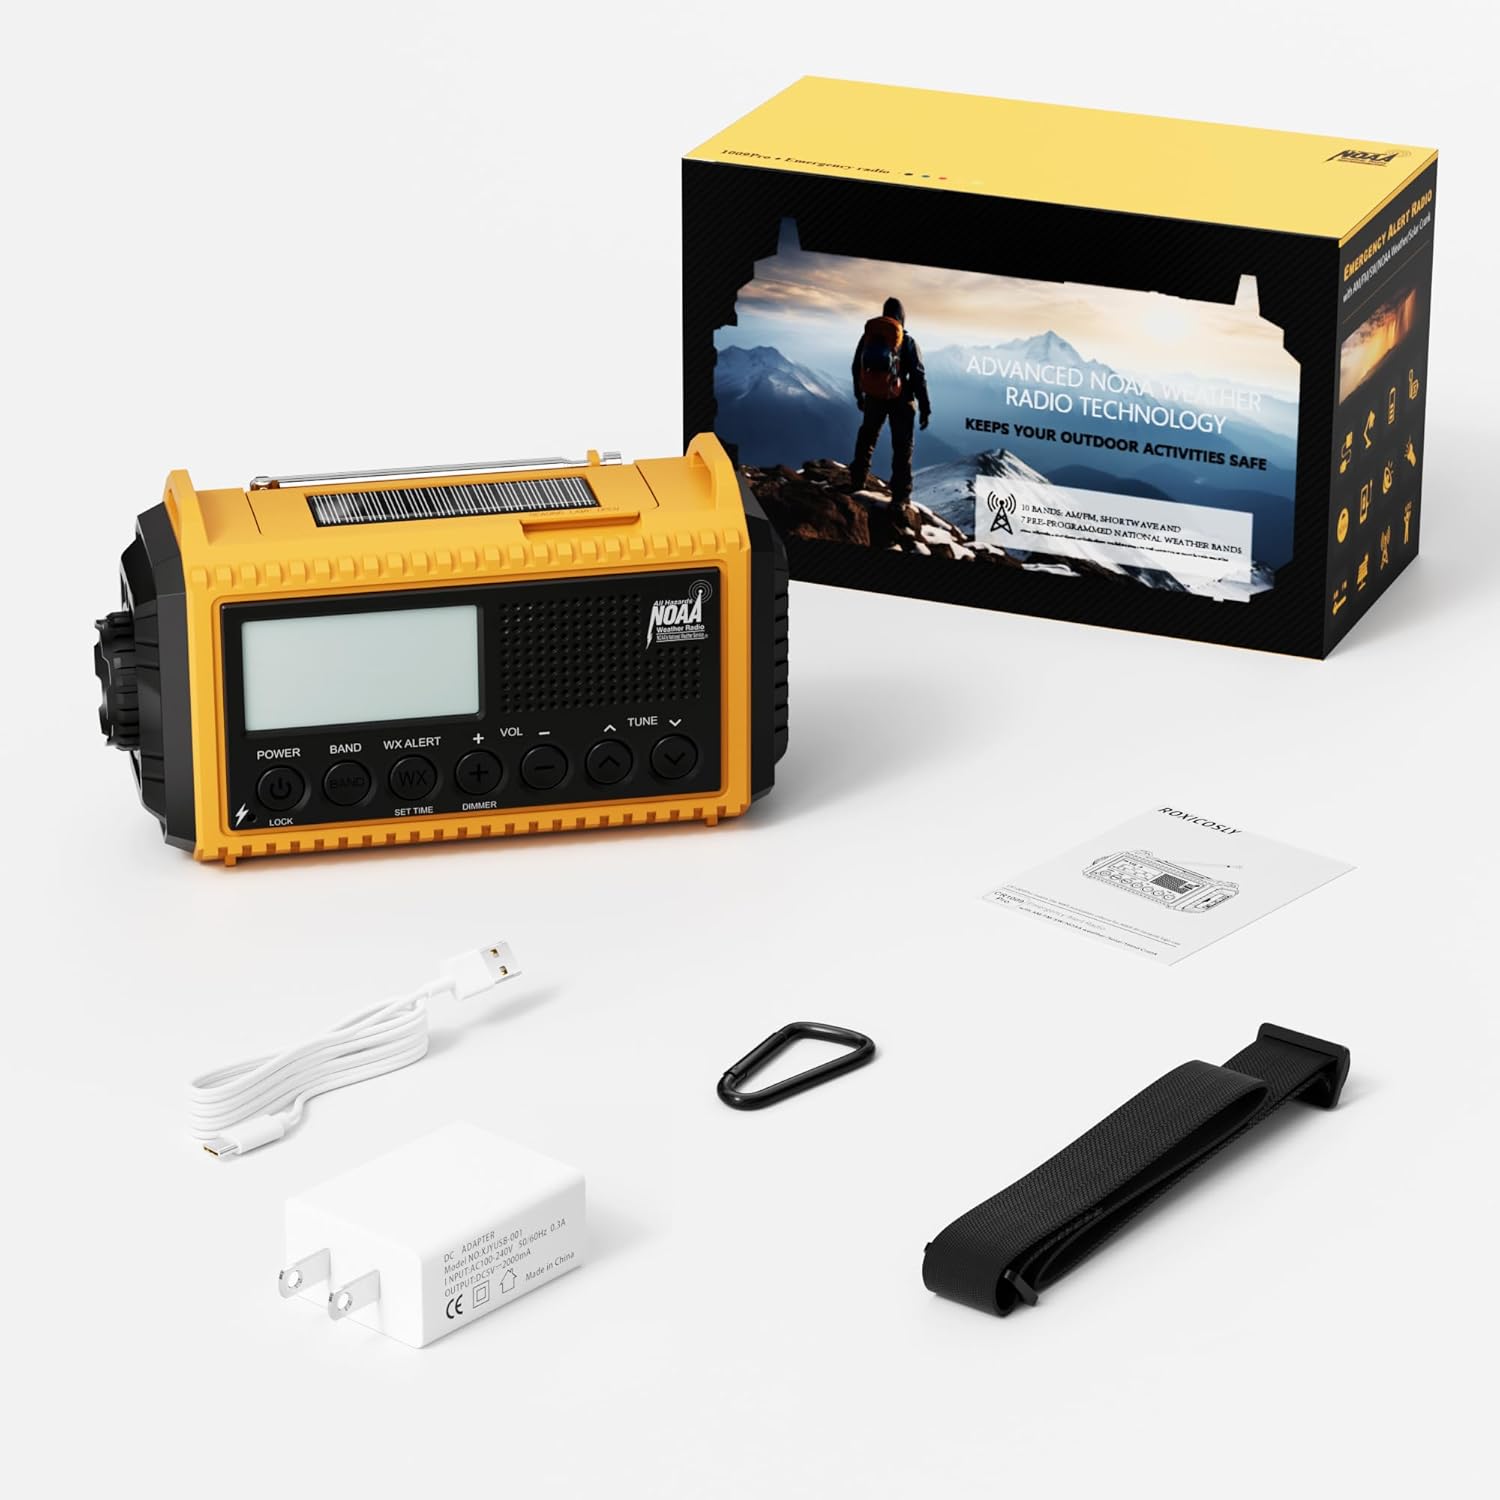
Figure 3.1: Contents included in the product package.
4. Component Identification
Familiarize yourself with the various parts of your Eoxsmile Emergency Weather Radio:

Figure 4.1: Front view of the radio with key components.
- LCD Display: Shows time, frequency, battery level, and alert indicators.
- Control Buttons: Power, Band, WX Alert, Volume (+/-), Tune (up/down), Set Time, Dimmer, Lock.
- Telescopic Antenna: Extendable for improved radio reception.
- LED Flashlight: Located on the side, provides bright directional light.
- Reading Lamp: Integrated into the top handle, provides ambient light.
- Hand Crank: Foldable handle on the back for manual power generation.
- Solar Panel: Located on the top, for solar charging.
- USB-C Input Port: For charging the radio's internal battery.
- USB-A Output Port: For charging external devices (power bank function).
- 3.5mm Headphone Jack: For private audio listening.
- SOS Button: Activates emergency alarm and strobe light.
- Battery Compartment: Located on the back, for optional AAA batteries.
5. Powering the Device
Your Eoxsmile Emergency Weather Radio offers six different ways to power it, ensuring reliability in any situation:

Figure 5.1: Six ways to power your radio.
- USB-C Charging: Connect the included USB-C cable to the radio's USB-C input port and plug the other end into the 5V/2A adapter or any compatible USB power source. This is the primary and fastest charging method.
- Hand Crank: Extend the hand crank handle located on the back of the radio. Rotate the crank clockwise or counter-clockwise at a steady pace (approximately 130-150 RPM) for 3-5 minutes to generate power for short-term use or to initiate charging.
- Solar Panel: Place the radio with the solar panel facing direct sunlight. The solar panel provides a trickle charge to maintain the battery level and is most effective for extending battery life rather than rapid charging.
- Built-in 12000mAh Rechargeable Battery: The radio comes with a high-capacity internal Lithium Polymer battery. This battery powers all functions and can be recharged via USB-C, hand crank, or solar.
- AAA Batteries (Backup): Open the battery compartment on the back and insert 3 AAA batteries (not included). This serves as an alternative power source when the internal rechargeable battery is depleted and other charging methods are unavailable.
- AC Adapter: Use the included 5V/2A AC adapter with the USB-C cable for wall charging.
6. Setup
Before first use, it is recommended to fully charge the internal battery.
- Initial Charge: Connect the radio to a power outlet using the USB-C cable and 5V/2A adapter. The battery indicator on the LCD screen will show charging progress. A full charge may take several hours.
- Install AAA Batteries (Optional): If you wish to use AAA batteries as a backup, open the battery compartment on the back of the radio and insert 3 new AAA batteries, observing the correct polarity.
- Attach Hand Strap/Carabiner: Secure the portable hand strap or carabiner to the designated attachment points for easy carrying.
7. Operating Instructions
7.1 Radio Operation (AM/FM/SW)
- Power On/Off: Press the POWER button to turn the radio on or off.
- Select Band: Press the BAND button repeatedly to cycle through AM, FM, SW, and NOAA Weather Bands.
- Tune Stations: Use the TUNE + or TUNE - buttons to manually adjust the frequency. For automatic scanning, press and hold the TUNE + or TUNE - button.
- Adjust Volume: Use the VOL + or VOL - buttons to adjust the listening volume (16 levels).
- Extend Antenna: For optimal FM and SW reception, fully extend the telescopic antenna. For AM, the internal antenna is generally sufficient.
- Headphone Use: Insert 3.5mm headphones into the headphone jack for private listening.
7.2 NOAA Weather Alert
The radio can automatically monitor NOAA Weather Stations for hazard alerts.

Figure 7.2.1: NOAA Weather Alert function.
- Activate WX Alert: Press the WX ALERT button. The radio will automatically scan 7 NOAA Weather Stations.
- Set Alert Timer: After pressing WX ALERT, use the TUNE + or TUNE - buttons to preset a timer (e.g., 4H, 6H, 8H, 12H, 16H, 20H, 24H, or ON always). The radio will remain in alert mode for the set duration, even if turned off.
- Receiving Alerts: When a weather alert is received, the radio will emit a loud siren for 9 seconds and the red alert light will flash.
7.3 Flashlight and Reading Lamp
The radio provides two lighting options for various needs.
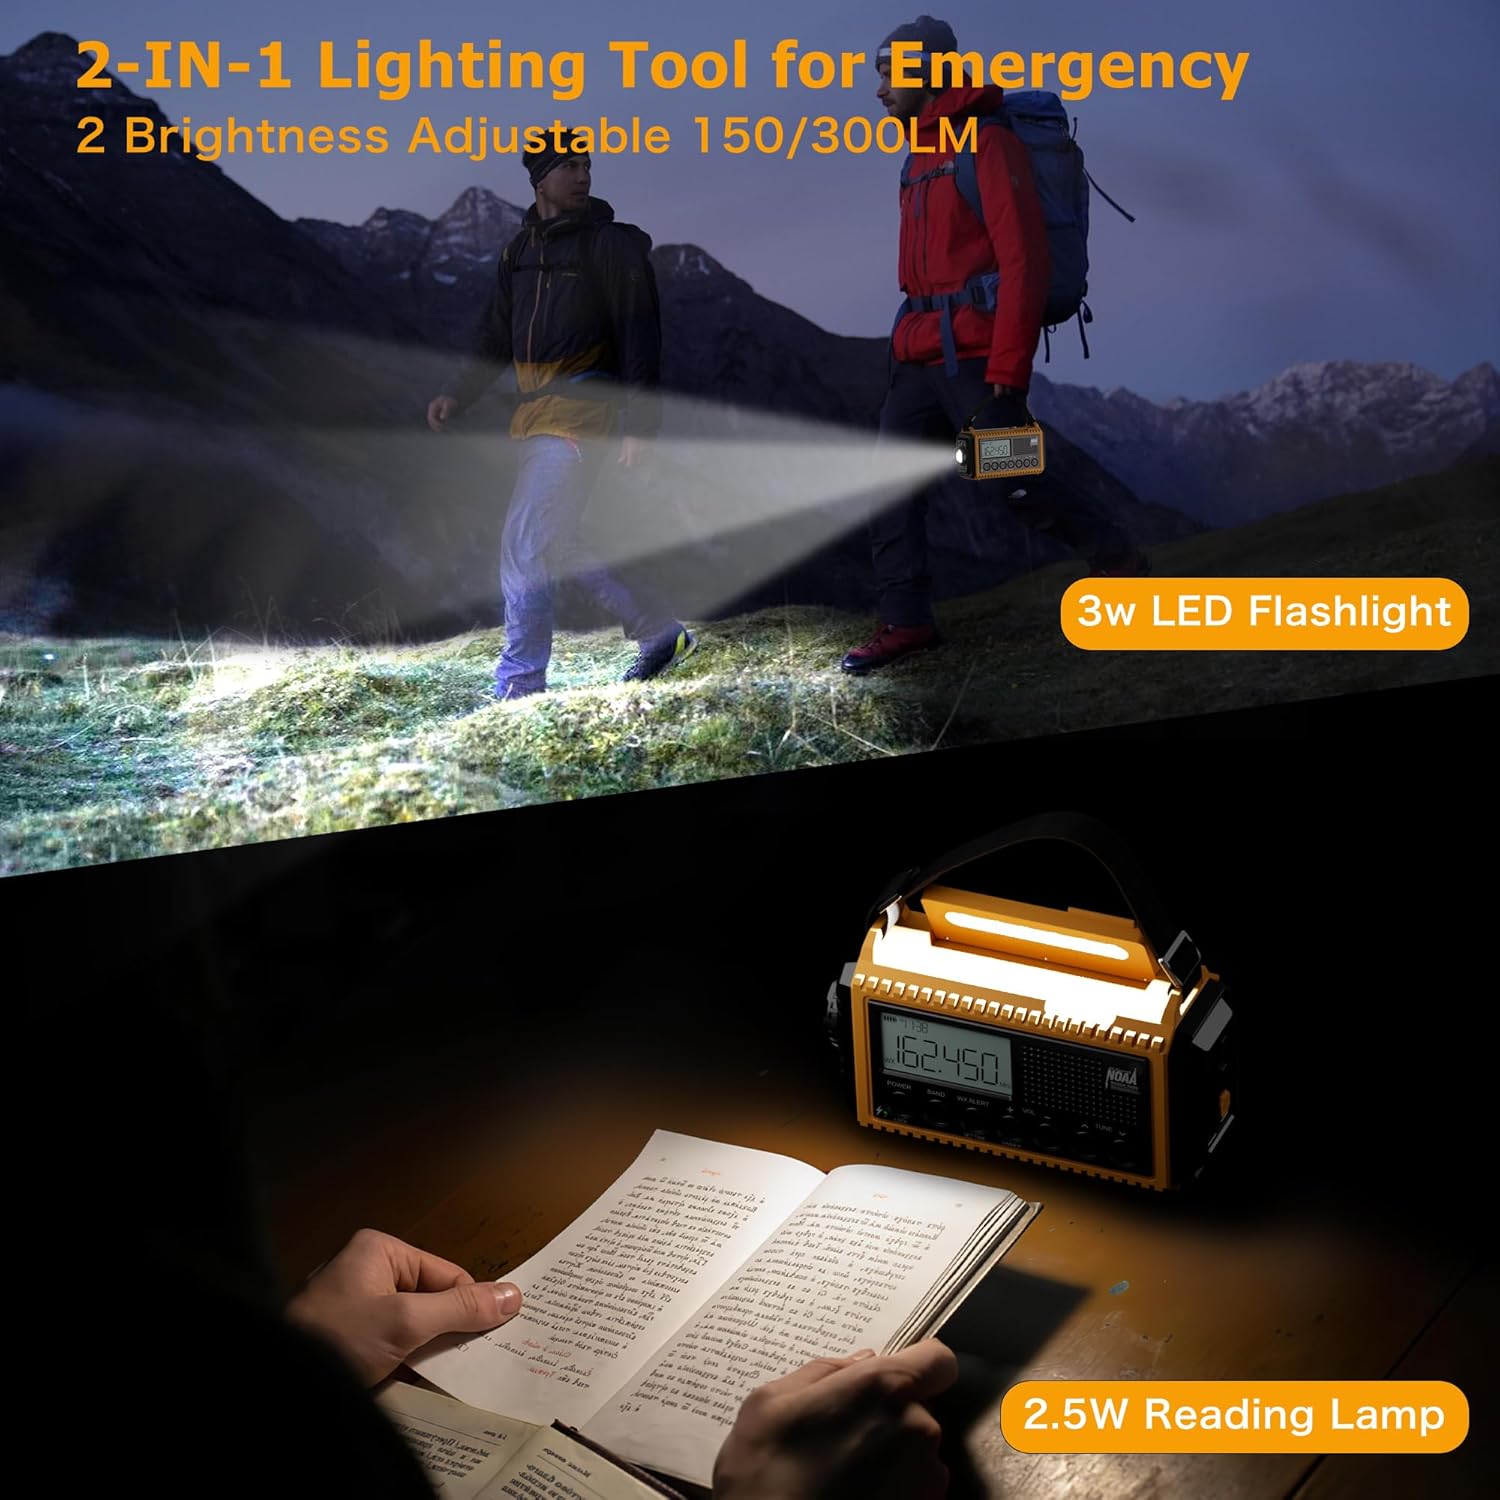
Figure 7.3.1: Flashlight and Reading Lamp in use.
- Flashlight: Press the dedicated flashlight button (usually on the side or front) to turn it on. Press again to adjust brightness or turn off.
- Reading Lamp: Lift the handle to reveal the reading lamp. Press the reading lamp button (often integrated with the dimmer) to turn it on. Press again to adjust brightness or turn off.
7.4 SOS Alarm
In emergency situations, activate the SOS alarm to attract attention.
- Activate SOS: Press the SOS button (typically red or clearly marked). This will trigger a super loud siren and a flashing red strobe light.
- Deactivate SOS: Press the SOS button again to turn off the alarm.
7.5 Power Bank Function
Use the radio to charge your mobile devices.

Figure 7.5.1: Charging a phone using the radio's power bank function.
- Connect Device: Plug your device's USB charging cable into the USB-A output port on the radio.
- Charging: The radio will begin charging your device. Ensure the radio has sufficient battery charge for this function.
7.6 LCD Digital Screen
The LCD screen provides essential information at a glance.
- Time Display: Shows current time.
- Frequency Display: Shows the current radio frequency.
- Battery Level Indicator: Displays the remaining battery charge.
- WX Alert Icon: Indicates when NOAA Weather Alert is active.
- Lock Icon: Indicates when the lock function is engaged.
8. Maintenance
Proper care will ensure the longevity of your radio.
- Cleaning: Wipe the radio with a soft, damp cloth. Do not use harsh chemicals or abrasive cleaners.
- Storage: Store the radio in a cool, dry place away from direct sunlight and extreme temperatures. If storing for extended periods, ensure the internal battery is charged to about 50-70% and recharge every 3-6 months to prevent deep discharge.
- Battery Care: Avoid fully depleting the internal rechargeable battery frequently. For optimal battery life, charge it regularly. Remove AAA batteries if the radio will not be used for a long time to prevent leakage.
9. Troubleshooting
If you encounter issues with your radio, refer to the following common problems and solutions:
| Problem | Possible Cause | Solution |
|---|---|---|
| Radio does not turn on. | Battery is depleted. | Charge the radio using USB-C, hand crank, or solar. Check AAA batteries if installed. |
| Poor radio reception. | Antenna not extended; weak signal area. | Fully extend the telescopic antenna. Reposition the radio for better signal. |
| Cannot charge external devices. | Radio battery too low; incorrect cable. | Ensure the radio's internal battery is sufficiently charged. Use a compatible USB charging cable for your device. |
| NOAA alert not working. | WX Alert not activated; no active alerts. | Press the WX ALERT button. Ensure you are in an area with NOAA coverage. |
| LCD screen is dim or unresponsive. | Dimmer setting; low battery. | Press the DIMMER button to adjust brightness. Charge the radio. |
10. Specifications
| Feature | Detail |
|---|---|
| Model Number | CR1009Ultra |
| Product Dimensions | 6.77 x 3.7 x 2.91 inches |
| Item Weight | 1 pounds |
| Battery Capacity | 12000mAh Lithium Polymer (included) |
| Backup Battery | 3 x AAA batteries (not included) |
| Radio Bands Supported | FM: 87-108 MHz / AM(MW): 520-1710 KHz / SW: 2.3-22.00 MHz / 7 NOAA Weather Band: 162.400MHz; 162.425MHz; 162.450MHz; 162.475MHz; 162.50MHz; 162.525MHz; 162.55MHz |
| Connectivity Technology | USB |
| Power Sources | Hand Crank, Solar Panel, Adapter, USB-C cord, Rechargeable Battery, AAA Batteries |
| Flashlight Power | 2.5W/3W |
| Reading Lamp Power | 2W/2.5W |
| Manufacturer | Bestway innovations LLC |
| Country of Origin | China |
11. Warranty and Support
Eoxsmile provides an 18-month warranty for this product. If you have any questions or require support, please contact our customer service team. Refer to the contact information provided on the product packaging or our official website for assistance.
For further assistance, please visit the Eoxsmile Store on Amazon.