1. Introduction
Thank you for choosing the Lafocuse Digital Alarm Clock, Model ZH0141B. This device is designed to provide clear time display, alarm functions, and additional features such as temperature and date display. Please read this manual carefully to ensure proper setup and operation.
The Lafocuse Digital Alarm Clock (Model ZH0141B) features a large 5.7-inch LED display, showing time, temperature, date, and day of the week. It supports up to three alarms with a snooze function, offers 25 alarm sounds, and 3 levels of adjustable brightness. The clock can be powered by its rechargeable battery or via a USB-C cable, and includes two USB output ports for charging other devices. It also features intelligent voice-activated display control for energy saving.
2. Product Overview
Familiarize yourself with the components and features of your alarm clock.

Figure 1: Overview of the Lafocuse Digital Alarm Clock and its key features.

Figure 2: Button and Port Layout.
Package Contents:
- 1 x Lafocuse Digital Alarm Clock
- 1 x USB Type-C Charging Cable
- 1 x User Manual (this document)
3. Setup
3.1 Powering the Device
The alarm clock can be powered in two ways:
- Rechargeable Battery: The clock includes a built-in 18650 (1800mAh) rechargeable battery. When powered by battery, the display will turn off after 15 seconds of inactivity to conserve energy. It can be reactivated by sound (voice control).
- USB-C Cable: Connect the provided USB Type-C cable to the Type-C Input port (11 in Figure 2) on the back of the clock and plug the other end into a 5V/2A USB power adapter (not included). When connected via USB, the display will remain continuously on.
It is recommended to fully charge the device before first use.

Figure 3: Powering the device and using USB output ports.
4. Operating Instructions
4.1 Setting Time and Date
- Press and hold the SET button (2 in Figure 2) for 3 seconds to enter time setting mode. The hour digits will flash.
- Use the +/Music button (3 in Figure 2) or -/Volume button (4 in Figure 2) to adjust the hour.
- Press SET again to confirm the hour and move to minute setting. Adjust minutes using +/Music or -/Volume.
- Continue pressing SET to cycle through and set the year, month, and day.
- After setting the day, press SET one last time to exit time and date setting.
- To switch between 12-hour and 24-hour format, short press the SET button when not in setting mode.
- To switch between Celsius and Fahrenheit temperature display, short press the -/Volume button when not in setting mode.

Figure 4: Multifunctional display showing time, temperature, and date.
4.2 Setting Alarms
The clock supports up to three independent alarms (Alarm 1, Alarm 2, Alarm 3).
- Press the Alarm-1 button (7 in Figure 2), Alarm-2 button (6 in Figure 2), or Alarm-3 button (5 in Figure 2) to select the alarm you wish to set. The alarm icon will appear on the display.
- Press and hold the selected alarm button for 3 seconds. The hour digits will flash.
- Use the +/Music or -/Volume buttons to adjust the hour.
- Press the alarm button again to confirm the hour and move to minute setting. Adjust minutes using +/Music or -/Volume.
- Press the alarm button one last time to confirm and exit alarm setting.
- To enable or disable an alarm, short press its corresponding alarm button. The alarm icon will appear (enabled) or disappear (disabled).
Alarm Sound and Volume:
- The clock offers 25 different alarm sounds. When setting an alarm, after setting the minutes, you can press the alarm button again to cycle through the alarm sounds using +/Music or -/Volume.
- There are 3 levels of alarm volume. Adjust the volume using the -/Volume button during alarm sound selection or when an alarm is actively sounding.
4.3 Snooze Function
When an alarm sounds, touch the SNOOZE LIGHT area (1 in Figure 2) on the top of the clock to activate the snooze function. The alarm will pause for 5 minutes and then sound again.

Figure 5: Activating the snooze function.
4.4 Brightness Adjustment
The display brightness can be adjusted manually or automatically.
- Manual Adjustment: Short press the SNOOZE LIGHT button (1 in Figure 2) when the alarm is not sounding to cycle through 3 brightness levels (High, Medium, Low).
- Automatic Adjustment: The clock can automatically adjust its brightness based on ambient light conditions. This feature is typically enabled by default. Refer to the full manual for specific instructions on enabling/disabling auto-brightness if needed.

Figure 6: Display brightness levels.
4.5 Voice Control (Battery Mode Only)
When the clock is powered by its internal battery, the display will automatically turn off after 15 seconds of inactivity to save power. To reactivate the display, make a sound louder than 60dB (e.g., clap your hands, tap the clock, or speak loudly).
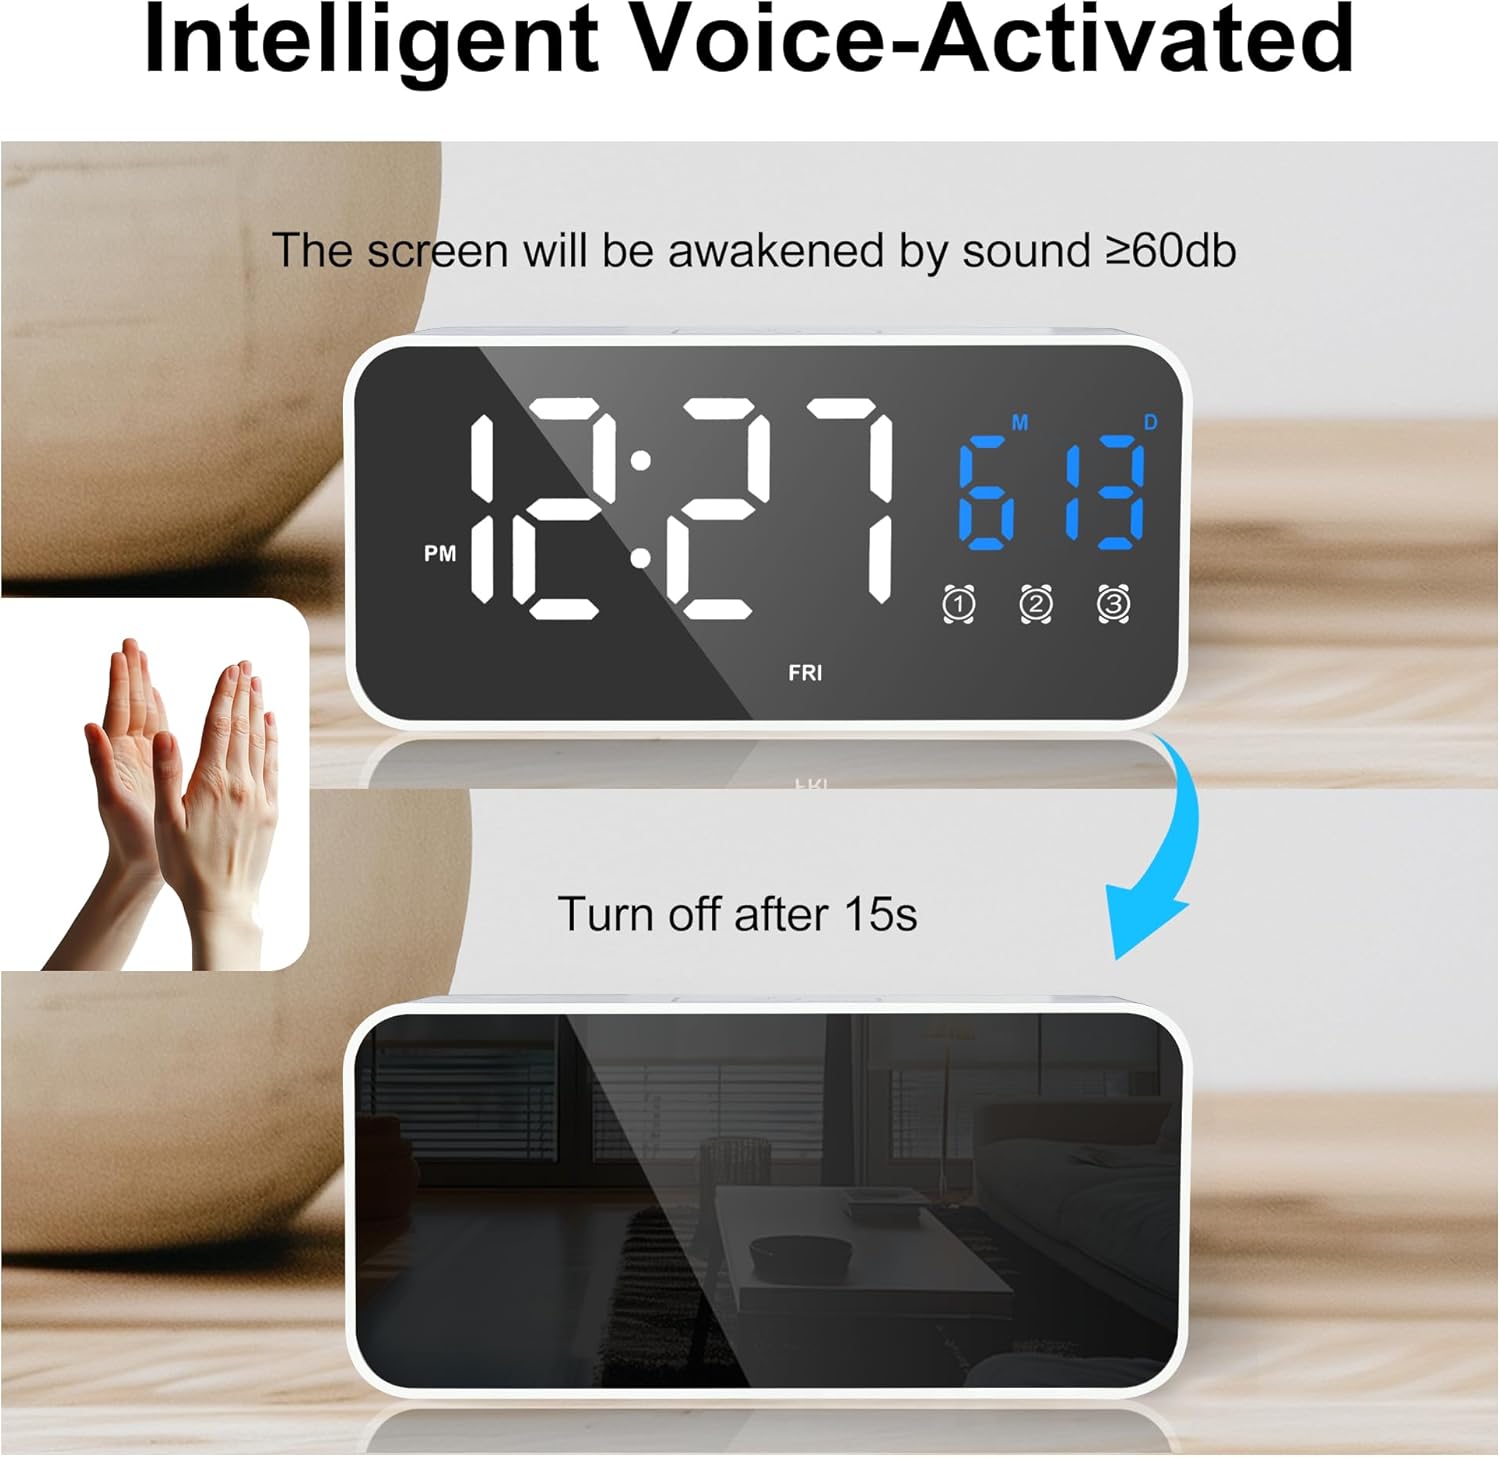
Figure 7: Voice-activated display control.
4.6 USB Charging Ports
The alarm clock is equipped with two USB output ports (9 and 10 in Figure 2) that can be used to charge other devices, such as smartphones. These ports are active only when the alarm clock is connected to a power source via its USB-C input cable.
5. Maintenance
5.1 Cleaning
To clean the clock, gently wipe the surface with a soft, dry cloth. Do not use abrasive cleaners, solvents, or chemical sprays, as these may damage the finish or internal components.
5.2 Environmental Considerations
Keep the digital alarm clock away from humid environments and high temperatures to prevent damage and ensure optimal performance.
6. Troubleshooting
- Display is blank or not responding:
- Ensure the clock is sufficiently charged or connected to a power source via the USB-C cable.
- If in battery mode, make a sound (e.g., clap) to activate the voice control display.
- Alarm is not sounding:
- Check if the alarm is enabled (the alarm icon should be visible on the display).
- Verify the alarm time is set correctly.
- Ensure the alarm volume is not set to the lowest level.
- USB output ports are not charging devices:
- The clock must be connected to a wall adapter via its USB-C input cable for the USB output ports to function.
- Ensure the charging cable for your device is properly connected to the clock's USB output port.
- Incorrect temperature reading:
- Ensure the clock is not placed near heat sources or in direct sunlight, which can affect temperature accuracy.
- Switch between Celsius and Fahrenheit using the -/Volume button to ensure the desired unit is displayed.
7. Specifications
| Brand | Lafocuse |
| Model Number | ZH0141B |
| Color | White |
| Dimensions (L x W x H) | 13.9 x 3.81 x 6.6 cm (5.5 x 1.5 x 2.6 inches) |
| Weight | 220 grams (0.48 lbs) |
| Material | Plastic |
| Display Type | Digital LED |
| Special Features | Date and Temperature Display, Snooze, Triple Alarm, Voice Control, USB Charging Ports |
| Power Source | Rechargeable Battery (1800mAh 18650 Lithium-ion), USB-C |
| Battery | 1 Lithium-ion battery (included) |
8. Warranty and Support
This product comes with a standard manufacturer's warranty. For specific warranty details, please refer to the packaging or contact your retailer. For technical support or further assistance, please reach out to the seller or manufacturer through the platform where the product was purchased.
