1. Introduction
Thank you for choosing the COMHOMA L-Shaped Gaming Desk. This manual provides essential information for the safe assembly, operation, and maintenance of your new desk. Please read it thoroughly before assembly and keep it for future reference.

Image 1.1: Overview of the COMHOMA L-Shaped Gaming Desk with a typical gaming setup, showcasing its spacious design and integrated features.
2. Safety Information
- Always assemble the desk on a soft, clean surface to prevent scratches.
- Ensure all screws and fasteners are tightened securely before use. Periodically check and re-tighten as needed.
- Do not overload the desk. The maximum load capacity is 100 kg (220 lbs).
- Keep small parts away from children during assembly to avoid choking hazards.
- Use only the provided hardware. Substituting parts may compromise stability.
- Avoid placing hot items directly on the desk surface without protection.
- Ensure proper cable management to prevent tripping hazards and damage to electronics.
- The desk features protective rounded edges to minimize injury risk.

Image 2.1: Illustration highlighting the protective rounded edges of the desk, designed for user safety compared to sharp edges.
3. Package Contents
Before beginning assembly, please verify that all components listed below are present and undamaged. If any parts are missing or damaged, please contact customer support.
(Note: A detailed parts list with quantities is typically included in the physical manual. Please refer to that for exact counts.)
- Desktop panels (L-shaped sections)
- Steel frame components (legs, support beams)
- Adjustable storage shelves
- USB charging module with power outlet
- Headphone hook
- Leveling feet
- Assembly hardware (screws, bolts, Allen wrench)
- Instruction manual
4. Assembly Instructions
Follow these steps carefully to assemble your COMHOMA L-Shaped Gaming Desk. It is recommended to have two people for assembly.
- Unpack and Identify Parts: Lay out all components on a clean, soft surface. Compare them with the parts list in your physical manual to ensure everything is present.
- Assemble the Frame: Attach the steel frame components (legs and support beams) according to the diagrams in your manual. Ensure all connections are finger-tight initially.
- Attach Desktop Panels: Carefully place the L-shaped desktop panels onto the assembled frame. Secure them using the provided screws.
- Install Storage Shelves: The storage shelves are adjustable. Determine your desired height and install them into the designated slots on the side frame.
- Integrate USB Charging Module: Insert the USB charging module and power outlet into the pre-drilled opening on the desktop. Connect the power cord.
- Attach Headphone Hook: Secure the headphone hook to the side of the desk as desired.
- Install Leveling Feet: Screw the leveling feet into the bottom of each leg. Adjust them to ensure the desk is stable and level on your floor.
- Final Tightening: Once all components are in place, go back and securely tighten all screws and bolts using the provided Allen wrench. Do not overtighten.

Image 4.1: Illustration demonstrating the adjustable storage shelves and various configurations for PC gaming, console gaming, or home office use.

Image 4.2: Detail showing the robust 20mm steel frame and adjustable leveling feet for enhanced stability.
5. Features and Functions
5.1. USB Charging Ports and Power Outlet
The desk is equipped with two USB charging ports (2A/5V) and one AC power outlet (16A/250V). These are designed to conveniently power and charge your electronic devices directly from your workspace.
- To use, plug the desk's main power cord into a wall outlet.
- Connect your devices to the USB ports or the AC outlet as needed.
- Ensure devices are compatible with the provided power specifications.

Image 5.1: Detailed view of the integrated USB charging ports and AC power outlet, showing various devices being charged.
5.2. Adjustable Storage Shelves
The L-shaped section of the desk includes two adjustable storage shelves. These shelves can be positioned at different heights to accommodate various items such as a PC tower, gaming consoles, books, or office supplies.
- To adjust, carefully remove the shelf and reposition it into the desired slots.
- Ensure the shelf is securely seated in all four support points before placing items on it.
5.3. Headphone Hook and Cable Management
A convenient headphone hook is provided for easy storage of your headset. The desk also features a cable management grommet to help keep your workspace tidy and organized, reducing clutter and potential hazards.

Image 5.2: Detail showing the integrated headphone hook and a cable management grommet on the desk surface.
6. Care and Maintenance
Proper care will extend the life and appearance of your COMHOMA desk.
- Cleaning: Wipe the desk surface with a soft, damp cloth. For stubborn marks, use a mild soap solution and dry immediately. Avoid abrasive cleaners or harsh chemicals.
- Spills: The carbon fiber surface is water-resistant. Wipe up spills immediately to prevent potential damage.
- Scratch Resistance: While the surface is scratch-resistant, avoid dragging sharp or heavy objects across it to maintain its finish.
- Hardware Check: Periodically check all screws and bolts to ensure they remain tight. Re-tighten as necessary to maintain stability.
- Environmental Conditions: Avoid exposing the desk to extreme temperatures or humidity, which can affect the material integrity.

Image 6.1: Visual guide demonstrating easy cleaning, adjustable feet, and scratch-resistant properties of the desk surface.
7. Troubleshooting
| Problem | Possible Cause | Solution |
|---|---|---|
| Desk is wobbly/unstable. | Screws are loose; uneven floor. | Tighten all assembly screws. Adjust the leveling feet until the desk is stable. |
| USB ports/Power outlet not working. | Desk not plugged into wall outlet; faulty wall outlet; device incompatibility. | Ensure the desk's power cord is securely plugged into a working wall outlet. Test the wall outlet with another device. Check device power requirements. |
| Difficulty assembling parts. | Incorrect orientation; missing hardware. | Refer to the assembly diagrams in your manual. Double-check part numbers and orientations. Contact customer support if parts are missing. |
| Scratches on surface. | Sharp objects dragged across surface. | While scratch-resistant, extreme force can cause damage. Use protective mats for heavy or sharp items. |
8. Specifications
| Brand: | COMHOMA |
| Model Number: | DL002 |
| Color: | Black |
| Product Dimensions (L x W x H): | 120 cm x 80 cm x 74 cm (47.2 x 31.5 x 29.1 inches) |
| Item Weight: | 18 kg (39.7 lbs) |
| Maximum Load Capacity: | 100 kg (220 lbs) |
| Materials: | FSC Certified Wood (desktop), Metal (frame) |
| Desktop Finish: | Carbon Fiber Texture, Scratch-resistant, Water-resistant |
| Frame Finish: | Powder Coating |
| Steel Frame Thickness: | 20 mm |
| Power Outlet: | 1 x AC (16A/250V) |
| USB Charging Ports: | 2 x USB (2A/5V) |
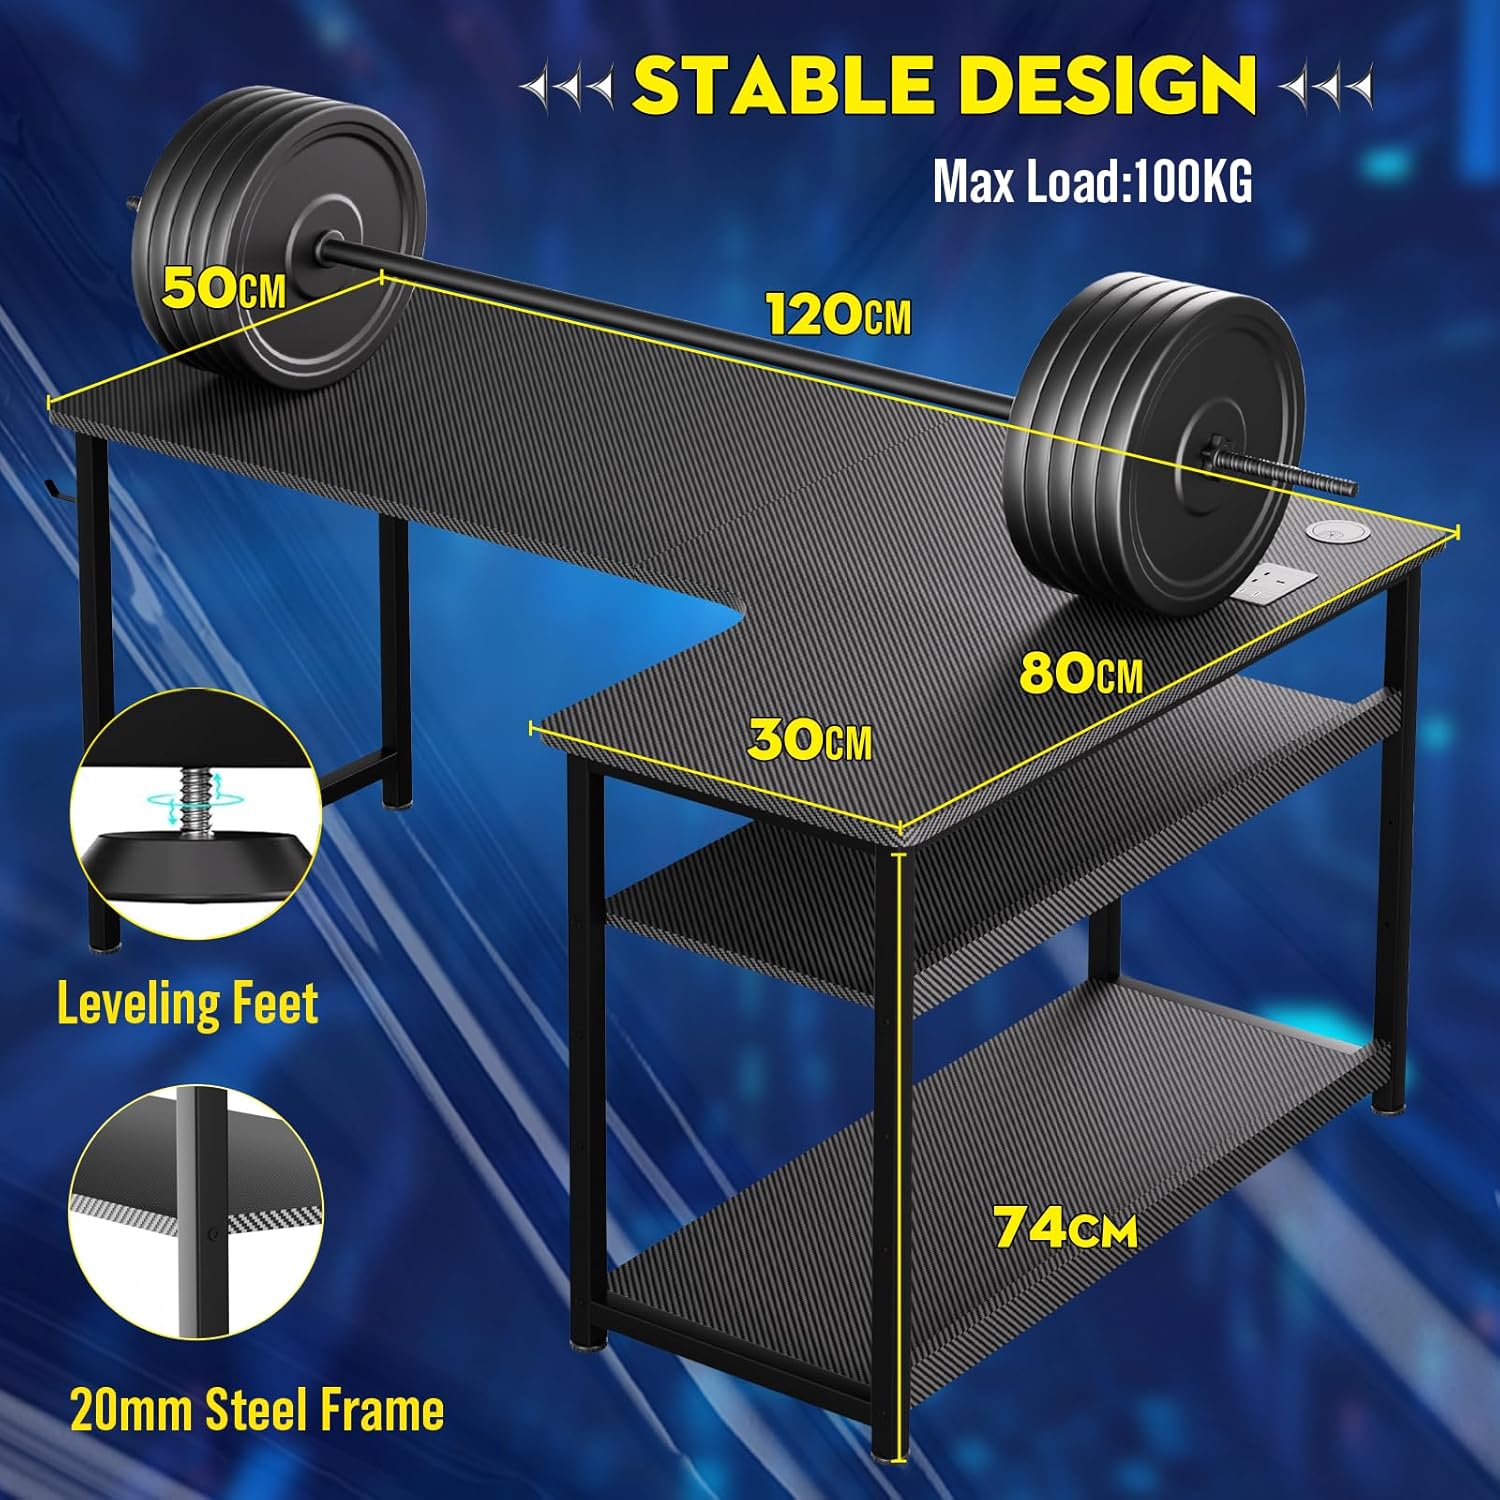
Image 8.1: Dimensional drawing of the desk, indicating overall length, width, height, and maximum load capacity.
9. Warranty and Support
COMHOMA products are manufactured with quality and durability in mind. For specific warranty details, please refer to the warranty card included with your purchase or visit the official COMHOMA website.
If you encounter any issues or have questions regarding your product, please contact COMHOMA customer support:
- Customer Service: [Insert Customer Service Contact Information, e.g., email, phone, website]
- Online Support: Visit the COMHOMA official website for FAQs and support resources.
Please have your model number (DL002) and purchase information ready when contacting support.


