1. Introduction
Thank you for choosing the Yesido KM15 Dual Dash Camera. This manual provides detailed instructions for the installation, operation, and maintenance of your device. The KM15 offers high-resolution 4K front recording and 1080P rear recording, ensuring comprehensive coverage of your journeys. Its advanced features include 24-hour parking monitoring, loop recording, and Wi-Fi connectivity for easy access to your footage.
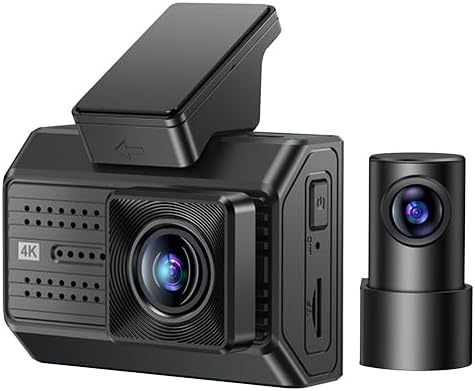
Figure 1.1: Yesido KM15 Dual Dash Camera (Front and Rear Units)
The KM15 is designed for reliability and ease of use, providing crucial evidence in case of incidents and peace of mind during parking. Please read this manual thoroughly before using the product to ensure proper operation and to maximize its lifespan.
2. Package Contents
Please verify that all the following items are included in your package:
- Front Camera Unit (Host)
- Rear Camera Unit with Cable
- ACC Power Cord
- 32GB TF Card
- Static Stickers for Mounting
- User Manual (this document)
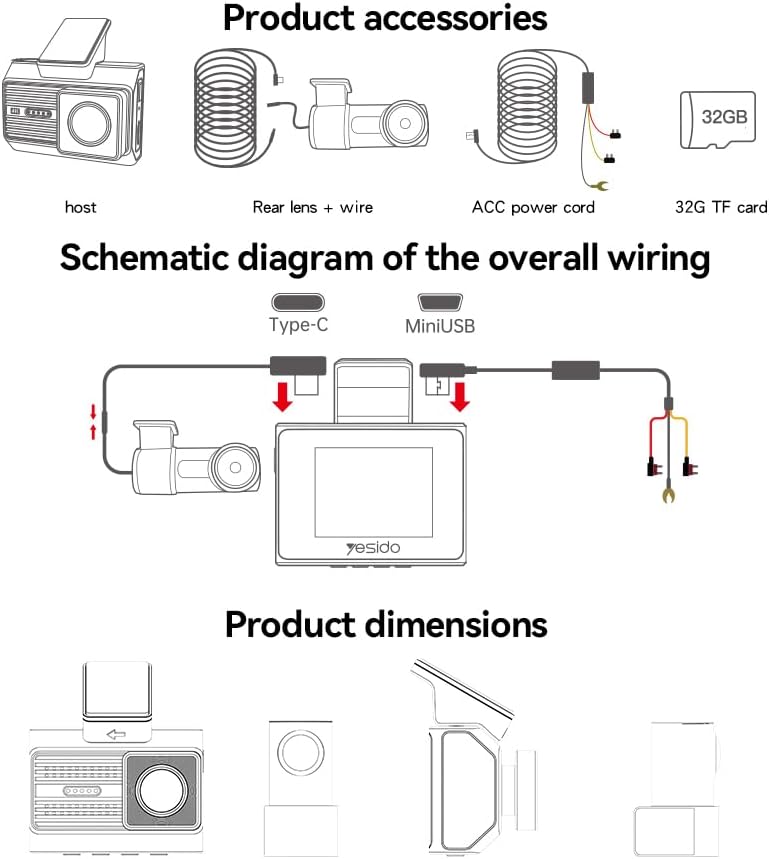
Figure 2.1: Product Accessories and Wiring Diagram
If any items are missing or damaged, please contact customer support immediately.
3. Product Specifications
The Yesido KM15 Dual Dash Camera features advanced components for optimal performance:
| Feature | Specification |
|---|---|
| Front Camera Resolution | 3840x2160P (4K) @ 30fps |
| Rear Camera Resolution | 1920x1080P @ 30fps |
| Image Sensor | 1/2.7-inch CMOS (Front) |
| Wide Angle Lens | 135° |
| Screen Size | 2-inch IPS Display |
| Chipset | NT96670 |
| Storage Support | Up to 256GB TF card (Class 10 or higher recommended) |
| Operating Memory | 900MHz, DDR3, 2GB |
| Built-in Flash | 32MB SPI Flash |
| Connectivity | Wi-Fi (2.4G), USB 2.0 |
| Compatible App | FinalCamX1 |
| Materials | PC + ABS |
| Product Dimensions | 19 x 5.6 x 14 cm |
| Item Weight | 327 grams |

Figure 3.1: Internal Components and Key Features
4. Setup and Installation
Proper installation is crucial for optimal performance. Follow these steps carefully:
4.1 Front Camera Installation
- Clean the windshield area where you intend to mount the dash camera. Ensure it is free of dust and grease.
- Attach the static sticker to the cleaned area on the windshield. This helps in easy removal and prevents residue.
- Mount the front camera unit onto the static sticker, ensuring it is securely attached and does not obstruct your view. Position it centrally, ideally behind the rearview mirror.
- Adjust the lens angle to capture the road ahead clearly.
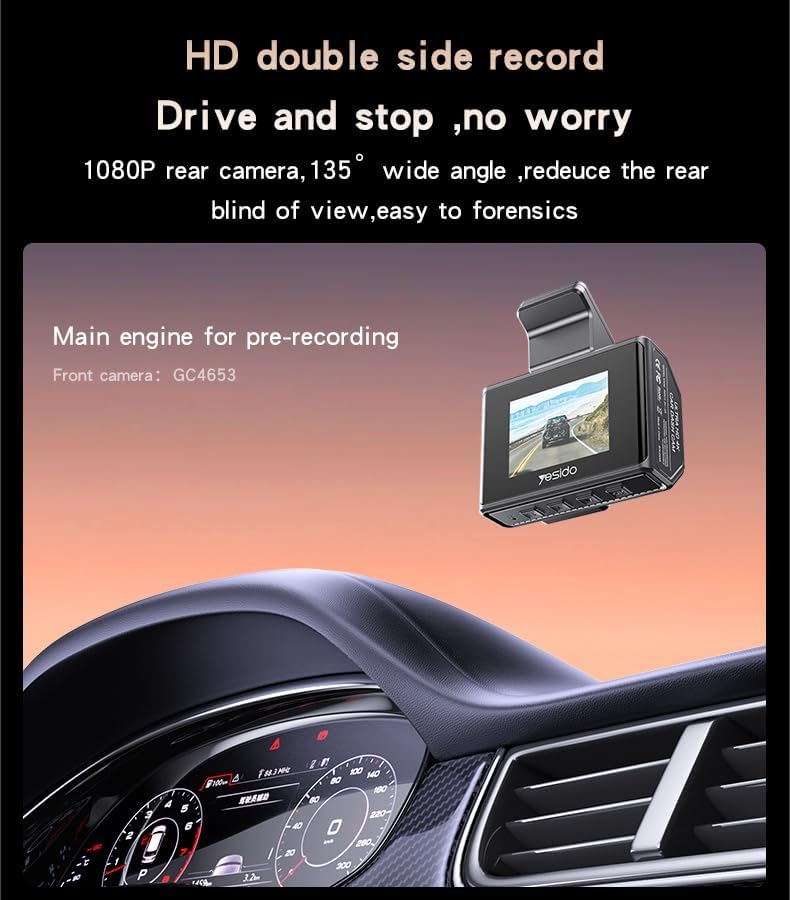
Figure 4.1: Front Camera Mounted on Windshield
4.2 Rear Camera Installation
- Identify a suitable location on your rear windshield for the rear camera. It should have a clear view and not be obstructed by the defroster lines or wiper blades.
- Clean the chosen area thoroughly.
- Attach the rear camera using the provided adhesive or mounting bracket.
- Route the rear camera cable neatly along the car's headliner and A-pillars to the front camera unit. Use cable clips if necessary to secure the cable.
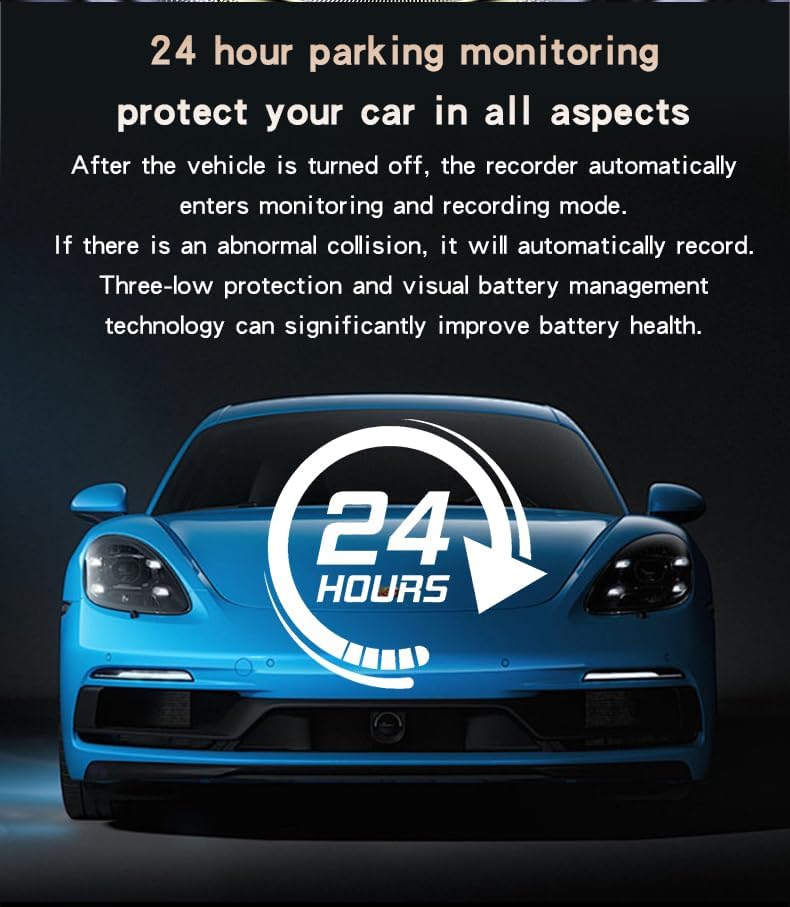
Figure 4.2: Rear Camera Mounted on Rear Windshield
4.3 Power Connection and Wiring
- Connect the ACC power cord to the front camera unit.
- For continuous power and parking monitoring, connect the ACC power cord to your car's fuse box. Consult a professional if you are unsure about this step. A voltage reduction line is required for low voltage detection during parking monitoring.
- Ensure all cables are tucked away neatly to avoid obstructing the driver's view or interfering with vehicle controls.
Figure 4.3: Overall Wiring Schematic
4.4 Inserting the TF Card
Insert the provided 32GB TF card (Class 10 or higher) into the designated slot on the side of the front camera unit. Ensure it clicks into place. The device supports up to 256GB TF cards.
5. Operating Instructions
Familiarize yourself with the key functions of your dash camera:
5.1 Power On/Off
The dash camera will automatically power on and begin recording when your vehicle's ignition is turned on. It will power off automatically when the ignition is turned off.
5.2 Loop Recording
The KM15 features automatic loop recording. When the TF card is full, the oldest unlocked files will be automatically overwritten by new recordings. This ensures continuous recording without manual intervention. It is recommended to format the TF card periodically to maintain optimal performance.
5.3 24-Hour Parking Monitoring
With the ACC power cord properly installed and connected to a constant power source, the dash camera can monitor your vehicle 24 hours a day. If a vibration or collision is detected while the car is parked, the G-sensor will trigger the camera to immediately start recording. This feature requires a voltage reduction line for low voltage detection to protect your car battery.

Figure 5.1: 24-Hour Parking Monitoring
5.4 Wi-Fi Connectivity and App (FinalCamX1)
The KM15 supports 2.4G Wi-Fi connectivity, allowing you to connect your smartphone to the dash camera via the FinalCamX1 app. Through the app, you can:
- View live footage from both front and rear cameras.
- Playback recorded videos directly on your phone.
- Download recorded videos to your phone's storage.
- Adjust camera settings.
Download the FinalCamX1 app from your smartphone's app store. Follow the in-app instructions to connect to your dash camera's Wi-Fi network.
6. Maintenance
To ensure the longevity and optimal performance of your Yesido KM15 Dash Camera, follow these maintenance guidelines:
- Cleaning: Regularly wipe the camera lenses with a soft, lint-free cloth to ensure clear recordings. Do not use abrasive cleaners or solvents.
- Temperature: Avoid exposing the dash camera to extreme temperatures for prolonged periods. While designed for automotive environments, excessive heat or cold can affect performance and lifespan.
- TF Card: Format the TF card once a month to prevent data corruption and ensure smooth loop recording. Back up any important footage before formatting.
- Firmware Updates: Check the official Yesido website or the FinalCamX1 app periodically for any available firmware updates. Keeping your device updated can improve performance and add new features.
- Secure Mounting: Periodically check that the camera units are securely mounted and that cables are not loose or interfering with driving.
7. Troubleshooting
If you encounter any issues with your dash camera, please refer to the following common problems and solutions:
- Camera not powering on:
– Ensure the power cable is securely connected to both the camera and the car's power source.
– Check the car's ignition and fuse box for any issues. - Recording stops or footage is corrupted:
– Ensure you are using a Class 10 or higher TF card.
– Format the TF card regularly (monthly is recommended).
– The TF card might be faulty; try replacing it with a new, high-quality card. - Poor video quality:
– Clean the camera lenses. Dust or smudges can significantly affect video clarity.
– Ensure the protective film has been removed from the lens.
– Check the resolution settings in the app; ensure it's set to 4K for the front camera and 1080P for the rear. - Wi-Fi connection issues:
– Ensure the camera's Wi-Fi is enabled.
– Restart both the camera and your smartphone.
– Make sure you are within close proximity to the camera.
– Reinstall the FinalCamX1 app if necessary. - Parking monitoring not working:
– Ensure the ACC power cord is correctly installed and connected to a constant power source.
– Verify that the voltage reduction line is properly connected for low voltage detection.
– Check the G-sensor sensitivity settings in the app.
If the problem persists after trying these solutions, please contact Yesido customer support for further assistance.
8. Warranty and Support
Yesido products are manufactured to high-quality standards. For specific warranty information, please refer to the warranty card included with your product or visit the official Yesido website. Keep your purchase receipt as proof of purchase for warranty claims.
For technical support, product inquiries, or warranty service, please contact Yesido customer support through the contact information provided on their official website or within the FinalCamX1 app.


