1. Introduction
This manual provides comprehensive instructions for the installation, operation, and maintenance of your MTX S6512-44 S65-Series Square 12-inch Subwoofers and MTX JH10001 Jackhammer Series 1100W Mono Block Amplifier. Please read this manual thoroughly before attempting installation or operation to ensure proper use and to maximize the performance and longevity of your audio system components.

Image 1.1: The MTX S6512-44 Subwoofers and JH10001 Amplifier System.
2. Safety Information
Improper installation or use of car audio components can lead to serious injury or damage to your vehicle. Always follow these safety guidelines:
- Professional Installation Recommended: Due to the complexity of car audio systems, professional installation by a qualified technician is highly recommended.
- Disconnect Battery: Always disconnect the vehicle's negative battery terminal before beginning any installation.
- Secure Wiring: Ensure all wiring is properly routed and secured to prevent pinching, chafing, or short circuits. Use appropriate gauge wire for power and ground connections.
- Ventilation: Ensure the amplifier is installed in a location with adequate ventilation to prevent overheating.
- Volume Levels: Prolonged exposure to high volume levels can cause permanent hearing damage. Use caution when adjusting volume.
- Impedance Matching: Correctly match the subwoofer impedance to the amplifier's stable operating impedance to prevent damage to both components.
3. Package Contents
Verify that all items are present in your package:
- 1x MTX JH10001 Jackhammer Series 1100W x 1 @ 1-Ohm Class D Mono Block Amplifier
- 2x MTX S6512-44 S65-Series Square 12" 500W RMS Dual 4-Ohm Subwoofers
- User Manual (this document)
4. Product Overview
4.1 MTX JH10001 Jackhammer Series Mono Block Amplifier
The MTX JH10001 amplifier is a Class D mono block amplifier designed to deliver powerful and efficient performance for your subwoofer system. It features easy-access controls for fine-tuning your audio output.
- 1100W x 1 Channel output at 1-Ohm.
- Easy access controls for Gain, Low Pass Filter (LPF), Subsonic Filter, and Bass Boost.
- High-quality power and speaker connections.
- Compact design for versatile installation.

Image 4.1.1: Angled view of the MTX JH10001 Amplifier.

Image 4.1.2: Top view of the MTX JH10001 Amplifier showing control panel.
4.2 MTX S6512-44 S65-Series Square Subwoofer
The MTX S6512-44 subwoofers are 12-inch square subwoofers designed for powerful bass reproduction. They feature advanced technologies for enhanced performance and durability.
- Patented surround geometry for increased excursion (Xmax) and higher Sound Pressure Level (SPL).
- Spider Plateau Venting for efficient voice coil cooling, improving reliability.
- Radial Ribbed T-Yoke design for lower distortion during extended use.
- Dual 4-Ohm voice coils for flexible wiring options.
- 500 Watt RMS power handling per subwoofer.

Image 4.2.1: Angled view of the MTX S6512-44 Square Subwoofer.

Image 4.2.2: Front view of the MTX S6512-44 Square Subwoofer.

Image 4.2.3: Rear view of the MTX S6512-44 Square Subwoofer.
5. Setup and Installation
5.1 Before You Begin
Gather all necessary tools and materials, including appropriate gauge wiring (1/0-gauge power wire recommended for the amplifier), fuses, connectors, and mounting hardware. Plan your installation carefully, considering wire routing, amplifier placement for ventilation, and subwoofer enclosure requirements.
5.2 Amplifier Mounting (JH10001)
Mount the amplifier securely to a solid surface in your vehicle. Ensure the mounting location allows for adequate airflow around the amplifier to prevent overheating. Avoid mounting in enclosed spaces without ventilation. Use appropriate screws and washers to prevent vibration.
5.3 Power and Ground Wiring (JH10001)
- Power Wire (+12V): Run a 1/0-gauge power wire directly from the positive terminal of your vehicle's battery to the amplifier's +12V terminal. Install an appropriate fuse holder (e.g., ANL or Mini-ANL) within 18 inches (45 cm) of the battery.
- Ground Wire (GND): Connect a 1/0-gauge ground wire from the amplifier's GND terminal to a clean, unpainted metal surface on the vehicle's chassis. Ensure a solid, low-resistance connection. The ground wire should be as short as possible, ideally less than 3 feet (1 meter).
- Remote Turn-On Wire (REM): Connect a smaller gauge wire (e.g., 18-gauge) from your head unit's remote turn-on output to the amplifier's REM terminal. This wire signals the amplifier to turn on and off with your head unit.
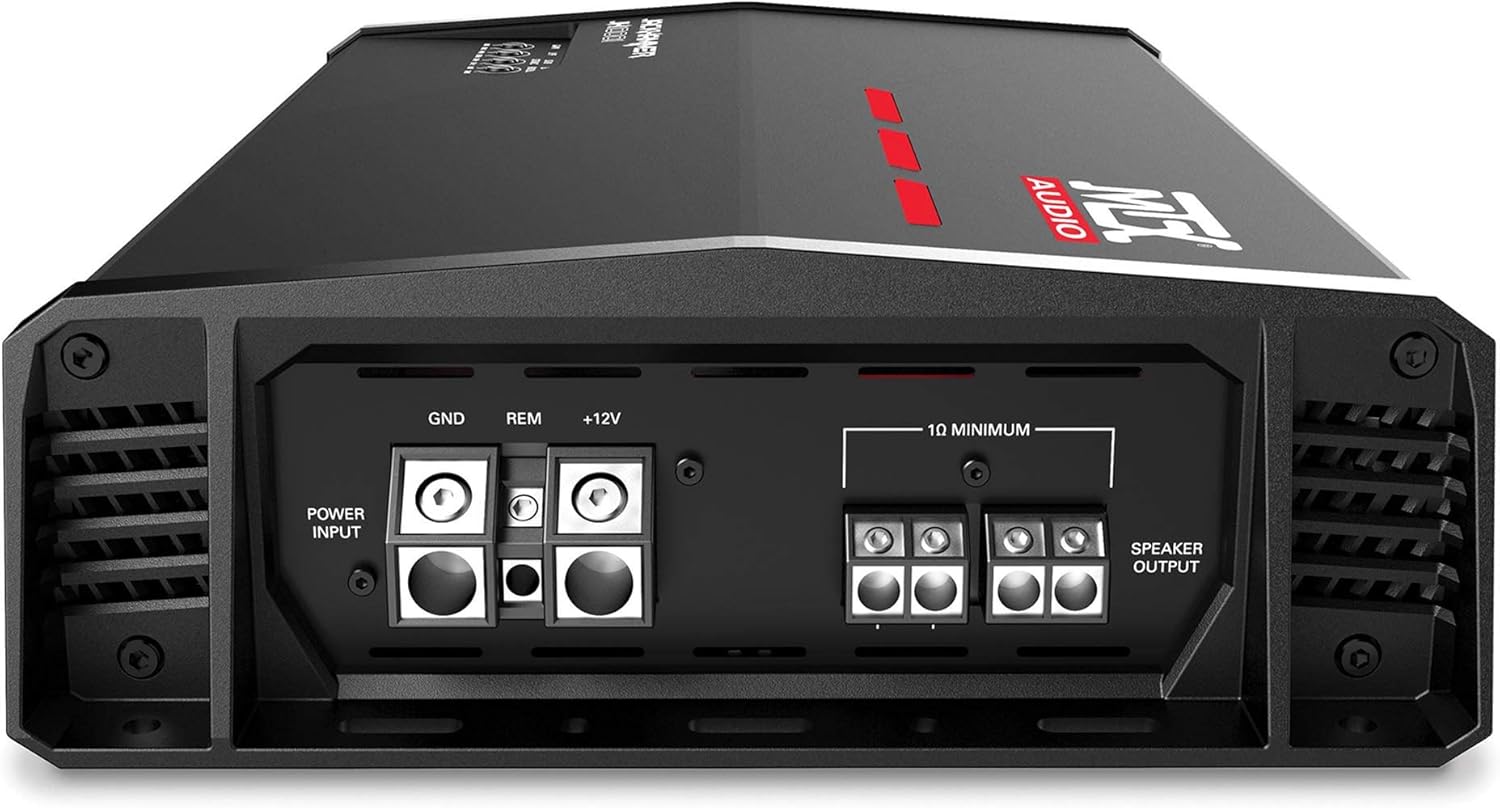
Image 5.3.1: Rear connections of the MTX JH10001 Amplifier.
5.4 Signal Input (JH10001)
Connect RCA cables from your head unit's subwoofer or full-range pre-outs to the RCA input jacks on the JH10001 amplifier. Ensure the cables are routed away from power wires to minimize noise.
5.5 Subwoofer Wiring (S6512-44)
Each S6512-44 subwoofer features dual 4-ohm voice coils. The JH10001 amplifier is stable down to 1-ohm. To achieve a 1-ohm final load with two dual 4-ohm subwoofers, wire each subwoofer's voice coils in parallel (resulting in 2 ohms per subwoofer), then wire the two subwoofers in parallel to the amplifier.
- Step 1 (Per Subwoofer): Connect the positive terminal of Voice Coil 1 to the positive terminal of Voice Coil 2. Connect the negative terminal of Voice Coil 1 to the negative terminal of Voice Coil 2. This creates a 2-ohm load for each subwoofer.
- Step 2 (To Amplifier): Connect the positive output from Subwoofer 1 (from Step 1) to the positive output from Subwoofer 2 (from Step 1). Connect this combined positive to the amplifier's positive speaker output terminal. Do the same for the negative terminals, connecting the combined negative to the amplifier's negative speaker output terminal. This results in a 1-ohm final load.
Refer to the amplifier's manual for specific speaker terminal connections. Always double-check your wiring with a multimeter before applying power to ensure correct impedance and polarity.
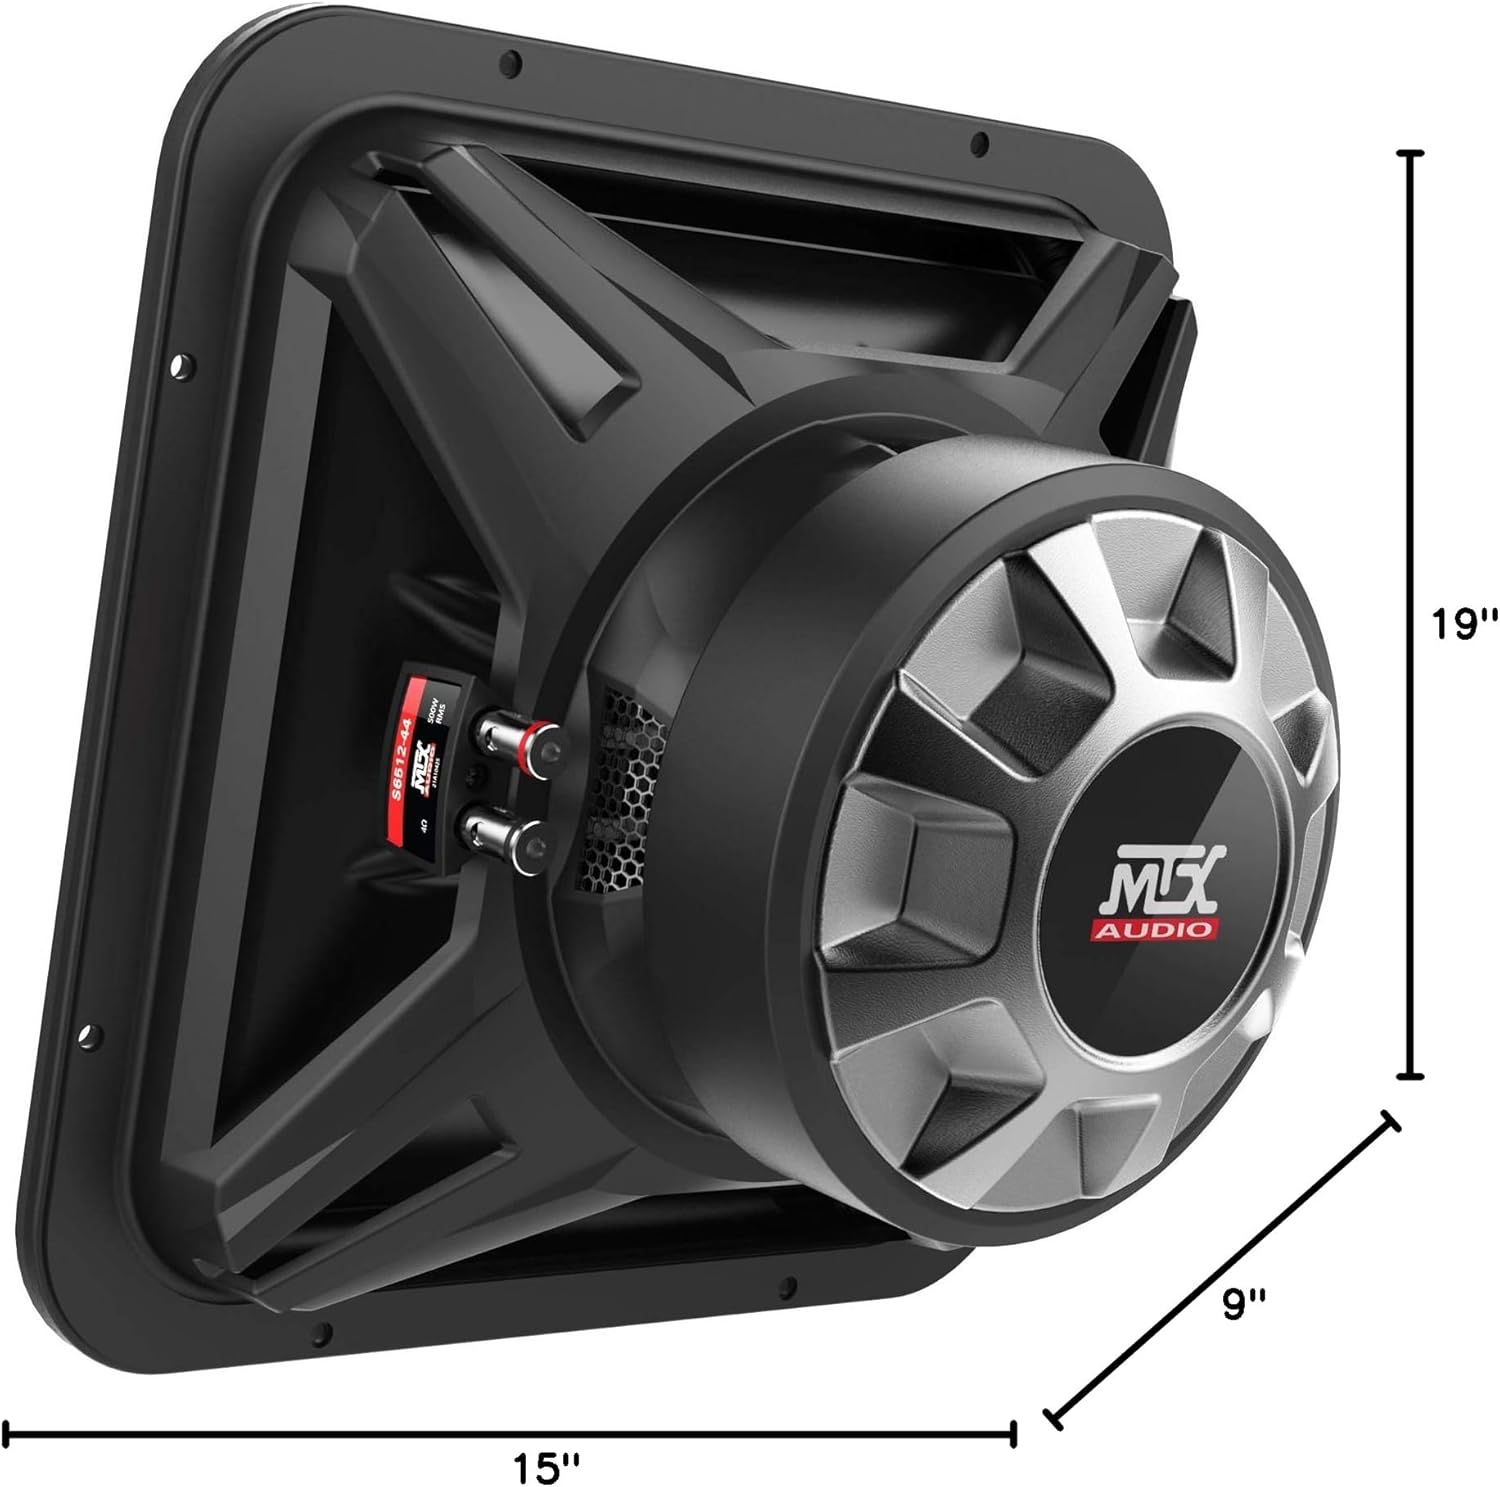
Image 5.5.1: MTX S6512-44 Subwoofer dimensions for enclosure planning.
5.6 Initial System Configuration (JH10001)
After all connections are made and verified, proceed with initial setup:
- Gain Control: Start with the gain control set to minimum. Play a familiar track at a moderate volume on your head unit. Slowly increase the amplifier's gain until you hear distortion, then back off slightly. The gain control is not a volume knob; it matches the amplifier's input sensitivity to the head unit's output.
- Low Pass Filter (LPF): Adjust the LPF to filter out frequencies above your desired subwoofer range, typically between 80Hz and 120Hz. This ensures the subwoofer only reproduces bass frequencies.
- Subsonic Filter: Set the subsonic filter to protect your subwoofers from playing frequencies below their resonant frequency, which can cause damage. A common setting is around 25Hz to 30Hz.
- Bass Boost: Use the bass boost sparingly, if at all. Excessive bass boost can lead to distortion and potential damage to your subwoofers. Adjust in small increments if desired.
6. Operation
Once installed and configured, your MTX audio system is ready for use. The amplifier will turn on automatically when your head unit is powered on via the remote turn-on wire. Adjust the volume from your head unit. If a remote bass knob is connected to the JH10001 amplifier, it provides convenient control over the subwoofer output level from the driver's seat.
7. Maintenance
Regular maintenance helps ensure the longevity and optimal performance of your audio system:
- Cleaning: Periodically clean the amplifier and subwoofer surfaces with a soft, dry cloth. Avoid using harsh chemicals or abrasive cleaners.
- Connection Checks: Annually inspect all wiring connections (power, ground, remote, speaker, RCA) to ensure they are secure and free from corrosion.
- Ventilation: Ensure the amplifier's cooling fins remain free of dust and debris to maintain proper heat dissipation.
8. Troubleshooting
If you encounter issues with your MTX audio system, refer to the following troubleshooting guide:
| Problem | Possible Cause | Solution |
|---|---|---|
| No Power / Amplifier Not Turning On | Blown fuse, loose power/ground/remote wire, faulty remote turn-on signal. | Check fuse near battery and on amplifier. Verify all power, ground, and remote connections are secure and receiving voltage. |
| No Sound from Subwoofers | Loose RCA cables, incorrect gain setting, speaker wires disconnected, amplifier in protection mode. | Check RCA connections. Ensure gain is set correctly. Verify speaker wire connections. Check amplifier status indicator light. |
| Distorted Sound | Gain set too high, incorrect LPF/subsonic settings, damaged subwoofer, improper impedance. | Reduce gain. Adjust LPF and subsonic filter settings. Inspect subwoofers for physical damage. Re-verify wiring impedance. |
| Amplifier Overheating | Insufficient ventilation, impedance too low, prolonged high volume. | Ensure adequate airflow around amplifier. Verify correct impedance wiring. Reduce volume or allow amplifier to cool. |
9. Specifications
9.1 MTX JH10001 Amplifier Specifications
| Feature | Specification |
|---|---|
| Output Power | 1100W x 1 @ 1-Ohm |
| Class | Class D |
| Control Method | Remote |
| Connectivity Technology | Wired |
| Audio Output Mode | Mono |
9.2 MTX S6512-44 Subwoofer Specifications
| Feature | Specification |
|---|---|
| Speaker Size | 12 Inches |
| Woofer Diameter | 12 Inches |
| Impedance | Dual 4 Ohm |
| Speaker Maximum Output Power | 500 Watts RMS |
| Frequency Response | 23Hz - 130Hz |
| Sensitivity | 86.7dB |
| Product Dimensions | 19"D x 9"W x 15"H (overall for the bundle, individual subwoofer dimensions are implied by the image) |
| Subwoofer Connectivity Technology | Wired |
10. Warranty and Support
Your MTX S6512-44 Subwoofers and JH10001 Amplifier System comes with a limited warranty. Please refer to the warranty card included with your product or visit the official MTX website for detailed terms and conditions.
For technical support, troubleshooting assistance, or warranty claims, please contact MTX customer service:
- Website: www.mtx.com
- Customer Service: Refer to the MTX website for current contact information (phone, email, or support portal).


