
1. Introduction
This manual provides essential information for the safe and proper installation, operation, and maintenance of your new ARIEL Kelly 72 in Slim Shaker Design Bathroom Vanity. Please read all instructions carefully before beginning installation and retain this manual for future reference.
The ARIEL Kelly vanity features a modern, minimalist Slim Shaker style with a clean, contemporary look. It includes a Carrara White Quartz countertop with a 1.5-inch thick mitered edge and 4-inch backsplash, along with a porcelain UPC-certified sink. Designed for optimal organization, it offers three levels of drawer sizes, inner pull-out drawers, soft-closing doors and drawers, and an interior adjustable shelf. Constructed from solid wood and plywood with durable Sherwin Williams PU paint, it ensures a sturdy and long-lasting structure.

Figure 1.1: Front view of the ARIEL Kelly 72-inch Slim Shaker Design Bathroom Vanity.
2. Safety Information
Always prioritize safety during installation and use. Failure to follow these guidelines may result in injury or damage to the product.
- Heavy Item: The vanity is heavy. Always use proper lifting techniques and seek assistance when moving or lifting the unit to prevent injury.
- Sharp Edges: Be cautious of sharp edges on the countertop or cabinet during handling. Wear appropriate protective gloves.
- Plumbing: Ensure all water supply lines are turned off before disconnecting or connecting plumbing fixtures. Consult a qualified plumber if you are unsure about any plumbing connections.
- Electrical: If installing lighting or electrical outlets, ensure power is disconnected at the circuit breaker. Consult a qualified electrician for any electrical work.
- Secure Installation: The vanity must be securely anchored to wall studs to prevent tipping. Use appropriate fasteners for your wall type.
- Ventilation: Ensure adequate ventilation in the bathroom to prevent moisture buildup, which can damage the vanity over time.
3. Package Contents
Verify that all components are present and undamaged before beginning assembly. If any parts are missing or damaged, contact customer support immediately.
- Pre-assembled Vanity Cabinet
- Carrara White Quartz Countertop with integrated sink(s)
- Backsplash
- Hardware (handles, adjustable shelf pins, leveling feet)
Note: Faucets, drains, and P-traps are not included and must be purchased separately.
4. Tools Required
The following tools are typically required for installation:
- Measuring Tape
- Pencil
- Level
- Stud Finder
- Drill with appropriate drill bits
- Screwdriver (Phillips and Flathead)
- Adjustable Wrench
- Caulk Gun and Silicone Sealant (mildew-resistant)
- Safety Glasses and Gloves
5. Installation and Setup
Follow these steps for proper installation of your vanity. It is recommended to have two people for installation due to the weight and size of the unit.
5.1 Pre-Installation Checks
- Inspect Area: Ensure the installation area is clean, dry, and free of obstructions. Verify that plumbing rough-ins are correctly positioned for the vanity.
- Level Floor: Check if the floor where the vanity will sit is level. Use the adjustable leveling feet on the vanity to compensate for minor unevenness.
- Locate Studs: Use a stud finder to locate wall studs behind the installation area. Mark their positions, as the vanity should be secured to these for stability.
5.2 Placing and Securing the Vanity
- Position Vanity: Carefully move the vanity cabinet into its desired position. Ensure it is centered and aligned with your plumbing.
- Level Vanity: Adjust the hidden leveling feet at the base of the vanity until the cabinet is perfectly level from front to back and side to side.
- Secure to Wall: Drill pilot holes through the vanity's back support rail into the wall studs. Secure the vanity to the wall using appropriate screws (not included) to prevent tipping.

Figure 5.1: Vanity Dimensions for planning.
5.3 Countertop and Sink Installation
- Apply Sealant: Apply a continuous bead of silicone sealant along the top edges of the vanity cabinet where the countertop will rest.
- Place Countertop: Carefully lower the quartz countertop onto the vanity cabinet, aligning it precisely. Press down firmly to ensure good adhesion with the sealant.
- Install Backsplash: Apply a bead of silicone sealant to the back edge of the countertop and the wall where the backsplash will be placed. Press the backsplash firmly into position.
- Connect Plumbing: Install your chosen faucets and drains according to their manufacturer's instructions. Connect the water supply lines and P-traps. Ensure all connections are tight to prevent leaks.

Figure 5.2: Detail of the Carrara White Quartz Countertop and Porcelain Sink.
5.4 Adjusting Doors and Drawers
The vanity features soft-closing doors and dovetail drawers. Minor adjustments may be needed after installation to ensure perfect alignment and smooth operation.
- Door Adjustment: Most soft-closing hinges have screws for horizontal, vertical, and depth adjustments. Refer to the hinge manufacturer's instructions for precise adjustments.
- Drawer Adjustment: Full-extension drawer slides can typically be adjusted for alignment. Consult the slide manufacturer's guide if drawers are not closing smoothly or are misaligned.
- Adjustable Shelves: The interior shelves can be adjusted to three different levels to customize storage space. Simply move the shelf pins to the desired height.
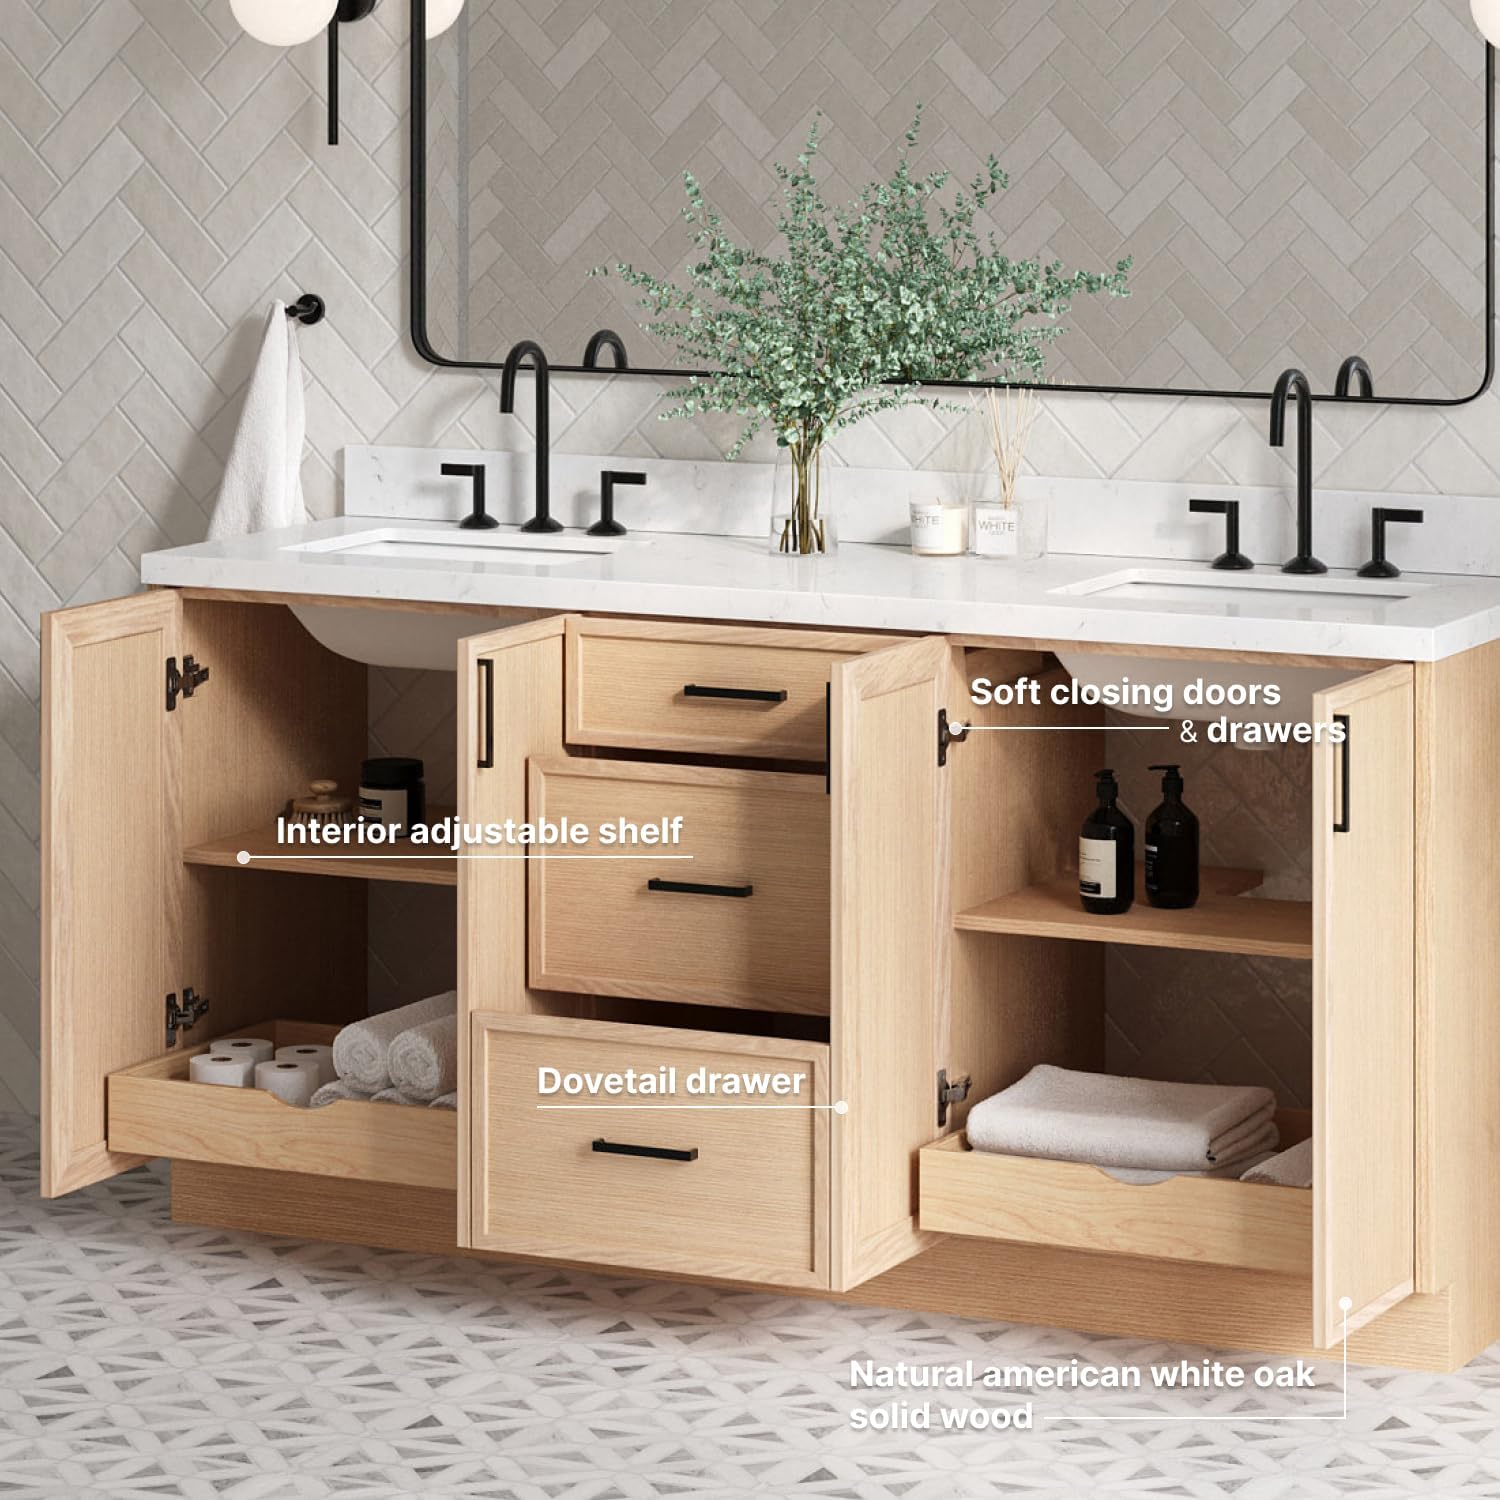
Figure 5.3: Interior storage features including adjustable shelves and dovetail drawers.

Figure 5.4: Adjustable interior shelving.
6. Operation
Your ARIEL Kelly vanity is designed for daily use in a bathroom environment. Its features are intuitive and require minimal special operation.
- Doors and Drawers: The soft-closing mechanisms ensure quiet and gentle closure. Avoid forcing them shut; allow the mechanism to engage naturally.
- Sinks: Use the integrated porcelain sinks for typical bathroom activities. Ensure proper drainage and avoid pouring harsh chemicals down the drain that could damage plumbing.
- Storage: Utilize the various drawer sizes and adjustable shelves for organized storage of bathroom essentials. The inner pull-out drawers maximize hidden space.
7. Maintenance
Regular cleaning and proper care will help maintain the beauty and longevity of your vanity.
7.1 Cabinet Care (Wood Finish)
- Cleaning: Wipe down the cabinet surfaces with a soft, damp cloth. For stubborn spots, use a mild, non-abrasive cleaner specifically designed for wood finishes. Always wipe dry immediately to prevent water spots or damage.
- Avoid Harsh Chemicals: Do not use abrasive cleaners, ammonia-based products, or silicone-based polishes, as these can damage the Sherwin Williams PU paint finish.
- Moisture: Promptly wipe up any spills or splashes to prevent water from penetrating the wood. Ensure good ventilation in the bathroom to minimize humidity.
7.2 Countertop Care (Carrara White Quartz)
- Daily Cleaning: Clean daily with a soft cloth and warm water, or a mild, pH-neutral cleaner.
- Stains: For tougher stains, use a non-abrasive household cleaner. Avoid highly acidic or alkaline cleaners, as well as abrasive scrubbing pads, which can dull the surface.
- Heat: While quartz is heat-resistant, it is recommended to use trivets or hot pads under hot items to prevent potential damage from extreme temperature changes.
- Sealing: Quartz countertops are non-porous and do not require sealing.
7.3 Sink Care (Porcelain)
- Cleaning: Clean the porcelain sink with a soft cloth and a mild, non-abrasive bathroom cleaner. Rinse thoroughly after cleaning.
- Avoid Abrasives: Do not use abrasive powders, scouring pads, or steel wool, as these can scratch the porcelain surface.
7.4 Hardware and Mechanisms
- Handles: Clean matte black handles with a soft, damp cloth. Avoid harsh chemicals that could strip the finish.
- Soft-Closing Mechanisms: These are designed for durability. Avoid slamming doors or drawers, as this can prematurely wear out the mechanisms. No lubrication is typically required.
8. Troubleshooting
This section addresses common issues you might encounter with your vanity.
| Problem | Possible Cause | Solution |
|---|---|---|
| Drawers not closing smoothly or fully. | Obstruction in drawer slide; drawer not aligned; soft-close mechanism issue. | Check for obstructions. Adjust drawer slides for alignment. Ensure soft-close mechanism is not damaged. |
| Cabinet doors are misaligned. | Hinges need adjustment; vanity not level. | Adjust hinge screws for horizontal, vertical, and depth alignment. Re-check vanity level and adjust leveling feet if necessary. |
| Water leaking from sink or plumbing. | Loose plumbing connections; improper sealant application. | Check all water supply and drain connections for tightness. Reapply silicone sealant around sink or countertop edges if necessary. Consult a plumber if leaks persist. |
| Sink draining slowly. | Clog in drain; pop-up stopper not fully opening. | Remove and clean the pop-up stopper. Use a drain cleaner suitable for plumbing, or consult a plumber for stubborn clogs. |
9. Specifications
| Feature | Detail |
|---|---|
| Brand | ARIEL |
| Model | Kelly 72 in Slim Shaker Design Bathroom Vanity |
| Color | White Oak |
| Product Dimensions (D x W x H) | 22"D x 72.25"W x 36"H |
| Countertop Material | Carrara White Quartz (1.5" thick mitered edge) |
| Sink Type | Porcelain, UPC-certified, Rectangle |
| Cabinet Material | Solid Wood and Plywood (no MDF, staples, or dowels) |
| Finish Type | Sherwin Williams PU paint |
| Door Style | Soft-closing |
| Drawer Features | Soft-closing, Dovetail drawer boxes, Full-extension, Inner pull-out drawers |
| Mounting Type | Free-Standing |
| Included Components | Vanity cabinet, countertop with sink, backsplash, shelves |
| Assembly Required | Yes (minor assembly/installation) |
| UPC | 840318385396 |
10. Warranty and Support
Your ARIEL Kelly Bathroom Vanity comes with a 3-year limited warranty. This warranty covers defects in materials and workmanship under normal use and service.
For warranty claims, technical assistance, or any questions regarding your product, please contact ARIEL customer support. They are available 24/7 to provide reliable service and peace of mind.
Contact Information: Please refer to the contact details provided on your purchase receipt or the ARIEL official website for the most current support information.
The product is shipped on custom pallets to prevent damage during transit, ensuring it arrives in optimal condition.