1. Product Overview
The Minisopuru MD6950U DisplayLink Docking Station is a versatile solution designed to expand your laptop's connectivity and display capabilities. It features 16 ports, enabling triple monitor setups, high-speed data transfer, and simultaneous charging for multiple devices. This docking station is compatible with a wide range of systems, including MacBook (M1/M2/M3/M4), Thunderbolt 5/4/3, and Windows laptops.
Key features include:
- 16-in-1 Connectivity: Expands a single USB-C host cable to 16 ports.
- Triple Monitor Support: Supports up to three external displays with 8K/4K resolution via HDMI and DisplayPort.
- High-Speed Data Transfer: Multiple USB ports offer up to 10Gbps data transfer speeds.
- Powerful Charging: Includes a 140W power adapter, providing up to 85W for laptops and 30W for phones/iPads.
- Wide Compatibility: Supports macOS, Windows, Chrome OS, Ubuntu, and Android.
2. Package Contents
Verify that all items are present in your package:
- 1x Minisopuru MD6950U DisplayLink Docking Station
- 1x 140W Power Adapter
- 1x USB-C to USB-C Cable
- 1x USB-A Converter
- 1x User Instructions

Image: Minisopuru MD6950U DisplayLink Docking Station and its accessories, including the 140W power adapter, USB-C cable, USB-A converter, and user guide.
3. Product Diagram and Ports
Familiarize yourself with the various ports and their functions on the docking station:

Image: Detailed diagram showing the front and rear ports of the Minisopuru MD6950U DisplayLink Docking Station with labels for each function.
Front Panel Ports:
- Power Button: To power on/off the docking station.
- SD & TF Card Slots: For memory card access.
- USB-A (10Gbps, 7.5W Charging) x2: High-speed data transfer and charging for peripherals.
- USB-C (10Gbps, 7.5W Charging) x2: High-speed data transfer and charging for peripherals.
- USB-C (10Gbps, 30W PD Charging): High-speed data transfer and fast charging for phones or tablets.
- USB-A (480Mbps): Standard USB 2.0 port for basic peripherals.
- Audio/Mic Jack: 3.5mm port for headphones or microphones.
Rear Panel Ports:
- DC IN (24V=5.83A, 140W): Power input for the docking station.
- TO HOST (USB-C, Max 85W Charging): Connects to your laptop for data, video, and power delivery.
- HDMI 8K@30Hz or DP 8K@30Hz (DP Alt Mode): High-resolution display output.
- HDMI 4K@60Hz or DP 4K@60Hz (Display 1, DisplayLink Driver): Display output requiring DisplayLink driver.
- HDMI 4K@60Hz or DP 4K@60Hz (Display 2, DisplayLink Driver): Display output requiring DisplayLink driver.
- Gigabit Ethernet: RJ45 port for wired network connection.
4. Setup Instructions
4.1. Driver Installation (Essential for Multi-Display)
To enable all display ports and unlock triple/dual display functionality, especially for macOS devices, the DisplayLink driver must be installed on your laptop.
- Go to the official DisplayLink website: synaptics.com/products/displaylink-usb-graphics/downloads
- Click on the "DOWNLOADS" section.
- Select the corresponding operating system (Windows, macOS, Chrome OS, Ubuntu, Android) to download and install the driver.
- For macOS users, after installation, navigate to Privacy & Security > Screen Recording Permission and allow "DisplayLink Manager" to join.

Image: Visual guide illustrating the steps to download and install the DisplayLink driver from the Synaptics website.
4.2. Connecting the Docking Station
- Connect the 140W power adapter to the DC IN port on the docking station and plug it into a power outlet.
- Connect your laptop to the TO HOST USB-C port on the docking station using the provided USB-C to USB-C cable. If your laptop only has USB-A ports, use the included USB-A converter.
- Connect your external monitors to the available HDMI or DisplayPort outputs on the docking station.
- Connect any desired peripherals (keyboard, mouse, external hard drives, printer, etc.) to the USB data ports.
- For a wired network connection, connect an Ethernet cable to the Gigabit Ethernet port.
- Press the power button on the front panel to turn on the docking station.
Video: A short demonstration showing the Minisopuru MD6950U docking station connected to a laptop, providing power and extending display to multiple monitors.
5. Operating Instructions
5.1. Display Configuration
The docking station supports various display combinations, including triple and dual extended displays, breaking the limitations of some MacBook M1/M2/M3/M4 chips.
- DP Alt Mode: One 8K HDMI or 8K DisplayPort output.
- DisplayLink Driver: Two 4K HDMI or two 4K DisplayPort outputs.
Ensure the DisplayLink driver is installed for optimal multi-display performance.
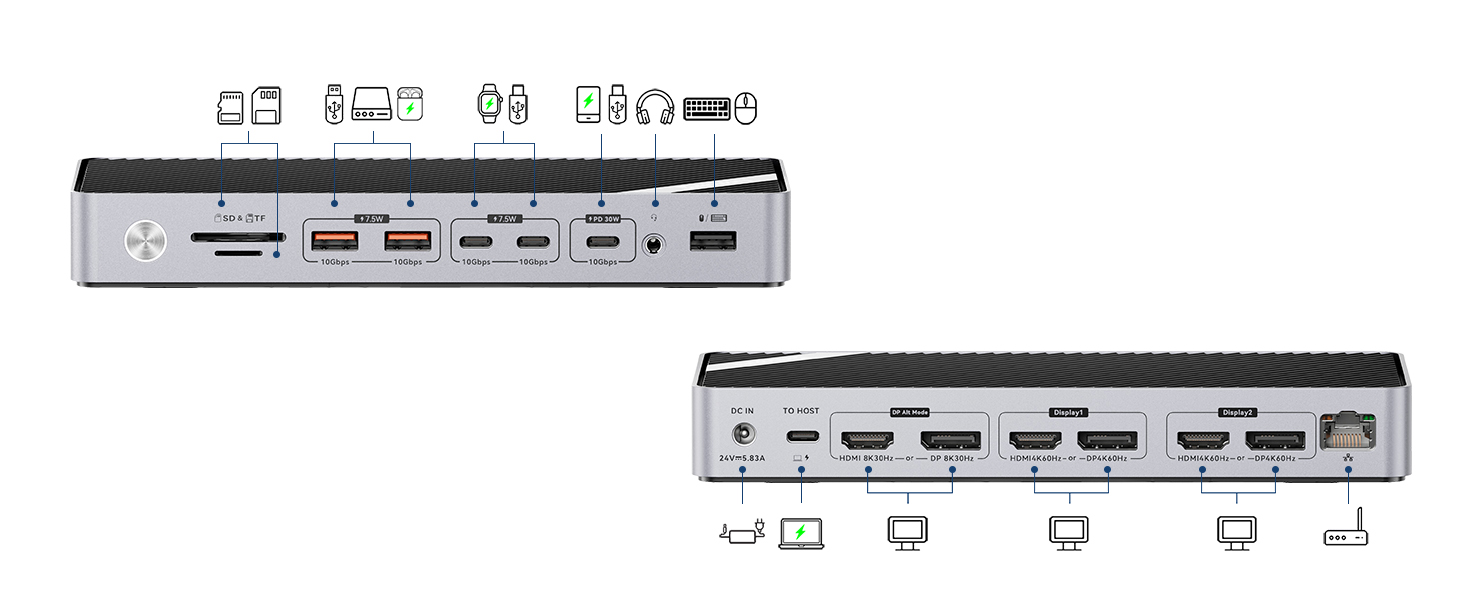
Image: Illustration of a laptop connected to three external monitors via the docking station, showcasing extended display capabilities for Mac and Windows.
5.2. Charging Capabilities
The included 140W power adapter ensures sufficient power for all connected devices.
- Laptop Charging: Provides up to 85W fast charging for your connected laptop via the TO HOST USB-C port.
- Device Charging: The dedicated 30W PD USB-C port can fast charge phones and iPads. Other USB data ports provide 7.5W charging for various peripherals.

Image: The docking station providing 85W charging to a laptop, 30W to a smartphone, and 7.5W to a smartwatch, all simultaneously.
5.3. Data Transfer
The docking station features multiple USB ports for high-speed data transfer:
- 10Gbps USB Ports: Four USB ports (2x USB-A, 2x USB-C) support up to 10Gbps data transfer speeds, ideal for external hard drives, SSDs, and other high-bandwidth devices.
- SD/TF Card Slots: Conveniently transfer data from memory cards.

Image: A desk setup showing the docking station connected to a laptop, charging a phone and smartwatch, and transferring data to an external hard drive and SD card.
6. Compatibility
The Minisopuru MD6950U DisplayLink Docking Station offers broad compatibility:
- Laptops: All laptops with a full-featured USB Type-C port (supporting Display, Charging, and Data Transfer protocols).
- MacBook: Compatible with MacBook Pro/Air (including M1, M2, M3, M4 chips), iMac 24-inch, iMac M3, iMac M4, Mac Mini 2018 and later.
- Thunderbolt: Compatible with Thunderbolt 5/4/3 devices.
- Operating Systems: Windows 10 or later, macOS, Chrome OS, Ubuntu, and Android.
- Note: Does NOT support Linux/Unix.
- USB-A Laptops: The included USB-A converter allows connection to USB-A laptops. However, when using the USB-A converter, the USB-C host port cannot charge USB-A laptops, and ports in DP Alt mode will not function.

Image: A visual representation of the docking station's compatibility with various operating systems and devices, including MacBooks, Windows laptops, and iMacs.
7. Troubleshooting
7.1. Display Issues
- No Display/Incorrect Resolution: Ensure the DisplayLink driver is correctly installed and updated for your operating system. Verify all display cables are securely connected.
- MacBook Display Limitations: For triple display on MacBooks, the DisplayLink driver is essential to bypass native chip limitations.
- DP Alt Mode Not Working with USB-A Converter: If using the USB-A converter, DP Alt Mode display outputs will not function.
7.2. Charging Issues
- Laptop Not Charging: Ensure the 140W power adapter is properly connected to the docking station and a power outlet. Verify the USB-C host cable is securely connected to a full-featured USB-C port on your laptop.
- USB-A Laptop Not Charging: The USB-C host port cannot charge USB-A laptops when using the USB-A converter.
7.3. Data Transfer Issues
- Peripherals Not Recognized: Check that USB devices are securely plugged into the correct ports. Try connecting the device directly to your laptop to rule out device-specific issues.
7.4. General Performance
- Intermittent Connectivity: Ensure all cables are firmly connected. Restarting the docking station and your laptop can resolve temporary issues.
- Heat Dissipation: The docking station is designed with rapid heat dissipation features. Ensure it is placed in a well-ventilated area.
Video: A demonstration of switching between a Windows laptop and a MacBook using a single USB-C cable connected to the Minisopuru MD6950U docking station, showcasing seamless transition of displays and peripherals.
8. Specifications
| Feature | Specification |
|---|---|
| Product Dimensions | 7.7 x 3.4 x 1.1 inches (19.56 x 8.64 x 2.79 cm) |
| Item Weight | 15.9 ounces (451 Grams) |
| Total Ports | 16 |
| Total HDMI Ports | 3 |
| Total DisplayPort Ports | 3 |
| Total USB Ports | 6 (4x 10Gbps, 1x 480Mbps, 1x 30W PD USB-C) |
| Power Adapter Wattage | 140W |
| Laptop Charging (Host) | Up to 85W |
| Hardware Interface | 3.5mm Audio, DisplayPort, HDMI, USB 3.2 Gen 2, USB Type C, Gigabit Ethernet, SD/TF Card Slots |
| Color | Grey |
9. Warranty and Customer Support
Minisopuru is committed to providing excellent products and customer care. This product comes with a 2-year customer service warranty. For technical assistance or product inquiries, please contact our 7/24 technical support team.
For further assistance, please refer to the contact information provided in your detailed User Instructions or visit the official Minisopuru website.

