1. Product Overview
The INKEE GC12 is a 12W Bi-Color Inflatable LED Tube Light designed for professional video recording and photography. It features a wide color temperature range, flexible design, and portable power, making it suitable for various lighting scenarios.

Image 1.1: The INKEE GC12 Inflatable LED Tube Light shown with its included data cable and storage bag.
Key Features:
- 12W Bi-Color LED: Features CRI 95+ lamp beads with an adjustable color temperature range from 2700K to 6500K.
- Inflatable Design: Can be inflated into a 60cm stick light or deflated into a flexible cloth light for versatile styling.
- Multifunctional Air Nozzle: Supports both electric and manual inflation, with easy deflation for storage.
- Built-in Battery: Equipped with an 18.5Wh lithium battery, providing approximately 75 minutes of use at full power. Supports 15W fast charging, reaching full charge in about 120 minutes.
- Durable and Waterproof: Constructed with a high-strength TPU airbag, offering IP66 protection against water and wear.
- Magnetic Mounting: Three built-in N52 magnets allow for secure attachment to iron surfaces.
- Intuitive Display: A 0.96-inch color screen displays working status and lighting modes.
2. What's in the Box
Please check the package contents upon unboxing:
- INKEE GC12 Inflatable LED Tube Light x 1
- USB Data Cable x 1
- User Manual x 1
- Storage Bag x 1
3. Setup
3.1 Initial Charging
Before first use, fully charge the device. Connect the provided USB data cable to the USB Type-C port on the light and to a compatible 15W fast charger (not included). The 0.96-inch color screen will indicate charging status.

Image 3.1: Illustration of the built-in 18.5Wh lithium battery and 15W fast charging capability.
A full charge from 0% typically takes approximately 120 minutes.
3.2 Inflation and Deflation
The GC12 can be used in two forms: inflated as a stick light or deflated as a flexible cloth light.
- To Inflate: Locate the multifunctional air nozzle. You can inflate the light manually by blowing into the nozzle or by using an electric pump. Inflate until the light forms a rigid 60cm stick.
- To Deflate: Press and hold the air nozzle to release the air. Once deflated, the light transforms into a flexible cloth, convenient for storage and alternative lighting setups.

Image 3.2: Demonstrates the multifunctional air nozzle for both mouth blowing and machine pumping to inflate the light.

Image 3.3: The GC12 light shown in its flexible, deflated state and its rigid, inflated stick form, demonstrating its versatility.
3.3 Mounting Options
The GC12 offers several mounting possibilities:
- Magnetic Attachment: Utilize the three built-in N52 magnets to firmly attach the light to any iron brackets or metallic surfaces.
- Flexible Positioning: When deflated, the light can be bent and stretched to conform to various shapes and positions for creative lighting.

Image 3.4: The GC12 light magnetically attached to a camera rig, highlighting the N52 magnets.
4. Operating Instructions
4.1 Power On/Off
Locate the power button on the control panel. Press and hold to power the device on or off.
4.2 Adjusting Color Temperature
The GC12 allows for precise adjustment of color temperature from 2700K (warm light) to 6500K (cool light). Use the dedicated buttons on the control panel to increase or decrease the color temperature. The 0.96-inch color screen will display the current setting.

Image 4.1: Demonstrates the adjustable bi-color temperature range of the GC12, from 6500K to 2700K.
4.3 Adjusting Brightness
Use the brightness control buttons on the panel to adjust the light intensity from 0% to 100%. The current brightness level will be shown on the display screen.
4.4 Understanding the Display Screen
The 0.96-inch color screen provides real-time information about the light's status, including:
- Battery percentage and remaining usage time.
- Current color temperature (K).
- Brightness level (%).
- Working status and selected lighting mode.

Image 4.2: Close-up of the 0.96-inch color screen displaying battery, brightness, and color temperature settings.
5. Maintenance
5.1 Cleaning
To clean the light, gently wipe the exterior with a soft, damp cloth. Avoid using harsh chemicals or abrasive materials that could damage the TPU airbag or control panel.
5.2 Storage
For long-term storage, deflate the light completely and store it in the provided storage bag. This protects the device and saves space.
5.3 Water Resistance
The INKEE GC12 features an IP66 protection level, making it resistant to dust and powerful water jets. It can be used in most harsh environments, including light rain. However, avoid submerging the device in water for extended periods.
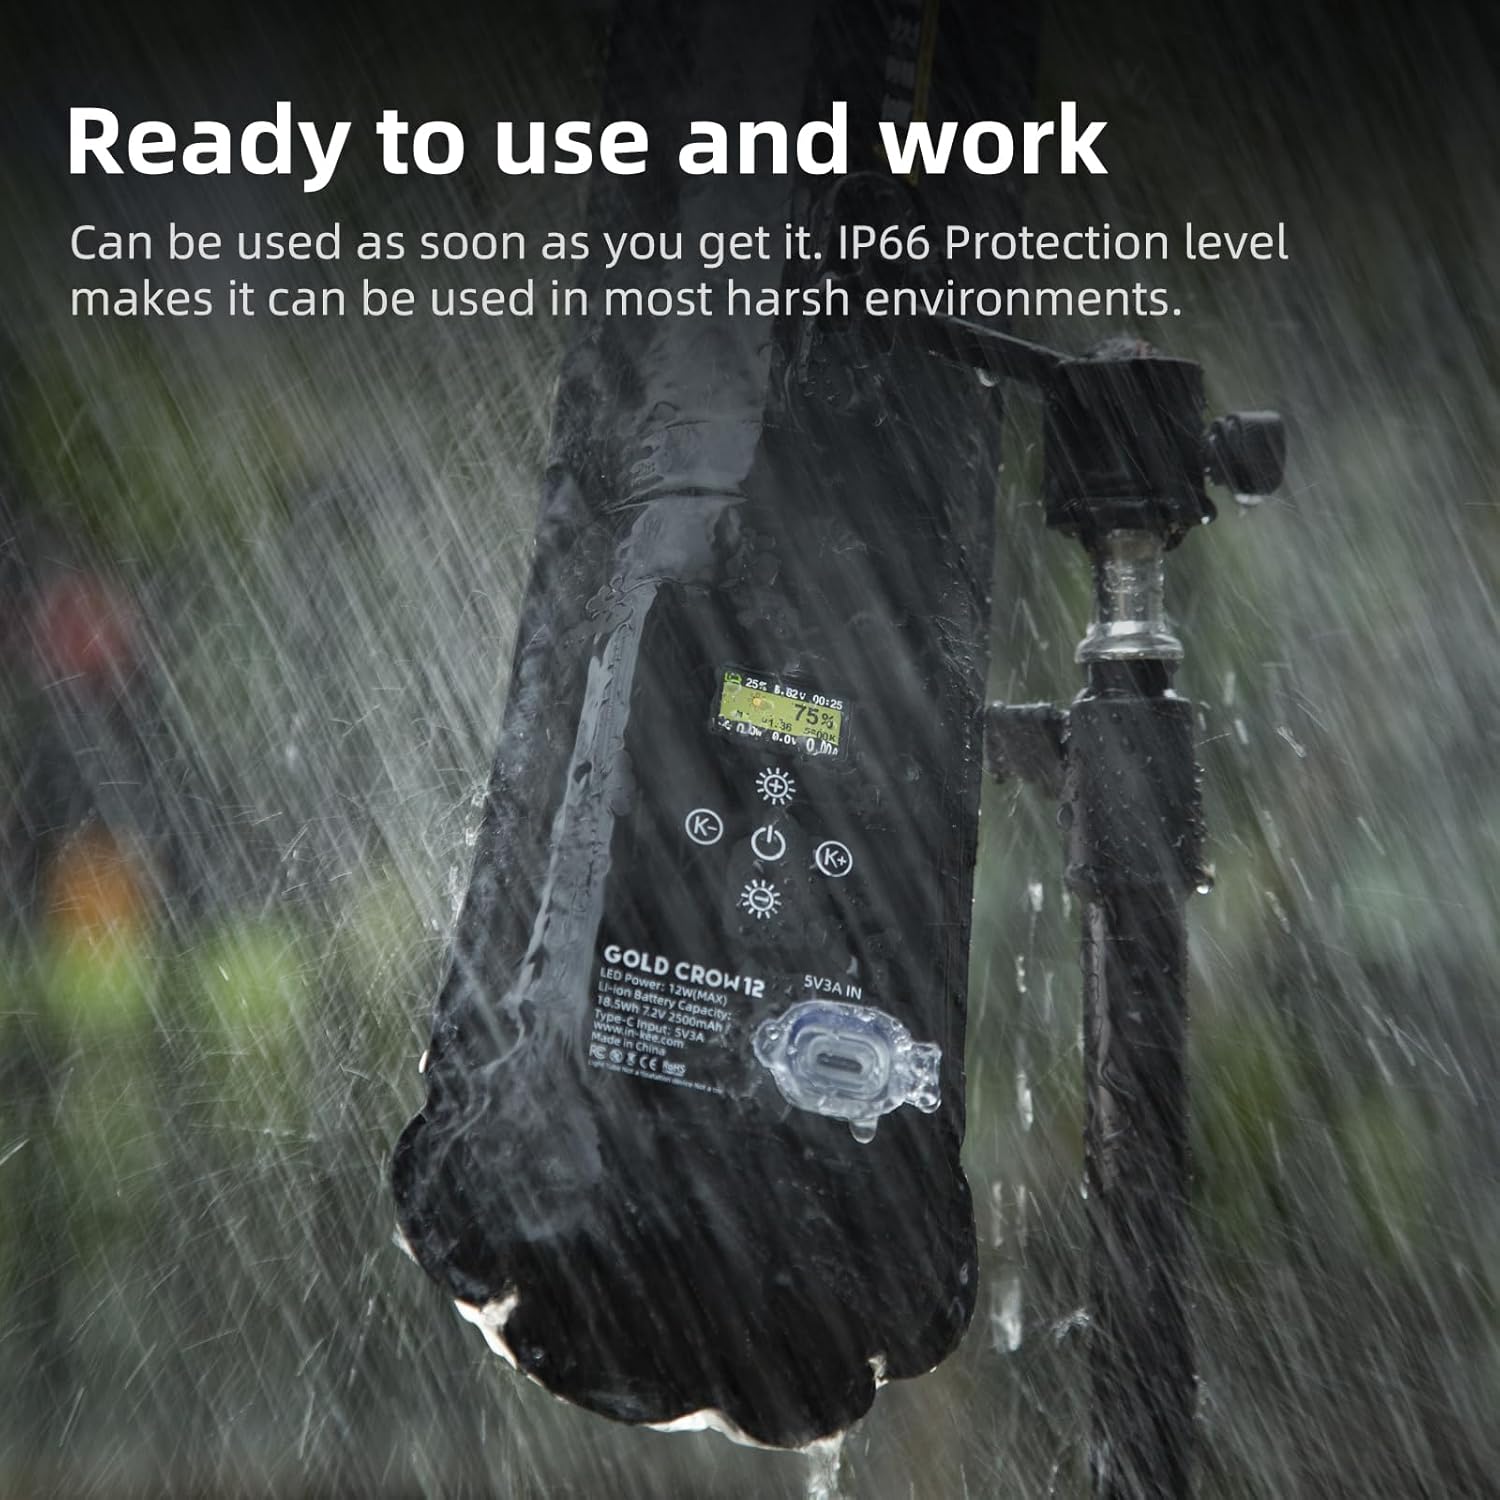
Image 5.1: The GC12 light operating under simulated rain conditions, illustrating its IP66 protection level.
6. Troubleshooting
| Problem | Possible Cause | Solution |
|---|---|---|
| Light does not turn on. | Battery is depleted. | Charge the device using the provided USB data cable and a compatible power adapter. |
| Light does not inflate properly. | Air nozzle not sealed or insufficient air. | Ensure the air nozzle is properly sealed after inflation. Add more air if necessary. |
| Charging is slow or not working. | Incompatible charger or damaged cable/port. | Use a 15W fast charger. Check the USB cable for damage. Ensure the charging port is clean and free of debris. |
| Inconsistent light output. | Low battery or internal issue. | Ensure the battery is sufficiently charged. If the problem persists, contact customer support. |
7. Specifications
| Feature | Detail |
|---|---|
| Model Number | GC12 |
| Power Output | 12W |
| Color Temperature | 2700K-6500K |
| CRI | 95+ |
| Battery Capacity | 18.5Wh Lithium Ion (included) |
| Full Power Usage Time | Approx. 75 minutes |
| Charging Time | Approx. 120 minutes (with 15W fast charger) |
| Charging Interface | USB Type-C |
| Protection Level | IP66 |
| Magnets | 3 x N52 magnets |
| Display Screen | 0.96-inch color screen |
| Item Weight | 10.8 ounces (approx. 306 grams) |
| Package Dimensions | 9.09 x 5.55 x 1.85 inches |
8. Warranty and Support
For warranty information and technical support, please refer to the official INKEE website or contact your retailer. Keep your purchase receipt as proof of purchase for any warranty claims.
For further assistance, please visit: www.inkee.cn (Example link, replace with actual support link if available).


