1. Introduction
This manual provides essential information for the safe and efficient operation of your Sunvivi 20QT Electric Roaster Oven. Please read all instructions carefully before initial use and retain this manual for future reference.

Figure 1: Sunvivi 20QT Electric Roaster Oven with 3-bin buffet server. This appliance is designed for roasting, baking, and keeping food warm.
2. Important Safety Instructions
When using electrical appliances, basic safety precautions should always be followed to reduce the risk of fire, electric shock, and injury to persons, including the following:
- Read all instructions.
- Do not touch hot surfaces. Use handles or knobs.
- To protect against electrical shock, do not immerse cord, plugs, or the main body of the roaster in water or other liquid.
- Close supervision is necessary when any appliance is used by or near children.
- Unplug from outlet when not in use and before cleaning. Allow to cool before putting on or taking off parts.
- Do not operate any appliance with a damaged cord or plug or after the appliance malfunctions or has been damaged in any manner.
- The use of accessory attachments not recommended by the appliance manufacturer may cause injuries.
- Do not use outdoors.
- Do not let cord hang over edge of table or counter, or touch hot surfaces.
- Do not place on or near a hot gas or electric burner, or in a heated oven.
- Extreme caution must be used when moving an appliance containing hot oil or other hot liquids.
- Always attach plug to appliance first, then plug cord into the wall outlet. To disconnect, turn any control to 'OFF', then remove plug from wall outlet.
- Do not use appliance for other than intended use.
3. Product Components
Your Sunvivi Electric Roaster Oven includes the following components:
- Roaster Oven Body (Stainless Steel)
- Removable Enamel Roasting Pan
- Liftable Roasting Rack
- Self-Basting Lid with Handle
- 3-Bin Buffet Server (optional accessory, includes 3 individual trays)

Figure 2: Exploded view of the roaster oven components for assembly and cleaning reference.
4. Setup
- Unpack: Carefully remove all packaging materials and components from the box.
- Initial Cleaning: Before first use, wash the removable roasting pan, roasting rack, and buffet server trays in warm, soapy water. Rinse thoroughly and dry. Wipe the exterior of the roaster body with a damp cloth. Do not immerse the roaster body in water.
- Placement: Place the roaster oven on a stable, level, and heat-resistant surface. Ensure there is adequate ventilation around the appliance.
- Assembly: Insert the removable enamel roasting pan into the roaster oven body. If roasting, place the liftable roasting rack inside the pan. If using the buffet server, place the 3-bin buffet server on top of the roasting pan.
5. Operating Instructions
5.1 Temperature Control
The roaster oven features a full-range temperature control knob, allowing settings from 150°F to 450°F, as well as 'KEEP WARM' and 'DEFROST' functions.
- Temperature Settings: Rotate the knob to select the desired cooking temperature for roasting or baking.
- KEEP WARM: Use this setting to maintain the temperature of cooked food without further cooking. Ideal for buffet serving.
- DEFROST: This setting provides a low, consistent heat to safely defrost frozen items, such as a turkey.

Figure 3: Temperature control dial with settings for Keep Warm, Defrost, and 150-450°F.
5.2 Roasting and Baking
- Place the food (e.g., turkey, chicken, vegetables) on the liftable roasting rack within the removable pan.
- Add any desired liquids (broth, water) to the bottom of the roasting pan, ensuring it does not touch the food on the rack.
- Cover the roaster with the self-basting lid. The lid is designed to circulate moisture, promoting even cooking and juicy results.
- Plug the roaster into a grounded electrical outlet.
- Set the temperature control knob to the desired temperature. The indicator light will illuminate when heating and cycle on/off to maintain the set temperature.
- Monitor cooking progress. Use a meat thermometer to ensure food reaches safe internal temperatures.
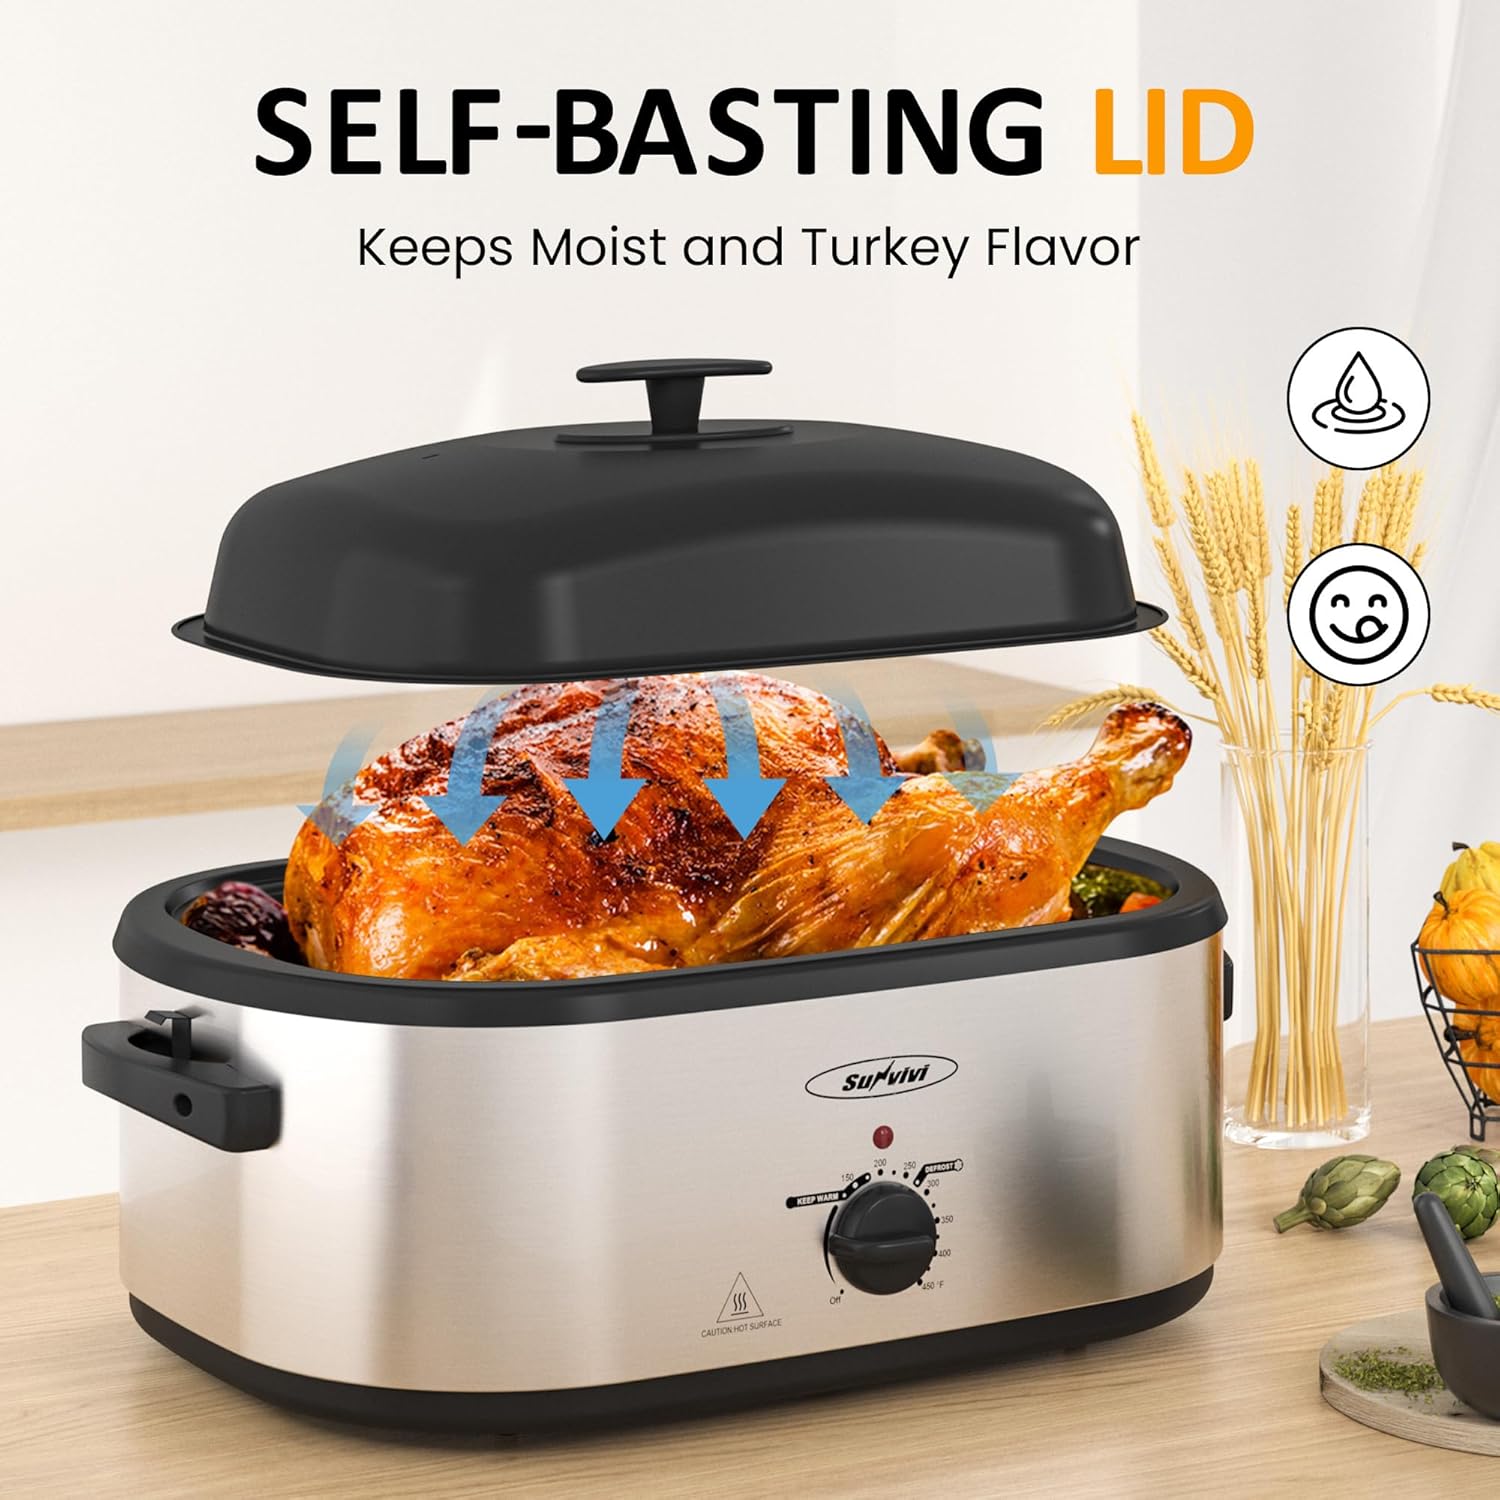
Figure 4: The self-basting lid helps retain moisture during cooking.
Video 1: Demonstration of the Sunvivi Electric Roaster in red, showcasing its cooking capabilities.
5.3 Buffet Server Function
The 3-bin buffet server allows you to keep multiple side dishes warm simultaneously.
- After cooking your main dish in the roasting pan, or if using the roaster solely as a buffet server, ensure the removable pan is in place.
- Place the 3-bin buffet server frame on top of the removable roasting pan.
- Distribute cooked side dishes into the three individual buffet trays.
- Place the filled trays into the buffet server frame.
- Set the temperature control knob to 'KEEP WARM'.
- The buffet server will maintain the food at a serving temperature.

Figure 5: The roaster oven configured with the 3-bin buffet server for keeping multiple dishes warm.
Video 2: Demonstration of the multi-functional use of the roaster oven, including its buffet server feature.
6. Maintenance and Cleaning
Proper maintenance ensures the longevity and performance of your roaster oven.
- Cool Down: Always unplug the appliance and allow it to cool completely before cleaning.
- Removable Parts: The removable enamel roasting pan, roasting rack, and buffet server trays are dishwasher safe for convenient cleaning. Alternatively, wash them in warm, soapy water, rinse, and dry thoroughly.
- Exterior Cleaning: Wipe the exterior of the roaster oven body with a damp cloth. Do not use abrasive cleaners or scouring pads, as these can damage the finish.
- Storage: Ensure all parts are clean and dry before storing. Store the roaster in a cool, dry place.

Figure 6: The removable pan is designed for easy cleaning.
7. Troubleshooting
If you encounter issues with your roaster oven, refer to the following common problems and solutions:
- Appliance does not turn on: Ensure the power cord is securely plugged into a functional electrical outlet. Check if the temperature control knob is set to an active temperature (not 'OFF').
- Food not cooking evenly: Ensure the lid is properly seated. Avoid frequently lifting the lid, as this can cause heat loss. Verify the temperature setting is appropriate for the food being cooked.
- Food is drying out: Utilize the self-basting lid feature. Consider adding more liquid (broth, water) to the bottom of the roasting pan to create steam.
- Indicator light not working: The indicator light cycles on and off to maintain the set temperature. If it never illuminates when the unit is plugged in and set to a temperature, contact customer support.
8. Specifications
| Brand | SUNVIVI |
| Model Name | Electric Roaster Oven |
| Item Model Number | ZER010SL-SV |
| Capacity | 20QT |
| Color | Silver |
| Material | Stainless Steel |
| Product Dimensions | 23.3"D x 12.99"W x 15.6"H |
| Item Weight | 17.31 pounds |
| Temperature Control Range | 150-450°F |
| Special Feature | Cool Touch Exterior |
| Included Components | User Manual, Removable Pan, Roasting Rack, 3-Bin Buffet Server |
9. Warranty and Support
Sunvivi offers a warranty on this product. Please refer to the warranty card included with your purchase for specific terms and conditions, which typically range from 1 to 5 years. For technical support, troubleshooting assistance, or warranty claims, please contact Sunvivi customer service. Contact information can usually be found in the included user manual or on the official Sunvivi website.
The product includes a 365-day free replacement policy for eligible issues.


