1. Introduction
Thank you for purchasing the Andoer V12 1080P Full HD Camcorder. This portable video camera is designed to capture high-quality videos and photos with features such as 16X digital zoom, infrared night vision, face detection, and face beautification. Please read this manual carefully before using the device to ensure proper operation and to maximize its capabilities.

Figure 1.1: Andoer V12 Camcorder with an attached external microphone, showcasing its compact design and front lens.
2. Package Contents
Before proceeding, please verify that all items listed below are included in your package:
- 1 x Andoer V12 Digital Video Camera
- 1 x NP-120 Li-ion Battery (Built-in)
- 1 x USB Cable
- 1 x Camera Bag
- 1 x User Manual (English & Chinese)
Note: A memory card is not included and must be purchased separately. The NP-120 battery is shipped with an insulation paste on its surface; please remove this paste before first use.
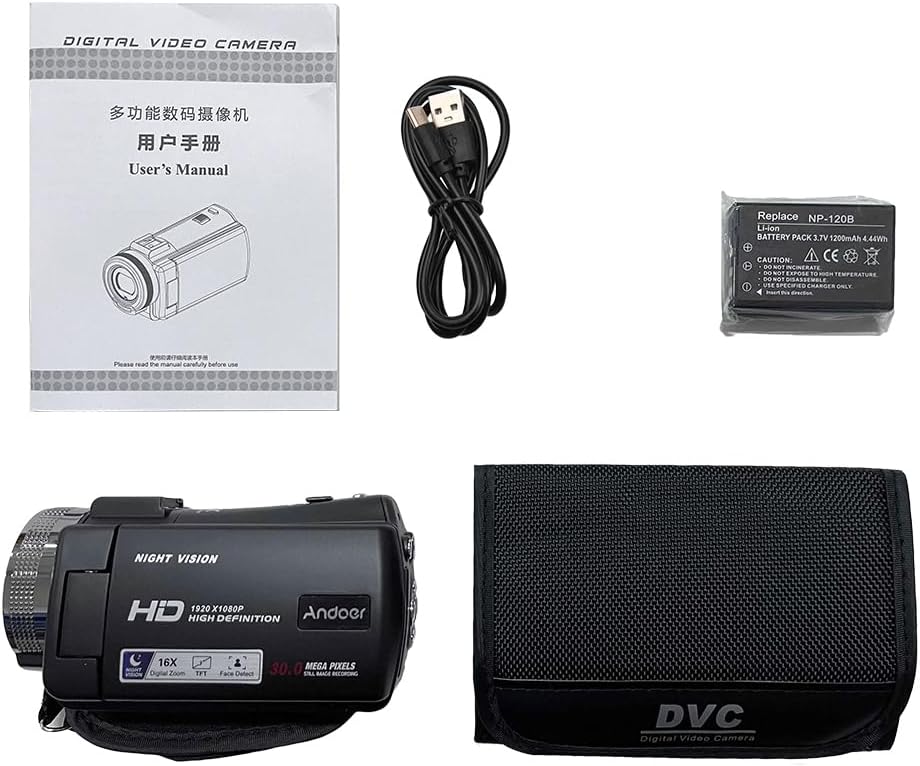
Figure 2.1: The complete package contents of the Andoer V12 Camcorder, showing the camera, user manual, USB cable, NP-120 battery, and camera bag.
3. Setup
3.1 Battery Installation and Charging
- Locate the battery compartment on the camcorder.
- Open the battery compartment cover.
- Insert the NP-120 Li-ion battery, ensuring the correct polarity. Important: Remove the insulation paste from the battery surface before insertion.
- Close the battery compartment cover securely.
- Connect the camcorder to a power source using the provided USB cable (Type-C port) to charge the battery. The charging indicator will illuminate.
3.2 Memory Card Insertion
The Andoer V12 supports TF/High capacity TF cards up to 128GB. Ensure the camcorder is powered off before inserting or removing the memory card.
- Locate the memory card slot, typically on the side or bottom of the camcorder.
- Insert the TF card with the metal contacts facing the correct direction until it clicks into place.
- To remove, gently push the card inward until it springs out.
4. Operating Instructions
4.1 Powering On/Off
- To power on, press and hold the Power button.
- To power off, press and hold the Power button again. The camcorder also features an auto-shutdown function (Off, 1 minute, 3 minutes, 5 minutes, 10 minutes) which can be configured in settings.
4.2 Recording Videos
The V12 supports FHD1080, HD720P, and VGA video resolutions in AVI format.
- Turn on the camcorder.
- Ensure the camcorder is in Video mode (check the mode indicator on the 3.0 inch TFT-LCD screen).
- Press the Record button to start recording. The recording indicator will typically blink.
- Press the Record button again to stop recording.

Figure 4.1: Visual comparison demonstrating the clarity difference between 720P and 1080P video recording on the Andoer V12 camcorder.
4.3 Taking Photos
The V12 captures static photos in JPEG format with resolutions up to 30M (software interpolation).
- Turn on the camcorder.
- Switch to Photo mode.
- Frame your shot using the LCD screen.
- Press the Shutter button to take a photo.
4.4 Special Features
- 16X Digital Zoom: Use the zoom controls (T/W) to magnify or reduce the subject. This feature allows for closer shots without physically moving closer to the subject.

Figure 4.2: Illustration of the 16X digital zoom capability, showing different magnification levels from 4X to 16X.
- Anti-Shake Function: The electronic anti-shake feature helps to stabilize footage, reducing blur caused by camera movement. This is automatically enabled.
- Face Detection & Beautification: The camcorder can detect faces in the frame and automatically apply beautification effects to enhance portraits in both photos and videos.

Figure 4.3: Demonstrates the effect of the face beautification function, showing a comparison between beauty mode off and on.
- Infrared Night Vision: For shooting in low-light or dark environments, activate the infrared night vision function. This allows the camera to capture clear images and videos even without visible light.

Figure 4.4: Explains the IR Night Vision feature, showing how the V12 captures high-definition images in the absence of light.

Figure 4.5: An example of the camcorder being used for infrared night vision shooting, highlighting its effectiveness in dark settings.
- Hot Cold Interface: The camcorder features a cold shoe interface, allowing for the attachment of external accessories such as LED fill lights or infrared night vision lights to adapt to various shooting environments.

Figure 4.6: Illustrates the hot cold shoe interface on the camcorder, designed for attaching external accessories like fill lights.
- Remote Control: The included infrared remote control allows for convenient operation from a distance of over 6 meters.
- White Balance: Adjust white balance settings (Auto/sun/cloudy/light bulb/fluorescent lamp) to ensure accurate color reproduction under different lighting conditions.
- Exposure Compensation: Modify exposure compensation (-3.0EV~+3.0EV) to adjust the brightness of your images and videos.
- Self Timer: Set a delay (Off, 2s, 5s, 10s) before a photo is taken, useful for self-portraits or group shots.
- TV Output: Connect the camcorder to a TV using the appropriate cable (not included) to view your recordings on a larger screen (NTSC/PAL).
5. Maintenance
- Cleaning: Use a soft, dry cloth to clean the camera body. For the lens, use a specialized lens cleaning cloth and solution. Avoid using harsh chemicals.
- Battery Care: Store the battery in a cool, dry place when not in use. Avoid extreme temperatures. If the camera will not be used for an extended period, remove the battery.
- Storage: Store the camcorder in the provided camera bag or a protective case to prevent dust and scratches. Keep it away from direct sunlight, moisture, and strong magnetic fields.
6. Troubleshooting
| Problem | Possible Cause | Solution |
|---|---|---|
| Camcorder does not power on or only works when charging. | Battery insulation paste not removed. Battery is depleted. | Ensure the insulation paste is removed from the NP-120 battery. Charge the battery fully using the USB cable. |
| Cannot record video/take photos. | No memory card inserted. Memory card is full. Memory card error. | Insert a compatible TF card. Delete unnecessary files or replace with a new card. Format the memory card (this will erase all data). |
| Images/videos are blurry. | Lens is dirty. Insufficient lighting. Anti-shake not effective. | Clean the lens. Ensure adequate lighting or use infrared night vision. Hold the camera steady. |
| Remote control not working. | Battery in remote is dead. Obstruction between remote and camera. | Replace remote control battery. Ensure clear line of sight to the camera's IR receiver. |
7. Specifications

Figure 7.1: Diagram illustrating the high-performance CMOS sensor within the Andoer V12, which reduces crosstalk for vivid images.
| Feature | Specification |
|---|---|
| Brand | Andoer |
| Model | V12 |
| Image Sensor | CMOS sensor, max. 30 million pixels (software interpolation) |
| Induction Sensibility | Auto, ISO100, ISO200, ISO400 |
| Storage Media | Support TF/High capacity TF card, max. 128GB |
| Video Lens | Fixed lens, F/3.2, f=7.5mm |
| Focus Range | Normal: 1m~infinity |
| Static Photo Format/Resolution | JPEG; VGA, 2M, 3M, 5M, 7M, 8M, 10M, 12M, 16M, 20M, 30M (software interpolation) |
| Video Clips Format/Resolution | AVI; FHD1080, HD720P, VGA |
| Zoom | 16X digital zoom |
| Anti-Shake Function | Electronic anti-shake |
| Video Voice | Support |
| Face Detection | Support |
| Face Beautification | Support |
| Monitor Screen | 3.0 inch TFT-LCD |
| Infrared Night Vision | Support |
| Infrared Remote Control | Support (>6m) |
| White Balance | Auto/sun/cloudy/light bulb/fluorescent lamp |
| Exposure Compensation | -3.0EV~+3.0EV |
| Self Time | Off, 2s, 5s, 10s |
| Computer Interface | Type-C |
| Auto Shutdown | Off, 1 minute, 3 minutes, 5 minutes, 10 minutes |
| TV Output | Yes, NTSC/PAL |
| Camera Battery | NP-120 Li-ion battery, 3.7V, 1200mAh |
| Item Size | 12 * 6.2 * 6.5cm / 4.7 * 2.4 * 2.6in |
| Item Weight | 292g / 10.3oz |
8. Warranty and Support
For detailed warranty information, please refer to the warranty card or the specific section within the user manual included in your product package. For technical support or further inquiries, please visit the official Andoer website or contact their customer service department. Contact information is typically provided in the physical user manual or on the product packaging.


