Introduction
Thank you for choosing the Luxor Multipurpose Storage Utility Cart. This durable, 3-shelf cart is designed for versatile use in various environments, including schools, offices, warehouses, shops, garages, and cafes. Its robust construction ensures long-lasting performance and easy mobility.
This manual provides essential information for the proper assembly, operation, and maintenance of your new utility cart. Please read all instructions carefully before beginning assembly or use to ensure safe and efficient operation.

Figure 1: Luxor Multipurpose Storage Utility Cart (Black)
Safety Information
- Always ensure the cart is on a stable, level surface before loading items.
- Do not exceed the maximum weight capacity of 400 pounds (evenly distributed).
- Engage the locking brakes on the casters when the cart needs to remain stationary.
- Keep hands and fingers clear of moving parts, especially during assembly and when adjusting the cart.
- Use appropriate tools for assembly as specified in the instructions. A rubber mallet is highly recommended.
- Do not allow children to play on or around the cart.
- Avoid placing hot items directly on the plastic shelves without adequate protection.
Package Contents
Before beginning assembly, verify that all components are present and undamaged. If any parts are missing or damaged, please contact customer support.
- 3 x Structural Foam Plastic Shelves (including top shelf with integrated push handle)
- 8 x Plastic Legs/Poles
- 4 x 4-inch Swivel Casters (2 with locking brakes)

Figure 2: Key Components of the Utility Cart
Assembly Instructions
Assembly of the Luxor Utility Cart is straightforward and typically takes about 10 minutes. A rubber mallet is highly recommended for easier assembly. Some users find that applying a small amount of lubricant (like silicone spray or 3-in-1 oil) to the leg ends can facilitate insertion into the shelves.
- Attach Casters to Bottom Shelf: Insert the four casters into the designated holes on the underside of the bottom shelf. Ensure the two locking casters are placed on the same side for convenient access. Press firmly until they click into place.
- Attach First Set of Legs: Insert four plastic legs into the corner holes of the bottom shelf. Use a rubber mallet to gently tap them into place until they are fully seated and secure.
- Attach Middle Shelf: Align the middle shelf over the top of the four legs. Carefully lower the shelf, ensuring each leg aligns with its corresponding hole. Use a rubber mallet to tap the shelf down evenly on all four corners until it is securely in place.
- Attach Second Set of Legs: Insert the remaining four plastic legs into the corner holes of the middle shelf. Tap them into place with a rubber mallet.
- Attach Top Shelf: Align the top shelf (with the integrated push handle) over the second set of legs. Carefully lower the shelf, ensuring each leg aligns with its corresponding hole. Use a rubber mallet to tap the shelf down evenly on all four corners until it is securely in place.
- Verify Stability: Once assembled, gently push down on each corner of the top shelf to ensure all connections are tight and the cart is stable.
Video 1: Product Overview of the Luxor Utility Cart. This video demonstrates the assembled cart and highlights its features, providing a visual reference for the final product.
Features
- Three Shelf Design: Provides ample storage and transport space.
- Integral Safety Push Handle: Molded into the top shelf for comfortable and secure maneuvering.
- Durable Construction: Legs and shelves are made from injection-molded thermoplastic resin, ensuring they will not scratch, dent, or rust.
- Generous Dimensions: Measures 24"W x 18"D x 34"H, with a 12" shelf clearance for accommodating various items.
- Mobile Design: Equipped with 4" swivel casters, two of which include locking brakes for stability.
- High Weight Capacity: Supports up to 400 lbs. (evenly distributed).
- Made in the USA: Ensures quality manufacturing standards.

Figure 3: Utility Cart in Use
Specifications
| Attribute | Detail |
|---|---|
| Product Dimensions | 18"D x 24"W x 34"H |
| Material | High Density Polyethylene (HDPE) |
| Color | Black |
| Number of Shelves | 3 |
| Shelf Clearance | 12 inches |
| Caster Type | 4" swiveling casters (2 locking) |
| Weight Limit | 400 Pounds (evenly distributed) |
| Item Weight | 20 Pounds |
| Assembly Required | Yes |
| Model Number | HE34-B |
| UPC | 812552016961 |
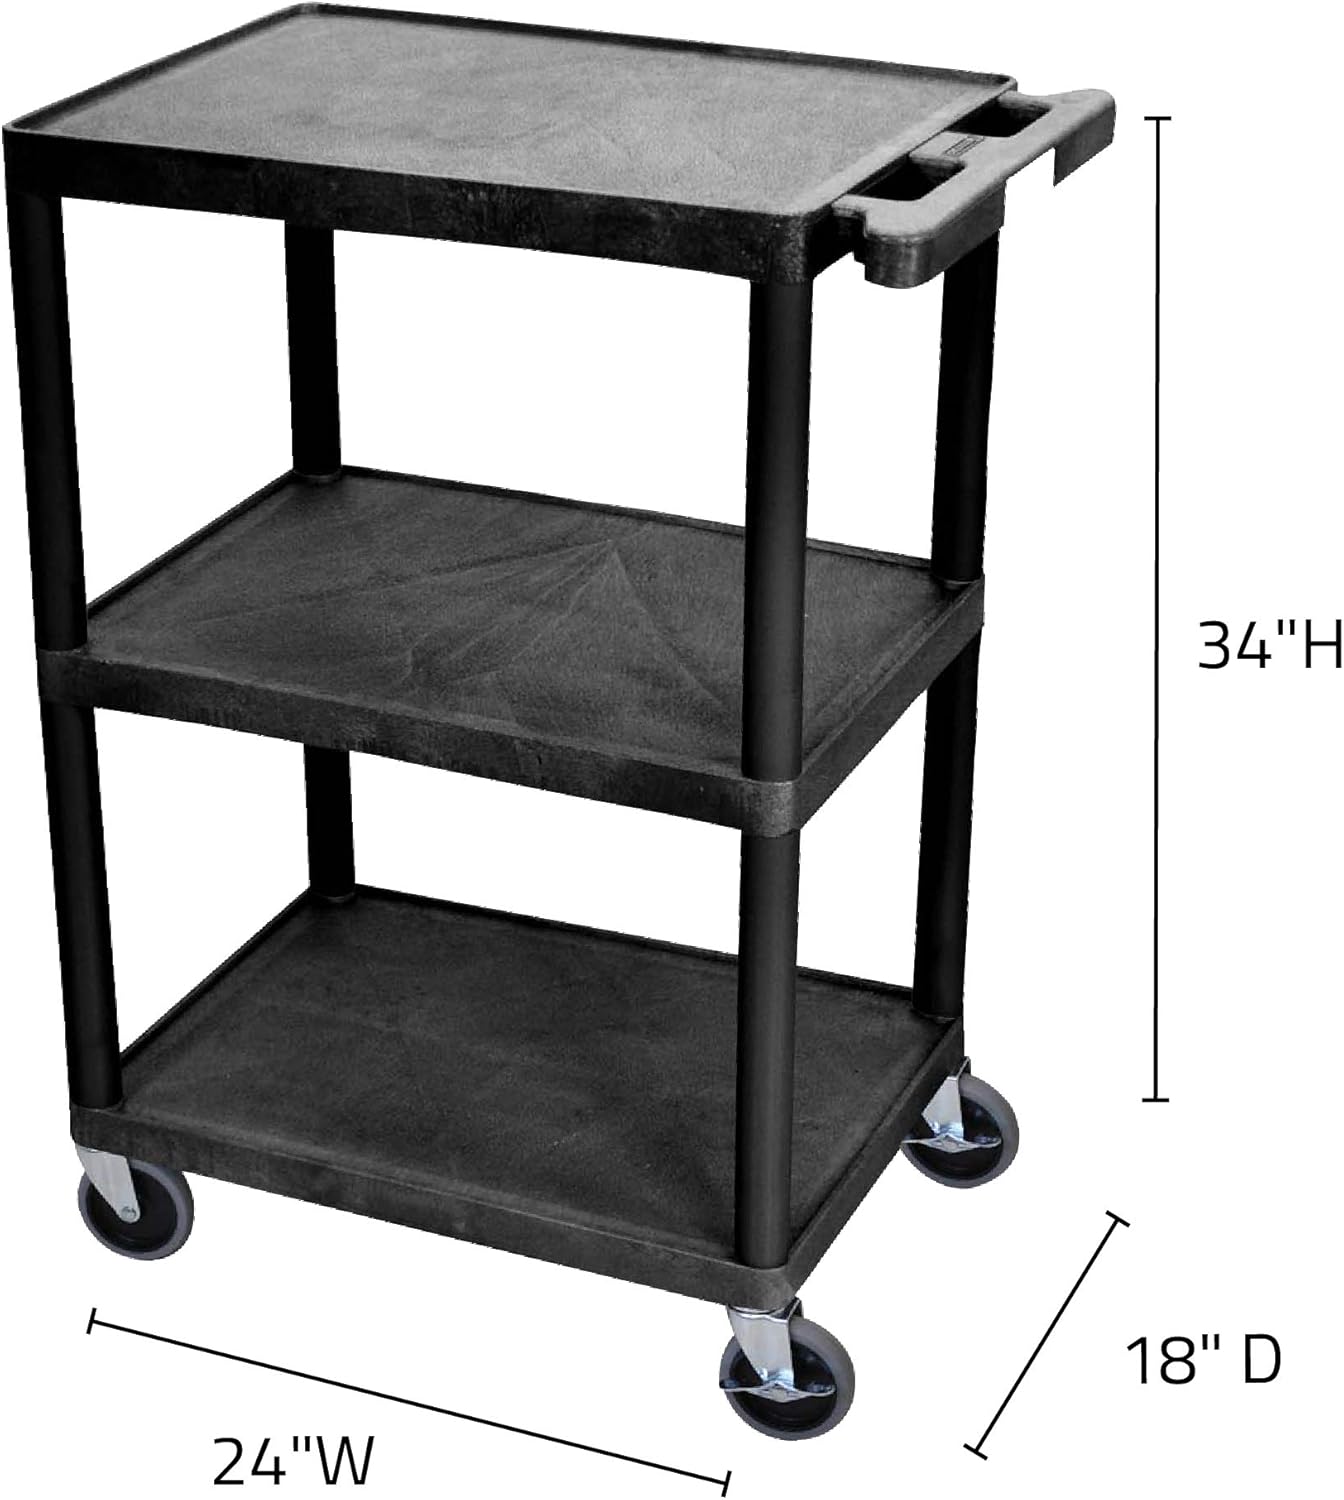
Figure 4: Cart Dimensions
Operating Instructions
- Moving the Cart: To move the cart, disengage the locking brakes on the casters. Use the integrated push handle on the top shelf to guide the cart to your desired location.
- Securing the Cart: Once the cart is in position, engage the locking brakes on the two designated casters to prevent unintended movement.
- Loading Items: Place items evenly across the shelves to maintain balance and prevent tipping. The shelves feature a .25" retaining lip to help secure items during transport.
- Unloading Items: Ensure the cart is secured with the brakes engaged before removing items.
Maintenance
- Cleaning: The thermoplastic resin shelves and legs can be easily cleaned with a damp cloth and mild soap. Avoid abrasive cleaners that may damage the surface.
- Caster Care: Periodically check the casters for any debris (e.g., hair, lint) that may impede their movement. Clean as necessary. Lubricate the swivel mechanisms if they become stiff.
- Structural Integrity: Regularly inspect all connections to ensure they remain secure. If any part appears loose, gently tap it back into place with a rubber mallet.
Troubleshooting
| Problem | Possible Cause | Solution |
|---|---|---|
| Difficulty during assembly (legs not fitting into shelves) | Tight fit by design for stability. | Use a rubber mallet to firmly tap components into place. Applying a small amount of silicone spray or 3-in-1 oil to the leg ends can also help. |
| Cart is unstable or wobbly | Components not fully seated. | Ensure all legs are fully inserted into the shelves. Use a rubber mallet to secure any loose connections. |
| Casters not rolling smoothly | Debris in caster mechanism or lack of lubrication. | Clean any debris from the caster wheels and swivel mechanisms. Apply a silicone-based lubricant if necessary. |
| Shelves appear to bow or sag | Overloading or uneven weight distribution. | Ensure weight does not exceed the 400 lb. capacity and is distributed evenly across the shelves. |
Warranty and Support
The Luxor Multipurpose Storage Utility Cart comes with a Lifetime Warranty, ensuring long-term reliability and peace of mind. This warranty covers defects in materials and workmanship under normal use.
For warranty claims, technical support, or any questions regarding your product, please contact Luxor customer service. You can typically find contact information on the manufacturer's official website or through your point of purchase.
For more information, visit the official Luxor website: www.luxorworkspaces.com


