1. Introduction
The Irfora W2023 Electronic Humidity Controller is an intelligent digital device designed for precise humidity management. It features a clear 1.0-inch LCD display and two control buttons for easy operation. Equipped with a high-precision humidity sensor, this controller can accurately measure and regulate ambient humidity. It supports both humidification and dehumidification modes, making it suitable for a wide range of applications such as egg incubators, greenhouse planting, and humidity control in storage areas or computer rooms.
2. Package Contents
Please verify that all items are present in the package:
- 1 x Irfora W2023 Electronic Humidity Controller
- 1 x Humidity Sensor (integrated)
- 1 x Power Cord (US Plug variant)
- 1 x Instruction Manual (English)
- Accessories: Suction cup, screws (for mounting options)
Video: This video demonstrates the appearance of the humidity controller and its included accessories, such as the sensor, power cord, and mounting hardware.
3. Specifications
| Parameter | Value |
|---|---|
| Product Name | Digital Humidity Controller |
| Item Model Number | W2023 |
| Power Supply Voltage | AC 110-220V |
| Humidity Measurement Range | 0%RH - 99%RH |
| Humidity Control Accuracy | 0.1%RH |
| Output Type | Direct Output |
| Output Power | 1500W |
| Output Capacity | Max. 10A |
| Appearance Size | 118 * 60 * 33mm (4.65 * 2.36 * 1.30 inches) |
| Item Weight | 160g (5.64 oz) |

Image: Detailed technical specifications of the Irfora W2023 Humidity Controller, including model number, power, and dimensions.
4. Setup
Follow these steps to set up your humidity controller:
- Mounting: The controller can be wall-mounted using the provided screws or attached to a smooth surface using the suction cup. Ensure the mounting location is stable and allows for easy access to the display and buttons.
- Sensor Placement: Connect the humidity sensor to the controller. Place the sensor in the environment where humidity needs to be monitored and controlled. Ensure the sensor is not directly exposed to water or extreme conditions that could affect its accuracy.
- Power Connection: Plug the controller's power cord into a suitable 110-220V AC power outlet.
- Device Connection: Plug your humidification or dehumidification device (e.g., humidifier, dehumidifier) into the output socket of the controller.

Image: The Irfora W2023 Humidity Controller, illustrating the US plug type.
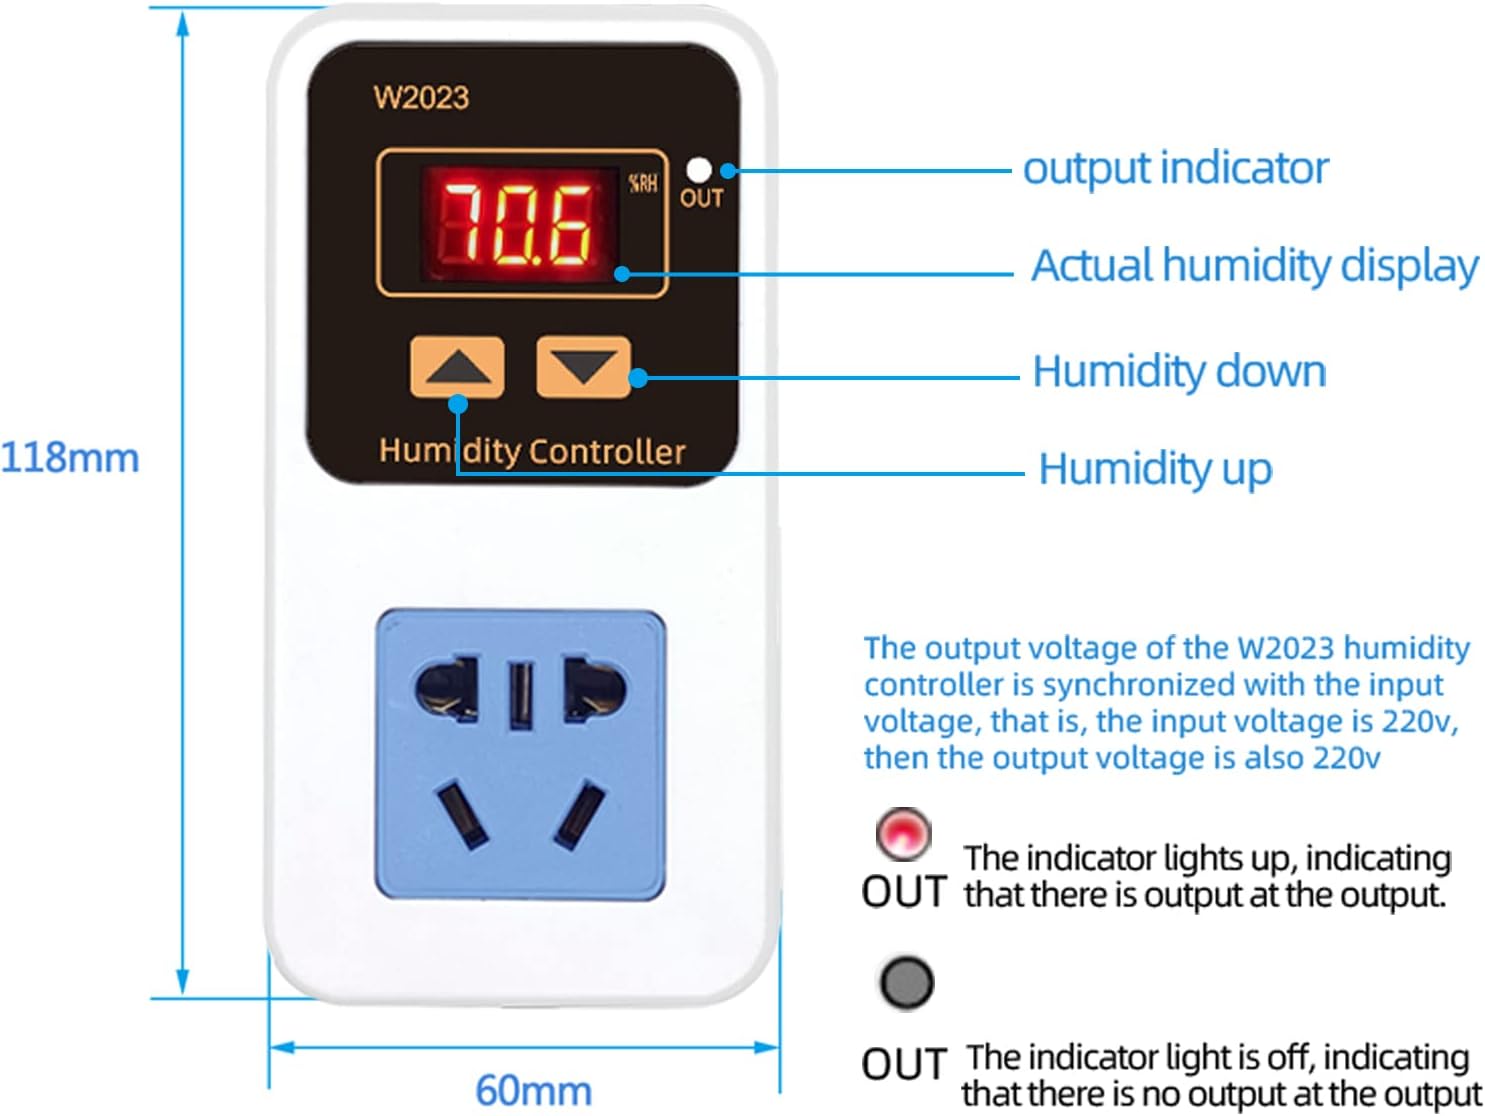
Image: Front view of the controller, detailing the display and button functions.
5. Operating Instructions
The controller automatically determines the operating mode (humidification or dehumidification) based on your set start and stop humidity values.
5.1 Setting Humidification Mode
Humidification mode is activated when the Start Humidity < Stop Humidity.
- Set Start Humidity: Long press the 'Up' button. When the display flashes, use the 'Up' and 'Down' buttons to adjust the desired starting humidity value.
- Set Stop Humidity: Long press the 'Down' button. When the display flashes, use the 'Up' and 'Down' buttons to adjust the desired stopping humidity value.
- The controller will automatically save the settings after flashing for three seconds.
Example: To control a humidifier to stop at 65%RH and restart at 50%RH:
- First, ensure the controller is in humidification mode (Start Humidity < Stop Humidity).
- Press and hold the 'Up' button to set the startup humidity to 50%RH. The display will flash, then automatically return after three seconds.
- Press and hold the 'Down' button to set the stop humidity to 65%RH. The display will flash, then automatically save and exit after three seconds.
5.2 Setting Dehumidification Mode
Dehumidification mode is activated when the Start Humidity > Stop Humidity.
- Set Start Humidity: Long press the 'Up' button. When the display flashes, use the 'Up' and 'Down' buttons to adjust the desired starting humidity value.
- Set Stop Humidity: Long press the 'Down' button. When the display flashes, use the 'Up' and 'Down' buttons to adjust the desired stopping humidity value.
- The controller will automatically save the settings after flashing for three seconds.
Example: To control a dehumidifier to stop at 26%RH and restart at 28%RH:
- First, ensure the controller is in dehumidification mode (Start Humidity > Stop Humidity).
- Press and hold the 'Up' button to set the startup humidity to 28%RH. The display will flash, then automatically return after three seconds.
- Press and hold the 'Down' button to set the stop humidity to 26%RH. The display will flash, then automatically save and exit after three seconds.

Image: Visual representation of how the controller automatically identifies humidification or dehumidification mode based on set humidity values.

Image: Step-by-step guide for setting humidification and dehumidification parameters.
Video: This video demonstrates the operational settings for a similar temperature and humidity controller, including setting temperature, humidity, and timer functions.
6. Applications
The Irfora W2023 Humidity Controller is versatile and can be used in various settings:
- Incubation Breeding: Maintain precise humidity levels for successful egg hatching.
- Greenhouse/Vegetable Planting: Optimize humidity for plant growth and health.
- Aquaculture Farms: Control humidity for aquatic environments.
- Warehouses/Computer Rooms: Prevent moisture damage and ensure optimal operating conditions for sensitive equipment.

Image: Examples of the humidity controller in use for incubation, greenhouse, computer room, and farm applications.
7. Maintenance
To ensure optimal performance and longevity of your Irfora W2023 Electronic Humidity Controller:
- Cleaning: Regularly wipe the controller and sensor with a soft, dry cloth. Avoid using abrasive cleaners or solvents.
- Sensor Care: Keep the humidity sensor clean and free from dust or debris. Do not immerse the sensor in water.
- Storage: If storing the device for an extended period, disconnect it from power and store it in a cool, dry place.
8. Troubleshooting
If you encounter issues with your humidity controller, refer to the following common problems and solutions:
- No Power/Display Off: Check if the power cord is securely plugged into a live outlet. Ensure there are no power outages.
- Inaccurate Readings: Verify the sensor is clean and properly placed. Avoid placing the sensor near heat sources, direct sunlight, or areas with poor air circulation.
- Device Not Activating: Confirm that your humidification/dehumidification device is correctly plugged into the controller's output socket and is functioning independently. Check your set start and stop humidity values to ensure they are configured correctly for the desired mode (humidification or dehumidification).
- Output Indicator Not Lighting Up: If the output indicator (OUT) is not lit when the connected device should be active, check the set humidity parameters. The indicator lights up when there is output at the output socket.
If problems persist, please contact customer support.
9. Safety Information
Please read and follow these safety precautions:
- Do not operate the device with wet hands.
- Do not disassemble or modify the controller.
- Keep the device away from water and high humidity environments (other than the sensor tip).
- Ensure the power supply voltage matches the device's requirements (110-220V).
- Do not exceed the maximum output capacity of 10A / 1500W.
10. Warranty and Support
For warranty information or technical support, please refer to the product packaging or contact the retailer where the product was purchased. Keep your proof of purchase for warranty claims.
