1. Introduction
This user manual provides detailed instructions for the ASRock WRX90 WS EVO motherboard. It covers essential information for proper installation, configuration, operation, and maintenance of your system. Please read this manual thoroughly before installing or operating the motherboard to ensure optimal performance and prevent damage.
The ASRock WRX90 WS EVO is a high-performance workstation motherboard designed to support AMD Ryzen Threadripper PRO processors, offering robust features for demanding computing tasks.
2. Product Overview
The ASRock WRX90 WS EVO motherboard is engineered for professional workstations, featuring advanced power delivery, extensive connectivity, and support for high-speed memory and storage.
Key Features:
- Supports AMD Ryzen Threadripper PRO Processors.
- Robust 18+3+3 Power Phase Design with 110A SPS for VCore.
- Eight DDR5 DIMM slots supporting eight-channel ECC Registered memory, with speeds up to 7600+ MHz (OC).
- Seven PCIe 5.0 x16 slots for high-performance expansion cards.
- Integrated Realtek ALC1220 7.1 CH HD Audio with Nahimic Audio enhancement.
- Multiple high-speed storage options including Blazing M.2 (PCIe Gen5 x4), Hyper M.2 (PCIe Gen4 x4), MCIO, and SlimSAS connectors.
- Comprehensive USB connectivity including USB4 Type-C, USB 3.2 Gen2x2 Type-C, USB 3.2 Gen2 Type-A, USB 3.2 Gen1, and USB 2.0 ports.
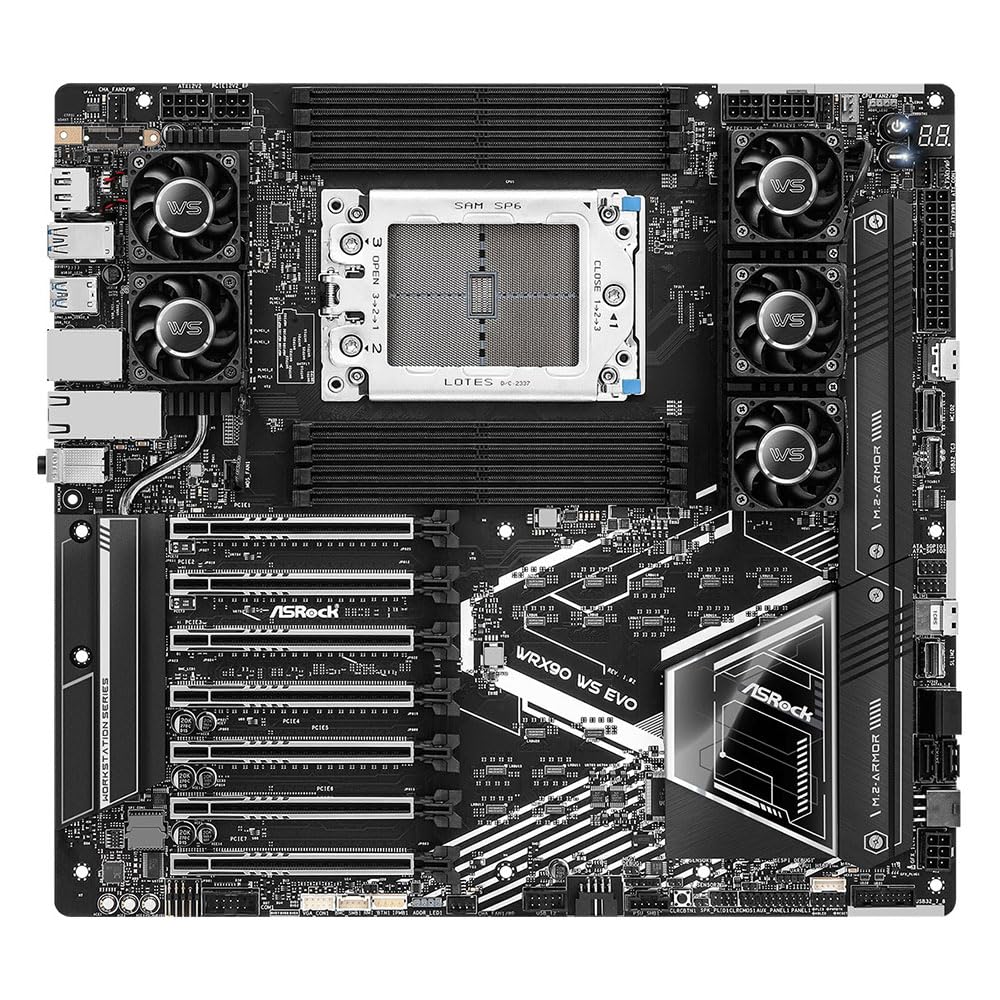
Figure 1: Top-down view of the ASRock WRX90 WS EVO motherboard. This image highlights the central sTRX4 CPU socket, surrounded by eight DDR5 DIMM slots and multiple cooling fan assemblies. The seven PCIe 5.0 x16 slots are visible at the bottom, along with various connectors and heatsinks.

Figure 2: Angled view of the ASRock WRX90 WS EVO motherboard. This perspective provides a clearer look at the integrated heatsinks for VRMs and M.2 drives, as well as the general layout of the board's components, including the CPU socket and PCIe slots.

Figure 3: Rear I/O panel of the ASRX90 WS EVO motherboard. This image details the available ports, including multiple USB ports (Type-A and Type-C, including USB4), dual Ethernet ports, and audio jacks, providing extensive connectivity options.
3. Setup and Installation
Proper installation is crucial for the stability and performance of your system. Follow these steps carefully.
3.1 Safety Precautions
- Always disconnect the power supply from the wall outlet before handling any components.
- Wear an anti-static wrist strap or frequently touch a grounded metal object to discharge static electricity.
- Handle components by their edges to avoid touching sensitive parts.
3.2 Component Installation
- CPU Installation: Carefully open the sTRX4 socket retention mechanism. Align the AMD Ryzen Threadripper PRO processor with the socket, ensuring the triangular mark on the CPU matches the mark on the socket. Gently place the CPU into the socket and secure the retention mechanism.
- CPU Cooler Installation: Install a compatible CPU cooler designed for the sTRX4 socket. Ensure proper thermal paste application and secure mounting.
- Memory (RAM) Installation: Open the clips on the DDR5 DIMM slots. Insert DDR5 ECC Registered memory modules firmly until the clips snap into place. For optimal performance, populate memory in a balanced configuration across the eight channels as recommended in the full manual.
- Storage Device Installation: Install M.2 SSDs into the Blazing M.2 or Hyper M.2 slots, securing them with the provided screws or retention mechanisms. Connect SATA drives to the SATA3 ports. For MCIO and SlimSAS connectors, refer to the full manual for specific cabling instructions.
- Expansion Card Installation: Insert PCIe 5.0 x16 expansion cards (e.g., graphics cards, network cards) into the desired PCIe slots, ensuring they are fully seated and secured with the case's retention clips.
- Power Supply Connection: Connect the 24-pin ATX power connector and the 8-pin/4-pin CPU power connectors from your power supply to the motherboard. Important: Ensure all necessary PCIe power cables (including any supplemental 6-pin or 8-pin PCIe power connectors on the motherboard itself, if present) are connected to provide adequate power to the PCIe slots, especially when using multiple high-power expansion cards.
- Front Panel Connections: Connect the front panel headers (power button, reset button, USB ports, audio jacks, LED indicators) to their respective pins on the motherboard. Refer to the motherboard layout diagram in the full manual for exact pin locations.
- Mounting: Secure the motherboard into your PC case using the appropriate standoffs and screws.
4. Operating Instructions
Once all components are installed and connected, you can proceed with initial system startup and configuration.
4.1 Initial Power On
- Connect your monitor, keyboard, and mouse.
- Connect the power supply to a wall outlet and turn on the power supply switch.
- Press the power button on your PC case.
4.2 BIOS/UEFI Setup
Upon initial boot, press the designated key (usually Del or F2) to enter the BIOS/UEFI setup utility. Here you can configure system settings such as boot order, memory profiles, CPU settings, and enable/disable integrated peripherals.
4.3 Operating System Installation
Insert your operating system installation media (USB drive or DVD) and follow the on-screen prompts to install your preferred operating system. After installation, install all necessary drivers from the ASRock website or the included driver CD/USB for optimal performance.
4.4 IPMI (Intelligent Platform Management Interface)
This motherboard features IPMI for remote management. Refer to the dedicated IPMI manual or ASRock's support website for detailed instructions on configuring and utilizing IPMI functionalities, such as remote power control, system monitoring, and KVM over IP.
5. Maintenance
Regular maintenance helps ensure the longevity and stable operation of your motherboard and system.
- Dust Removal: Periodically clean dust from inside your PC case, especially from fans, heatsinks, and ventilation areas, using compressed air. Ensure the system is powered off and unplugged before cleaning.
- BIOS/UEFI Updates: Check the ASRock website regularly for BIOS/UEFI updates. Updates can improve system stability, compatibility, and performance. Follow ASRock's instructions carefully when performing BIOS/UEFI updates.
- Driver Updates: Keep your device drivers updated to ensure compatibility and optimal performance with your operating system and hardware.
- CMOS Battery: The motherboard uses a CR2032 battery for the CMOS. If you experience issues with BIOS settings resetting, the battery may need replacement.
6. Troubleshooting
If you encounter issues, refer to the following common troubleshooting steps.
6.1 No Power / No POST (Power-On Self-Test)
- Check Power Connections: Ensure the 24-pin ATX and 8-pin/4-pin CPU power connectors are securely seated. Verify that any supplemental PCIe power connectors on the motherboard are also connected, as these are crucial for PCIe slot functionality.
- Verify Components: Ensure the CPU, RAM, and graphics card (if used) are correctly installed and seated.
- Clear CMOS: Refer to the full manual for instructions on how to clear the CMOS, which can resolve boot issues caused by incorrect BIOS settings.
- Minimal Boot: Try booting with only essential components (CPU, one RAM stick, graphics card if no integrated graphics) to isolate the issue.
6.2 System Instability / Crashes
- Check Temperatures: Monitor CPU and GPU temperatures to ensure components are not overheating.
- Memory Test: Run a memory diagnostic tool to check for faulty RAM modules.
- Driver Issues: Ensure all drivers are up-to-date and correctly installed.
- Power Supply: Verify your power supply unit (PSU) has sufficient wattage and is functioning correctly.
6.3 IPMI Issues
If IPMI functionality is not working as expected, ensure the dedicated IPMI LAN port is connected and configured correctly. Check for firmware updates for the IPMI controller on the ASRock support website. If issues persist, consult ASRock technical support.
7. Specifications
Below are the technical specifications for the ASRock WRX90 WS EVO motherboard.
| Feature | Specification |
|---|---|
| Model Name | WRX90 WS EVO |
| CPU Socket | sTRX4 |
| Compatible Processors | AMD Ryzen Threadripper PRO |
| Chipset Type | AMD WRX90 |
| RAM Memory Technology | DDR5 ECC Registered |
| Memory Slots | 8 x DDR5 DIMMs (Eight Channel) |
| Max Memory Speed | Up to 7600+ MHz (OC) |
| PCIe Slots | 7 x PCIe 5.0 x16 |
| Audio | Realtek ALC1220 7.1 CH HD Audio, Nahimic Audio |
| SATA Ports | 4 x SATA3 |
| M.2 Slots | 1 x Blazing M.2 (PCIe Gen5 x4), 1 x Hyper M.2 (PCIe Gen4 x4) |
| MCIO Connectors | 2 x MCIO (PCIe Gen5 x4 / 4 SATA3) |
| SlimSAS Connectors | 2 x SlimSAS SFF-8654 (PCIe Gen4 x4, one with 4 SATA3) |
| Rear USB Ports | 2 x USB4 Type-C, 4 x USB 3.2 Gen2 Type-A, 2 x USB 3.2 Gen1 |
| Front USB Ports | 1 x USB 3.2 Gen2x2 Type-C, 2 x USB 3.2 Gen1, 4 x USB 2.0 |
| CMOS Battery | 1 x CR2032 |
| Item Weight | 6.8 pounds |
8. Warranty Information
For detailed warranty terms and conditions, please refer to the warranty card included with your product or visit the official ASRock website. Warranty coverage typically includes defects in materials and workmanship under normal use. Keep your proof of purchase for warranty claims.
9. Support
For further assistance, technical support, driver downloads, BIOS updates, and FAQs, please visit the official ASRock support website:
https://www.asrock.com/support
You may also contact ASRock customer service directly through the contact information provided on their website.


