1. Introduction
This manual provides detailed instructions for the installation, operation, and maintenance of your Thermalright Frozen Warframe 240 Black ARGB AIO CPU Cooler. This all-in-one liquid cooling system is designed to provide efficient heat dissipation for your CPU, featuring an integrated IPS LCD screen for real-time monitoring and customization.
Please read this manual thoroughly before installation to ensure proper setup and optimal performance. Keep this manual for future reference.

Figure 1: Thermalright Frozen Warframe 240 Black ARGB AIO CPU Cooler.
2. Safety Information
WARNING: Failure to follow these safety instructions may result in damage to the product, personal injury, or voiding of the warranty.
- Ensure your computer system is powered off and unplugged from the wall outlet before installation or maintenance.
- Handle components with care to avoid damage.
- Do not open the liquid cooler pump or radiator. There are no user-serviceable parts inside.
- Keep the product away from liquids and excessive humidity.
- Do not attempt to modify the product. Unauthorized modifications may cause damage and void the warranty.
- Ensure all cables are connected securely and correctly to prevent electrical shorts or malfunctions.
3. Package Contents
Verify that all components listed below are present in your package:
- Thermalright Frozen Warframe 240 AIO CPU Cooler (Radiator, Pump/Water Block with LCD, Tubing)
- 2x TL-P12-S 120mm PWM ARGB Fans
- Mounting Hardware for Intel Sockets (LGA1150/1151/1155/1156/1200/2011/2066/1700)
- Mounting Hardware for AMD Sockets (AM4/AM5)
- Thermal Paste
- Fan Screws
- Controller/Cables for ARGB and LCD (USB 9PIN)
- User Manual (this document)

Figure 2: Cooler installed in a PC system, highlighting the integrated LCD screen and ARGB fans.
4. Technical Specifications
| Component | Parameter | Value |
|---|---|---|
| Radiator | Dimensions | 277 x 120 x 27 mm |
| Material | Aluminum | |
| Water Tube Protection | Polymer protective water pipe | |
| Pump / Water Block | Cold Head Size | 69.2 x 69.2 x 60 mm |
| Pump Speed | 3000 RPM ± 10% | |
| Operating Noise | ≤ 23 dBA | |
| Interface | PWM 4-pin | |
| Power | ≤ 3.4 W | |
| Fans (TL-P12-S) | Fan Size | 120 x 120 x 25 mm |
| Fan Speed | 2000 RPM ± 10% | |
| Voltage | DC 12V | |
| Current | 0.17 A | |
| Air Pressure | 2.63 mm H2O | |
| Airflow | 70.84 CFM | |
| Operating Noise | ≤ 22.1 dBA | |
| Compatibility | Intel Sockets | LGA1150/1151/1155/1156/1200/2011/2066/1700 |
| AMD Sockets | AM4/AM5 | |
| LCD Screen | Resolution | 320 x 240 |
| Interface | USB 9-pin (for power and data) |
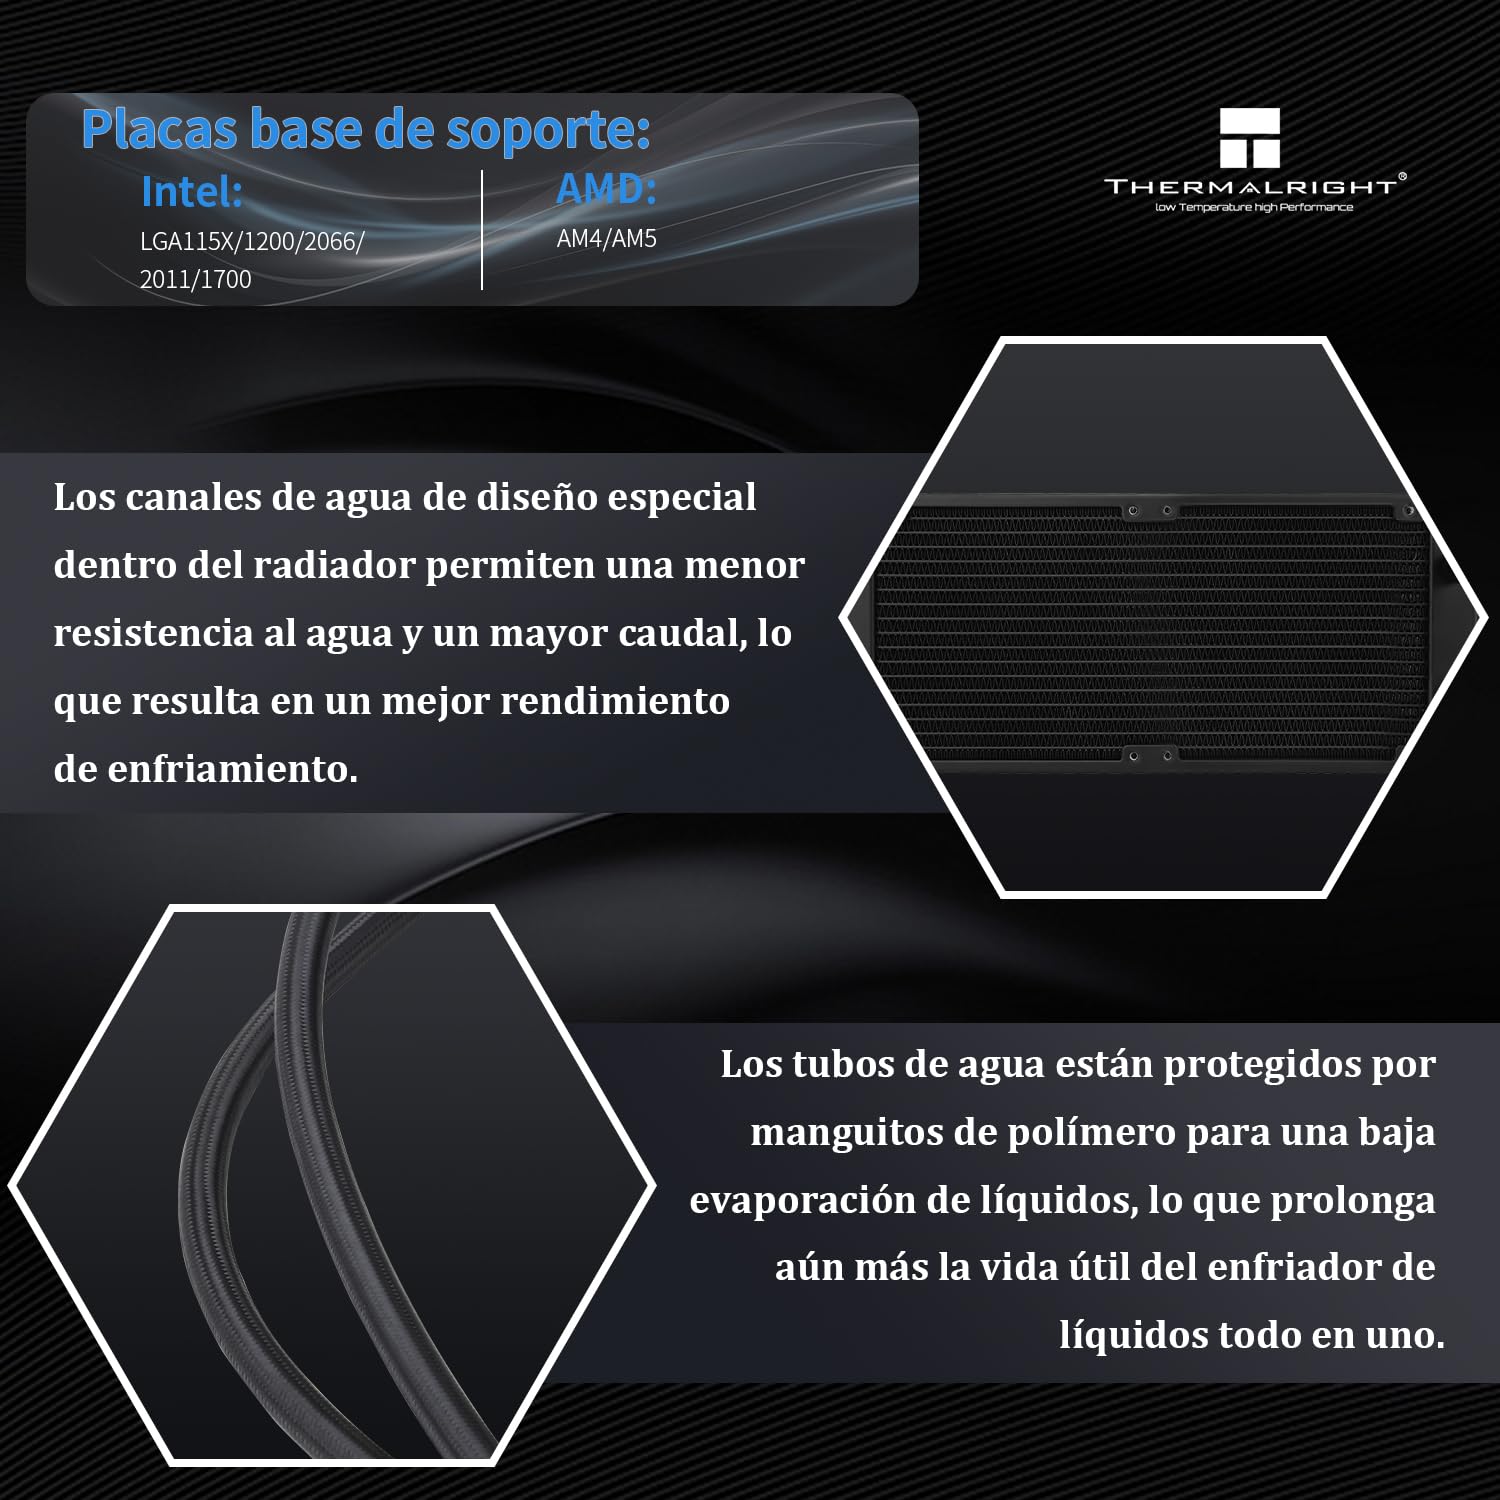
Figure 3: Radiator design with special water channels for improved flow and polymer-protected water tubes for reduced evaporation.
5. Setup & Installation
The installation process involves mounting the radiator, fans, and water block to your motherboard and PC case. Ensure you have the correct mounting hardware for your CPU socket (Intel or AMD).
5.1 General Installation Steps
- Prepare the Motherboard: Install the appropriate backplate (if required for your socket) and standoffs onto your motherboard.
- Apply Thermal Paste: Apply a small amount of thermal paste to the center of your CPU's integrated heat spreader (IHS).
- Mount the Water Block: Carefully place the water block onto the CPU, aligning it with the standoffs. Secure it with the provided screws, tightening them in a diagonal pattern until snug.
- Mount the Radiator and Fans: Attach the two TL-P12-S fans to the radiator using the long fan screws. Ensure the fans are oriented to push or pull air through the radiator as desired for your case airflow. Mount the radiator assembly to an available fan mount location in your PC case (e.g., top, front, or rear).
- Connect Cables:
- Connect the pump's 4-pin PWM cable to the CPU_FAN or AIO_PUMP header on your motherboard.
- Connect each fan's 4-pin PWM cable to available fan headers on your motherboard or a fan controller.
- Connect the ARGB cables from the fans and pump to an ARGB controller or a compatible motherboard ARGB header (5V 3-pin).
- Connect the LCD screen's USB 9-pin cable to an available internal USB 2.0 header on your motherboard. This provides power and data for the display.
- Cable Management: Route all cables neatly to ensure proper airflow and a clean build.
For detailed visual guidance, refer to the installation video or manual provided by Thermalright for your specific CPU socket type.

Figure 4: The water block features an IPS LCD screen for system monitoring, image/GIF playback, and video playback.
6. Operation
Once installed and powered on, the Thermalright Frozen Warframe 240 will begin cooling your CPU. The integrated IPS LCD screen provides real-time information and customization options.
6.1 LCD Screen Functionality
The IPS LCD screen (320 x 240 resolution) on the water block can display various information and custom content:
- System Monitoring: Displays CPU temperature, usage, and other system parameters.
- Custom Images/GIFs: Allows users to upload and display personalized images or animated GIFs.
- Video Playback: Supports playback of short video clips.
6.2 Software Control
To fully utilize the LCD screen's customization features, you need to install the dedicated software from Thermalright. The software allows you to:
- Configure display settings and content for the LCD screen.
- Upload custom images, GIFs, or videos.
- Monitor system parameters.
The software can be downloaded from the official Thermalright website. Ensure the USB 9-pin cable for the LCD screen is correctly connected to your motherboard for proper communication.

Figure 5: TL-P12-S fan features, including high static pressure, S-FDB bearing for durability, shock-absorbing pads, and PBT material.
7. Maintenance
Regular maintenance helps ensure the longevity and optimal performance of your AIO CPU cooler.
- Dust Removal: Periodically clean dust from the radiator fins and fan blades using compressed air or a soft brush. Excessive dust can impede airflow and reduce cooling efficiency.
- Check Connections: Ensure all cables (power, fan, ARGB, USB) are securely connected.
- Inspect Tubing: Occasionally check the water tubes for any signs of kinks, leaks, or damage. While the polymer protection reduces evaporation, regular inspection is recommended.
- Thermal Paste: If you ever remove the water block from the CPU, clean off the old thermal paste and apply a fresh layer before reinstallation.
8. Troubleshooting
If you encounter issues with your Thermalright Frozen Warframe 240, refer to the following common problems and solutions:
- No Power/Fans Not Spinning/Pump Not Working:
- Check all power connections to the motherboard and ensure they are seated correctly.
- Verify that the CPU_FAN or AIO_PUMP header is enabled in your motherboard's BIOS/UEFI.
- Ensure the power supply is functioning correctly.
- High CPU Temperatures:
- Confirm the water block is properly seated on the CPU with adequate thermal paste.
- Check fan orientation and ensure they are moving air through the radiator effectively.
- Clean any dust buildup on the radiator fins.
- Verify pump operation (you might hear a faint hum or feel vibrations in the tubes).
- Ensure sufficient airflow within your PC case.
- LCD Screen Not Displaying/Not Customizable:
- Ensure the USB 9-pin cable is securely connected to both the water block and an internal USB 2.0 header on your motherboard.
- Verify that the Thermalright software is installed and running.
- Check for any driver updates for your motherboard's USB controller.
- ARGB Lighting Not Working:
- Ensure all ARGB cables are correctly connected to a compatible 5V 3-pin ARGB header or controller.
- Check your motherboard's RGB software or external ARGB controller settings.
If problems persist after attempting these solutions, please contact Thermalright customer support for further assistance.
9. Warranty & Support
Thermalright products are manufactured to the highest quality standards. For information regarding warranty coverage, terms, and conditions, please refer to the warranty card included with your product or visit the official Thermalright website.
For technical support, troubleshooting assistance, or inquiries about replacement parts, please contact Thermalright customer service through their official website or the retailer where you purchased the product.
Official Thermalright Website: www.thermalright.com


