
AODK B02022001003UU7S4PI64D114
AODK 53" L Shaped Desk User Manual
Model: B02022001003UU7S4PI64D114 (5303)
Introduction
Thank you for choosing the AODK 53" L Shaped Desk. This manual provides essential information for the proper setup, operation, maintenance, and troubleshooting of your new desk. Please read this manual thoroughly before assembly and use to ensure optimal performance and longevity of the product.

Figure 1: AODK 53" L Shaped Desk, showcasing its L-shape, integrated LED lighting, and multiple storage drawers.
Setup and Assembly
The AODK 53" L Shaped Desk is designed for straightforward assembly. All necessary tools are included. It is recommended for one person to assemble this desk.
Package Contents
- Desk components (tabletops, frame parts)
- 7 Fabric File Drawers
- Movable CPU Stand
- LED Light Strip
- Built-in Power Outlet with USB Ports
- Assembly Hardware (screws, bolts, etc.)
- Assembly Tools (Allen wrench, screwdriver)
- Instruction Manual (this document)
Assembly Instructions
- Unpack Components: Carefully remove all parts from the packaging. Verify all components are present against the included parts list.
- Identify Reversible Design: The desk can be assembled with the longer section on either the left or right side. Determine your preferred orientation before proceeding.
- Assemble Frame: Connect the steel frame components according to the diagrams provided in the separate assembly guide. Ensure all connections are secure but do not fully tighten screws until the desk is fully assembled.
- Attach Tabletops: Secure the engineered wood tabletops to the assembled frame.
- Install Drawers: Insert the 7 fabric file drawers into their designated compartments.
- Mount Monitor Shelf: Attach the adjustable monitor shelf to the main desk surface.
- Install Power Outlet: Secure the built-in power outlet into its recessed position on the desk surface.
- Attach LED Light Strip: Adhere the LED light strip to the underside of the monitor shelf or designated area.
- Place CPU Stand: Position the movable CPU stand as desired.
- Final Tightening: Once all components are in place and aligned, fully tighten all screws and bolts.
- Adjust Leveling Feet: Adjust the leg pads at the base of the desk to ensure stability on uneven floors.
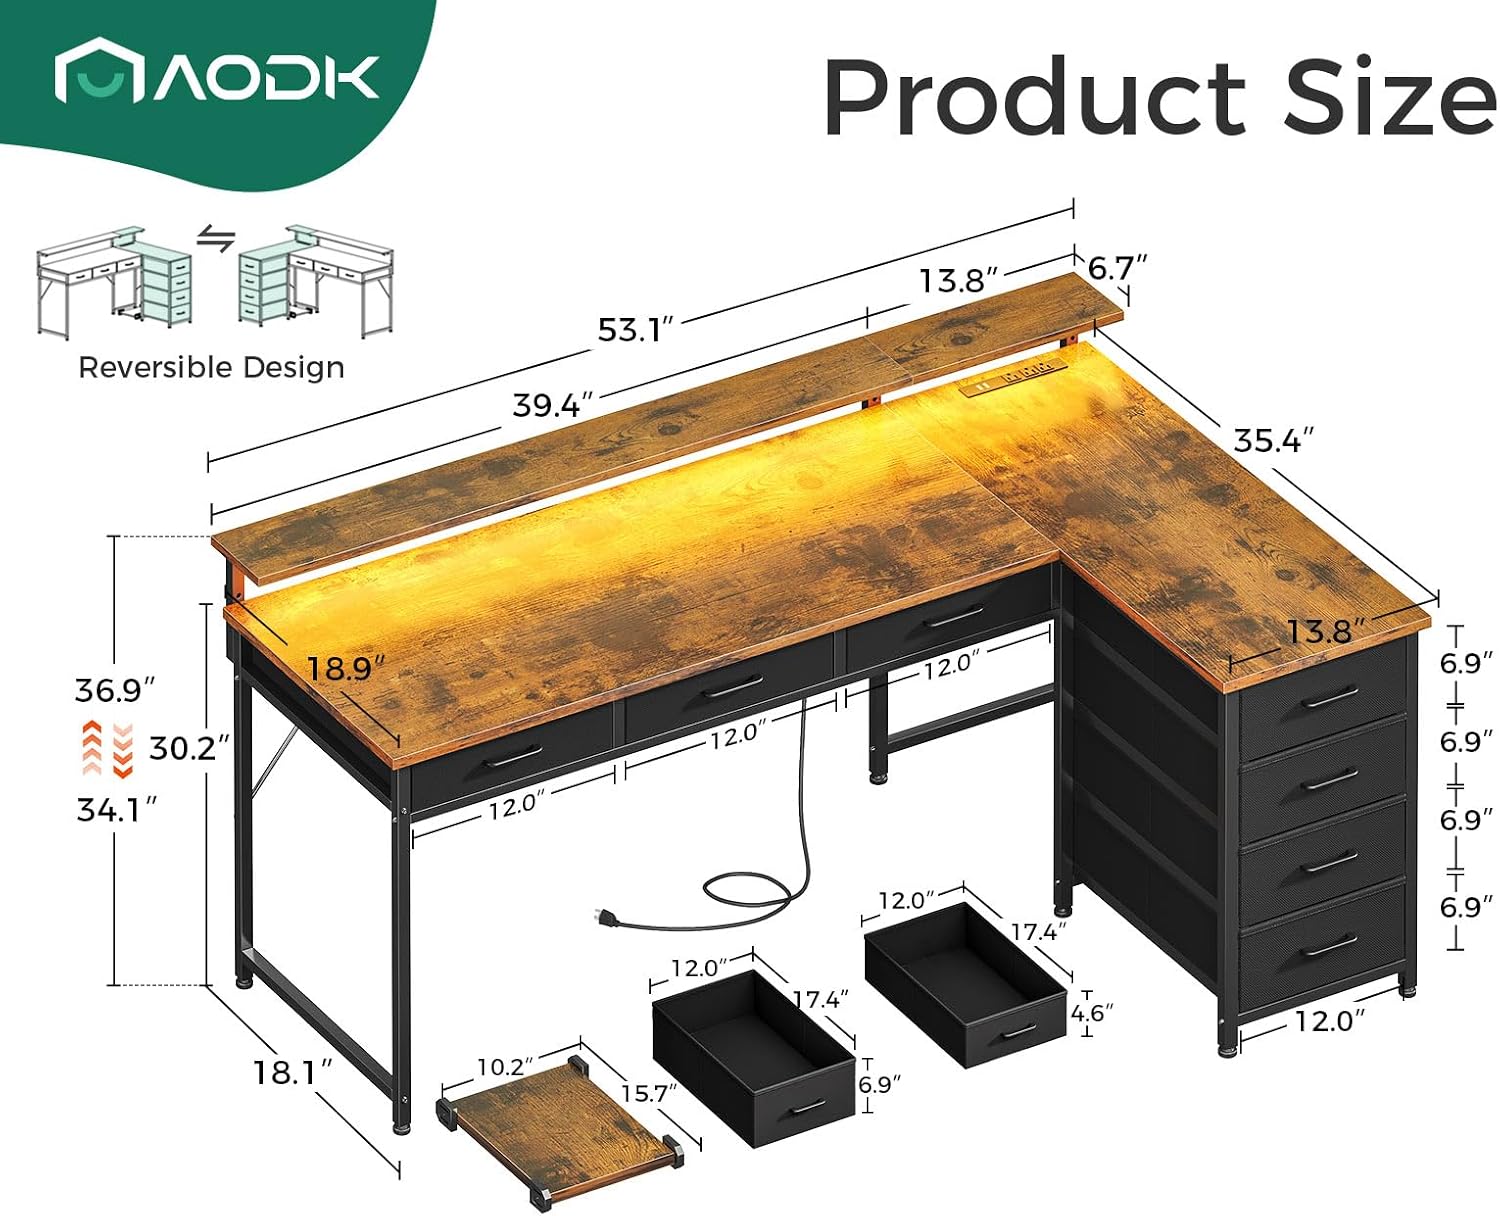
Figure 2: Detailed product dimensions, illustrating the overall size and key measurements for planning your space.
Product Features
Ample Storage Space
The desk features 7 fabric file drawers, providing extensive storage for documents, office supplies, and personal items, helping to maintain a clutter-free workspace.

Figure 3: View of the 4-tier fabric drawers, highlighting their capacity for various items.
Integrated Power Outlet and USB Charging Ports
A built-in power strip with 3 AC outlets and 2 USB ports allows for convenient charging of electronic devices directly on your desk, reducing cable clutter.
Cool LED Light Strip
Equipped with an LED lighting strip offering 10 colors and 10 lighting modes. This feature provides adjustable brightness and color settings to enhance your working or gaming environment.

Figure 4: The desk illuminated by its RGB LED lights, demonstrating various color options in a gaming context.
Adjustable Monitor Stand
The monitor stand offers 3 height modes, allowing you to adjust your monitor to an ergonomic viewing height, promoting better posture and reducing strain.
Movable CPU Stand
A separate, movable CPU stand is included to keep your computer tower off the floor, protecting it from dust and moisture, and allowing flexible placement.
Reversible Design and Sturdy Construction
The L-shape configuration can be set up for either left or right corner orientation. The desk is constructed with a strong alloy steel frame and engineered wood top, ensuring durability and stability. Adjustable leg pads further enhance stability on uneven surfaces.

Figure 5: Details of the movable CPU stand, adjustable monitor shelf, and the integrated recessed power outlet.
Operating Instructions
Using the LED Light Strip
The LED light strip is controlled via an inline remote or buttons. Connect the USB plug of the LED strip to a compatible USB power source (e.g., a USB port on the desk's power outlet, or a USB wall adapter).
- Power On/Off: Press the power button on the controller.
- Change Color: Use the color selection buttons to cycle through 10 available colors.
- Adjust Mode: Select from 10 lighting modes (e.g., static, flash, fade, strobe) using the mode button.
- Adjust Brightness: Use the brightness up/down buttons to increase or decrease light intensity.
Utilizing the Power Outlet and USB Ports
Plug the desk's main power cord into a standard wall outlet. The 3 AC outlets and 2 USB ports are now ready for use. Ensure devices are compatible with the provided voltage (125V/12A for AC, 5V/2A for USB).
Adjusting the Monitor Stand
The monitor stand can be adjusted to three different heights (3.9", 5.2", 6.6"). To adjust, loosen the securing screws on the stand supports, raise or lower the shelf to the desired height, and then re-tighten the screws firmly.
Care and Maintenance
Regular care will help maintain the appearance and functionality of your AODK L Shaped Desk.
- Cleaning: Wipe surfaces with a soft, damp cloth. Avoid harsh chemicals or abrasive cleaners, which can damage the finish. The desk board is waterproof and dust resistant for easy cleaning.
- Dusting: Regularly dust all surfaces, including the LED strip and power outlet, with a dry, soft cloth.
- Drawer Care: The fabric drawers can be spot cleaned with a mild detergent and water. Allow to air dry completely before reinserting.
- Hardware Check: Periodically check all screws and bolts to ensure they remain tight. Re-tighten if necessary to maintain stability.
- Avoid Overloading: Do not exceed the weight capacity of the desk or drawers.
- Environmental Conditions: Avoid placing the desk in direct sunlight or near heat sources, which can cause warping or discoloration.
Troubleshooting
| Problem | Possible Cause | Solution |
|---|---|---|
| Desk is wobbly or unstable. | Uneven floor; loose assembly hardware. | Adjust the leveling feet at the bottom of the desk legs. Check and tighten all assembly screws and bolts. |
| LED lights are not working. | USB power not connected; faulty connection; LED strip damage. | Ensure the USB plug is securely connected to a working power source. Check the inline controller for damage. Try a different USB port or power adapter. |
| Power outlets/USB ports not providing power. | Desk's main power cord not plugged in; circuit breaker tripped; faulty outlet. | Verify the desk's main power cord is securely plugged into a live wall outlet. Check your home's circuit breaker. Test the wall outlet with another device. |
| Drawers are difficult to open/close. | Overloaded drawers; misaligned drawer. | Reduce the weight in the drawers. Ensure drawers are inserted correctly and not obstructed. |
Specifications
| Feature | Detail |
|---|---|
| Brand | AODK |
| Model Number | B02022001003UU7S4PI64D114 |
| Model Name | 5303 |
| UPC | 850061908841 |
| Product Dimensions (D x W x H) | 35.4"D x 53.1"W x 37"H |
| Item Weight | 49.8 Pounds |
| Color | Vintage |
| Shape | L-Shape |
| Top Material Type | Engineered Wood |
| Base Material | Alloy Steel |
| Finish Type | Powder Coated |
| Number of Drawers | 7 (File Drawers) |
| Number of Shelves | 1 (Monitor Shelf) |
| Special Features | Reversible Design, Built-in Power Outlet (3 AC, 2 USB), LED Light Strip (10 colors, 10 modes), Adjustable Monitor Stand, Movable CPU Stand, Adjustable Feet Pads |
| Assembly Required | No (Pre-drilled, assembly of components required) |
| Recommended Assembly People | 1 |
| Included Assembly Tools | Yes |
Warranty Information
The AODK 53" L Shaped Desk comes with a Limited Warranty. This warranty covers manufacturing defects under normal use. Please retain your proof of purchase for any warranty claims. For specific terms and conditions, or to initiate a warranty claim, please contact AODK customer support.
Customer Support
For any questions, assistance with assembly, missing parts, or troubleshooting not covered in this manual, please contact AODK customer support. You can typically find contact information on the product packaging or the official AODK website. Please have your model number (B02022001003UU7S4PI64D114) and proof of purchase ready when contacting support.
Visit the AODK Store: AODK Official Store
Related documentsB02022001003UU7S4PI64D114


Ask a question about this manual
Ask about setup, troubleshooting, compatibility, parts, safety, or missing instructions. Manuals+ will review the question and use this page’s manual context to help answer it.