1. Introduction
The SKYSHL SS103PVC12 Optical Fiber Power Meter (OPM) is a compact and user-friendly instrument designed for comprehensive testing of fiber optic networks. It facilitates both absolute optical power measurement and relative optical loss measurement. This device is characterized by its robust design, wide power measurement range, high precision, and user self-calibration capabilities, making it a cost-effective solution for fiber optic professionals.
This manual provides detailed instructions for the safe and effective use of your SKYSHL SS103PVC12. Please read it thoroughly before operation and retain it for future reference.
2. Safety Information
Observe the following safety precautions to prevent injury and damage to the device:
- Laser Safety: The Visual Fault Locator (VFL) emits a visible red laser. Do not stare directly into the laser beam or view it with optical instruments. Direct exposure can cause severe eye injury.
- Battery Safety: Use only the specified battery type (3.7V 700mAh lithium battery). Do not disassemble, puncture, or expose the battery to extreme temperatures or fire. Dispose of batteries according to local regulations.
- Environmental Conditions: Operate the device within specified temperature and humidity ranges. Avoid exposure to water, dust, and corrosive substances.
- Cleaning: Use a soft, dry cloth for cleaning the device. For optical connectors, use specialized fiber optic cleaning tools.
- Maintenance: Do not attempt to open or repair the device yourself. Refer all servicing to qualified personnel.
3. Package Contents
Verify that all items are present in the package:
- 1 x SKYSHL SS103PVC12 Optical Fiber Power Meter
- 1 x USB-A to Micro USB Charging Cable
- 1 x FC-LC Adapter
- 1 x User Manual (this document)

4. Product Overview
The SKYSHL SS103PVC12 is an all-in-one tool for fiber optic network testing. It combines an Optical Power Meter (OPM), a Visual Fault Locator (VFL), an RJ45 cable tester, and an LED flashlight.
4.1 Key Features
- Multi-Wavelength Calibration: Supports 10 calibrated wavelengths: 850nm, 980nm, 1270nm, 1300nm, 1310nm, 1490nm, 1550nm, 1577nm, 1625nm, and 1650nm, suitable for both single-mode and multi-mode fiber testing.
- Wide Measurement Range: Measures optical power from -50dBm to +26dBm.
- Integrated VFL: 650nm red laser with a 30km range for identifying fiber breaks and continuity.
- RJ45 Cable Tester: For quick localization and testing of 8P/6P/4P network cables.
- Universal Connector Compatibility: Features a 2.5mm universal connector (compatible with FC/SC/ST) and includes an FC-LC adapter for LC connectors.
- Long Battery Life: Powered by a 3.7V 700mAh lithium battery, providing over 120 hours of typical operation.
- Compact and Durable Design: Ergonomic, portable, and built with high-strength plastic casing for resilience.
- 2-inch LCD Display: Clear and easy-to-read interface.
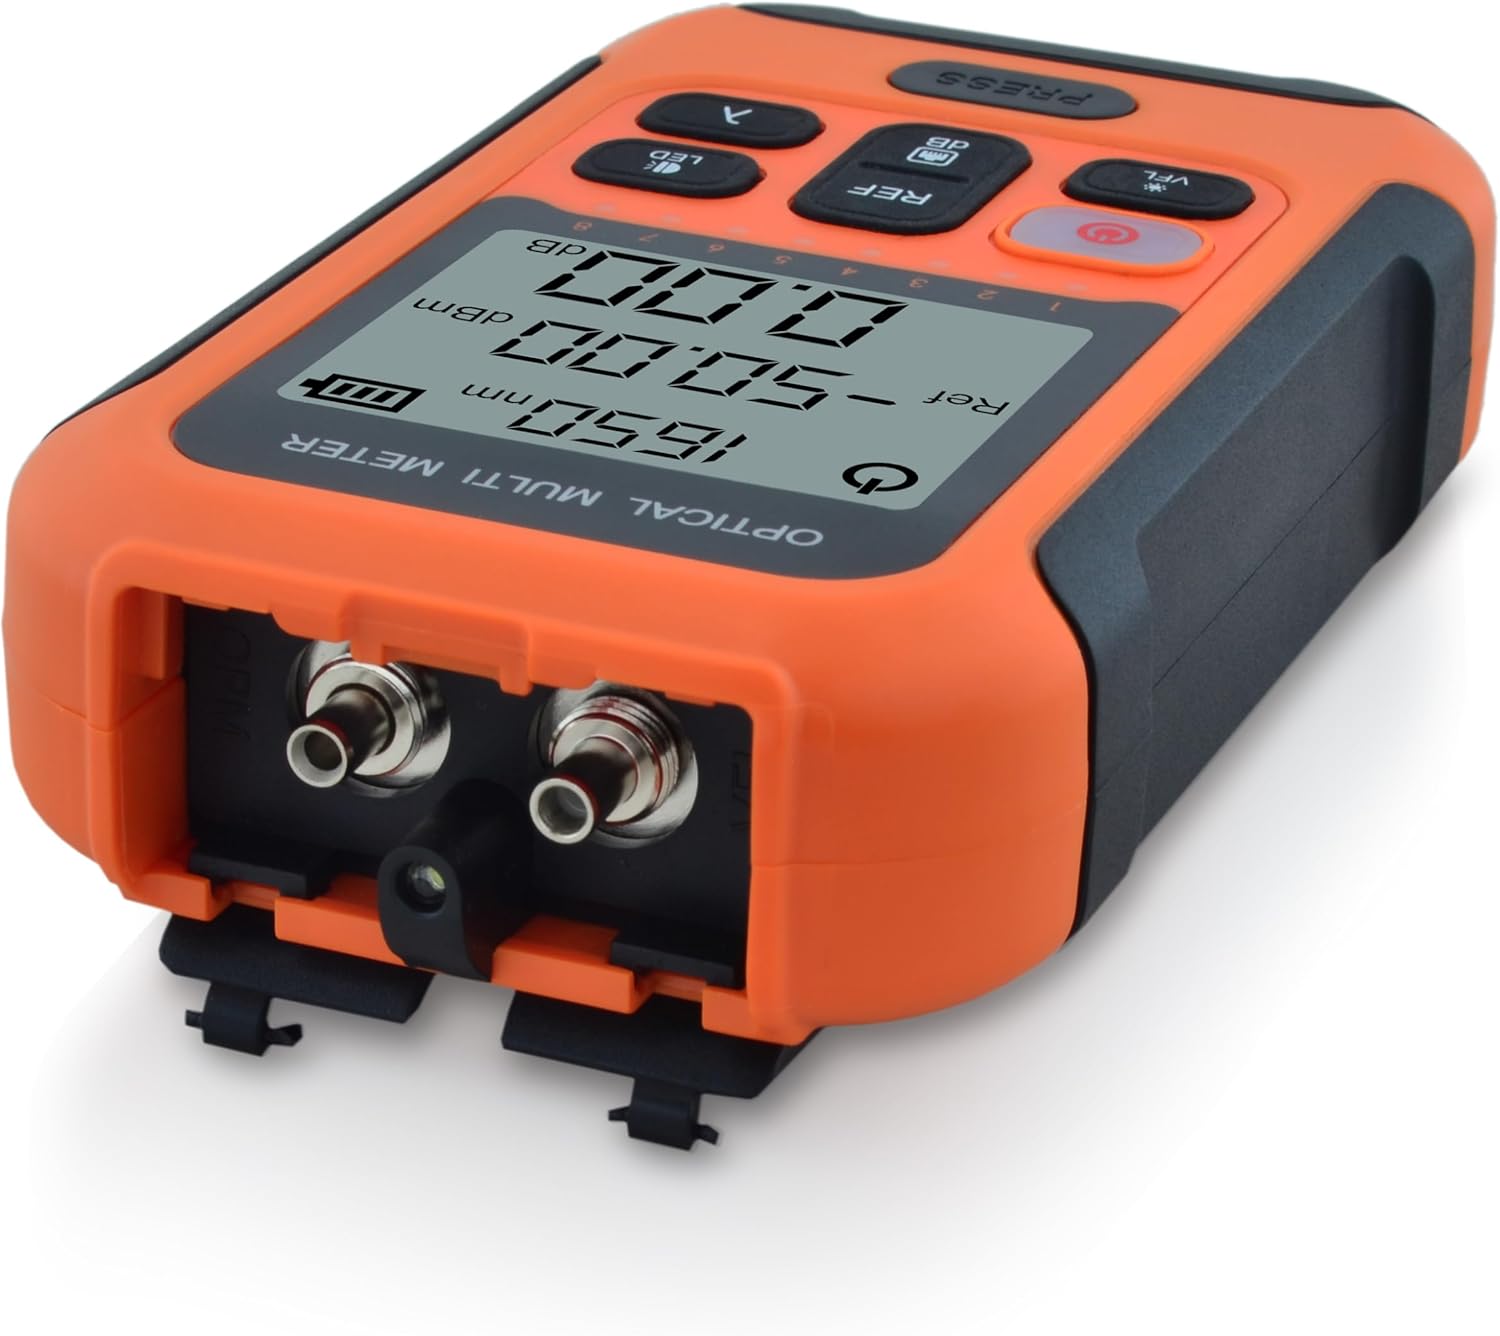
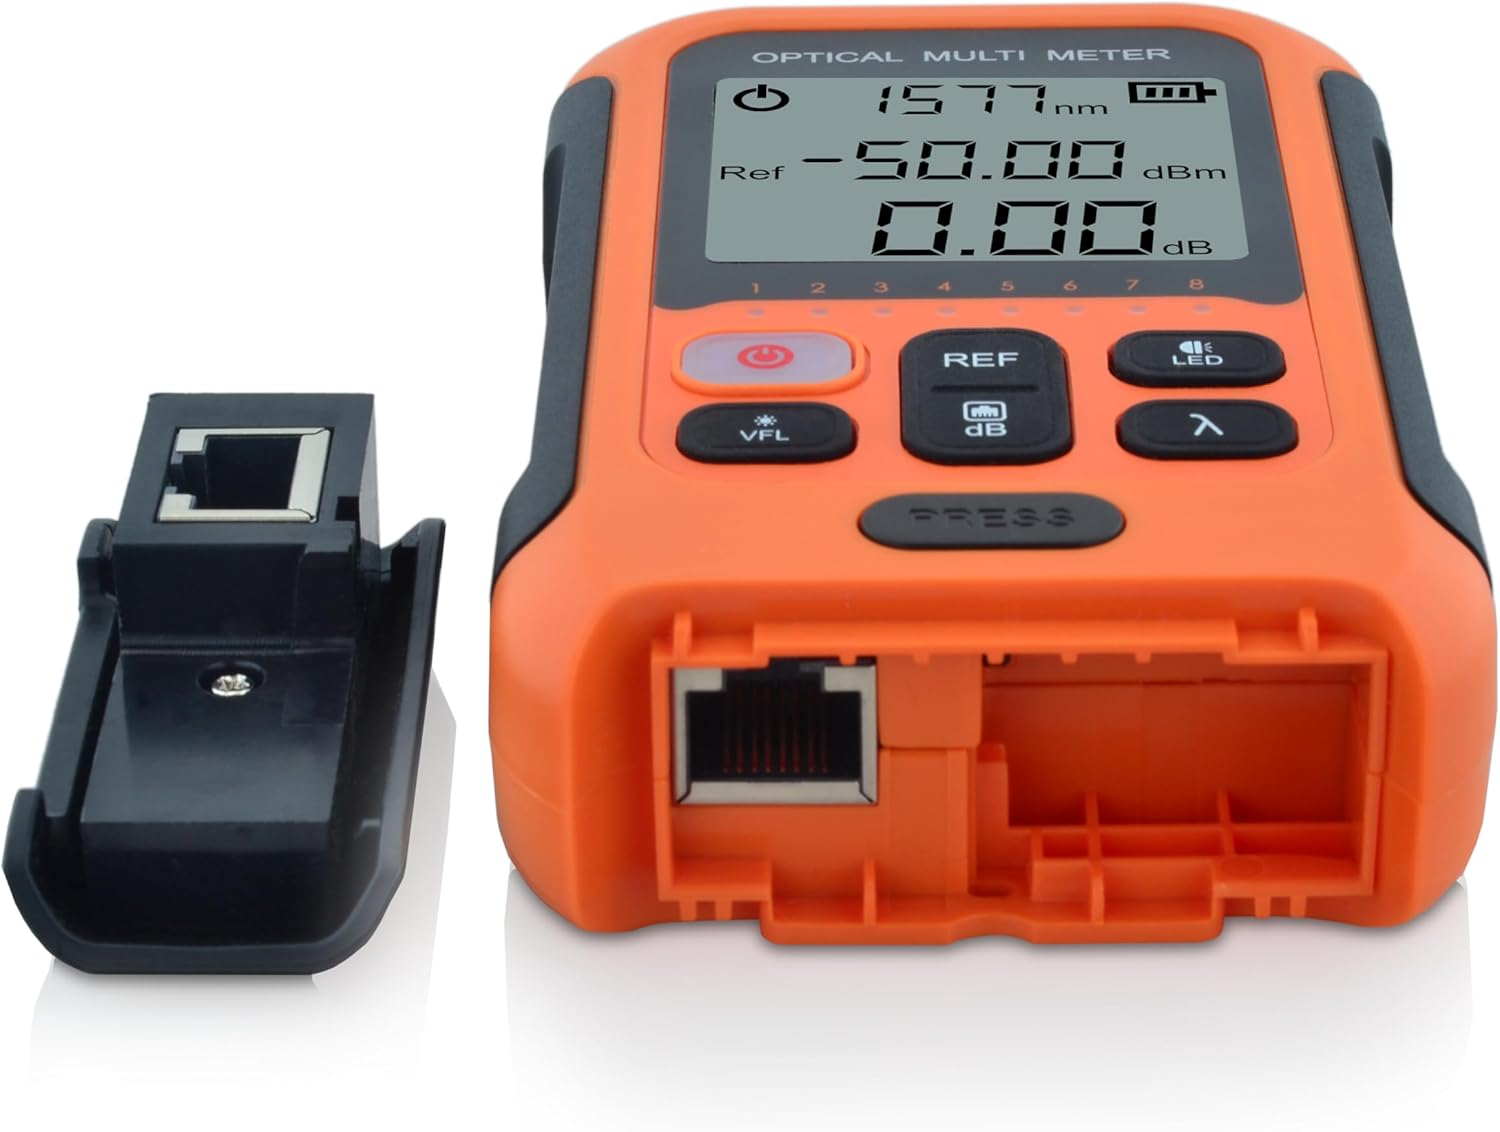
4.2 Device Layout


5. Setup
5.1 Charging the Battery
The device is powered by a built-in 3.7V 700mAh lithium battery. Before first use, or when the battery indicator on the display shows low charge, connect the device to a USB power source using the provided Micro USB cable. The power button will illuminate red during charging.
5.2 Connecting Fiber Optic Cables
- Ensure the fiber optic connector is clean. Use a fiber optic cleaning tool if necessary.
- For FC, SC, or ST connectors, directly insert them into the 2.5mm universal port on the top of the device.
- For LC connectors, attach the provided FC-LC adapter to the universal port, then insert the LC connector into the adapter.
- Ensure a secure connection to prevent inaccurate readings.
5.3 Connecting RJ45 Cables
- Detach the small RJ45 module from the side of the main unit.
- Connect one end of the RJ45 cable to the port on the main unit.
- Connect the other end of the RJ45 cable to the detached module.
- Proceed to the operating instructions for RJ45 cable testing.
6. Operating Instructions
6.1 Power On/Off
- To power on, press and hold the Power Button (red button with power symbol) for approximately 2 seconds.
- To power off, press and hold the Power Button again for approximately 2 seconds.
- The device features an automatic power-off function after 10 minutes of inactivity to conserve battery.
6.2 Optical Power Measurement (OPM)
- Select Wavelength: Press the λ (Wavelength) Button to cycle through the available calibrated wavelengths (850nm, 980nm, 1270nm, 1300nm, 1310nm, 1490nm, 1550nm, 1577nm, 1625nm, 1650nm). Select the wavelength corresponding to your fiber optic system.
- Connect Fiber: Connect the fiber optic cable to the appropriate port as described in Section 5.2.
- Read Absolute Power: The display will show the measured optical power in dBm.
- Set Reference (Relative Measurement):
- With a known good signal connected, press the REF/dB Button to set the current power reading as the reference value (0.00dB).
- When measuring other points in the fiber link, the display will show the relative loss or gain in dB compared to the set reference.
- Press the REF/dB Button again to toggle between absolute (dBm) and relative (dB) measurements.
6.3 Visual Fault Locator (VFL)
- Activate VFL: Press the VFL Button. The 650nm red laser will emit from the VFL port (located near the fiber optic input ports).
- Identify Faults: Connect the fiber to be tested to the VFL port. Observe the fiber for any visible red light leakage, which indicates breaks, sharp bends, or faulty connectors.
- Deactivate VFL: Press the VFL Button again to turn off the laser.
- Caution: Always follow laser safety guidelines (Section 2).
6.4 RJ45 Cable Tester
- Ensure the RJ45 cable is connected to both the main unit and the detached module as described in Section 5.3.
- The device will automatically begin testing the cable continuity. The display will show the status of each wire pair (1-8 for 8P, 1-6 for 6P, 1-4 for 4P).
- A successful test will show all corresponding numbers lighting up sequentially or indicating continuity. Any missing or incorrect sequence indicates a fault (e.g., open, short, cross).
6.5 LED Flashlight
- Press the LED Button to turn the integrated LED flashlight on or off. This is useful for working in dimly lit environments.
7. Maintenance
- Cleaning Optical Connectors: Regularly clean the fiber optic input ports and any adapters using specialized fiber optic cleaning swabs or pens. Dust and debris are the primary causes of inaccurate measurements.
- Device Cleaning: Wipe the exterior of the device with a soft, dry, lint-free cloth. Do not use abrasive cleaners or solvents.
- Battery Care: For optimal battery life, avoid fully discharging the battery frequently. If storing the device for an extended period, charge it to approximately 50% and recharge every few months.
- Storage: Store the device in a cool, dry place, away from direct sunlight and extreme temperatures. Use the protective caps for all ports when not in use.
8. Troubleshooting
| Problem | Possible Cause | Solution |
|---|---|---|
| Device does not power on. | Low or depleted battery. | Charge the device using the provided USB cable. |
| Inaccurate or unstable OPM readings. | Dirty fiber optic connectors or incorrect wavelength setting. | Clean all fiber optic connectors. Ensure the correct wavelength is selected on the device. |
| VFL red light is dim or not visible. | Dirty VFL port or fiber connection. | Clean the VFL port and the fiber end-face. |
| RJ45 cable test fails or shows incorrect pinout. | Faulty RJ45 cable, poor connection, or damaged port. | Ensure the cable is properly seated. Test with a known good cable. Inspect cable for damage. |
| Device freezes or becomes unresponsive. | Temporary software glitch. | Press and hold the Power Button for 10 seconds to force a restart. |
If the problem persists after attempting these solutions, please contact SKYSHL customer support for assistance.
9. Specifications
| Parameter | Value |
|---|---|
| Detector Type | InGaAs |
| Calibrated Wavelengths | 850nm, 980nm, 1270nm, 1300nm, 1310nm, 1490nm, 1550nm, 1577nm, 1625nm, 1650nm |
| Measurement Range | -50~+26dBm (CW/1Hz/2Hz) |
| VFL Wavelength/Range | 650nm / 30km |
| Power Measurement Uncertainty | ±0.3dB |
| Connectors | Universal 2.5mm (FC/SC/ST compatible), FC-LC adapter, RJ45 |
| Auto Power Off | 10 minutes |
| Power Supply | 3.7V 700mAh Lithium Battery |
| Display | 2-inch LCD |
| Operating Time | >120 hours (typical) |
| Dimensions (L x W x H) | 120 x 70 x 27 mm (4.72 x 2.76 x 1.06 inches) |
| Weight | 0.13 KG (0.29 lbs) |
| Manufacturer | SKYSHL |
| Model Number | SS103PVC12 |
| Color | Orange |
| Country of Origin | China |
10. Warranty and Support
SKYSHL provides the following warranty for the SS103PVC12 Optical Fiber Power Meter:
- 3 Years Free Replacement
- 5 Years Free Maintenance
- Lifetime Warranty
For technical support, warranty claims, or any inquiries regarding your device, please contact SKYSHL customer service through the retailer where you purchased the product or visit the official SKYSHL website for contact information.
