
Genérico T3-Android version
Contents
Tripsky T3 LED 1080P 120ANSI Lumens Android Projector
User Manual - Model: T3-Android version
1. Introduction
Thank you for purchasing the Tripsky T3 LED 1080P 120ANSI Lumens Android Projector. This manual provides essential information for setting up, operating, and maintaining your projector to ensure optimal performance and longevity. Please read this manual thoroughly before using the product.
2. Package Contents
Please check the box for the following items:
- Tripsky T3 Projector
- Remote Control
- Power Cord
- User Manual

If any items are missing or damaged, please contact your retailer immediately.
3. Product Overview
Familiarize yourself with the various parts and connections of your Tripsky T3 Projector.
3.1 Front and Top View


The top panel features navigation buttons and indicators. The front houses the projection lens. The focus and keystone adjustment dials are located near the lens on the top surface.
3.2 Side View
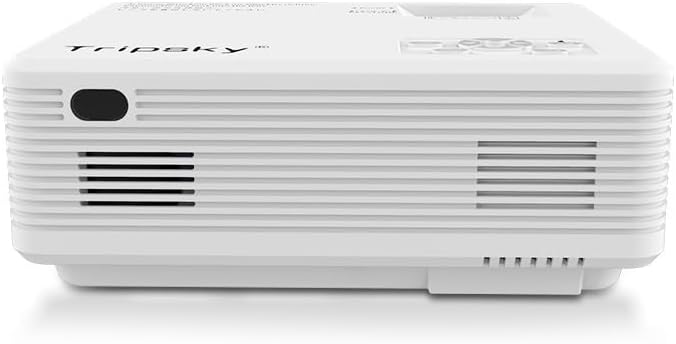
The sides of the projector feature ventilation grilles to ensure proper airflow and prevent overheating.
3.3 Rear Panel and Connections

The rear panel provides various connectivity options:
- AUX: Audio output for external speakers or headphones.
- AV: Composite video input.
- TF: MicroSD card slot for media playback.
- HDMI: High-Definition Multimedia Interface for digital audio/video input.
- USB: USB port for connecting USB drives, keyboards, or mice.
- VGA: Video Graphics Array input for computer connection.

The projector supports a wide range of devices including smartphones, tablets, USB devices, game consoles, computers, memory cards, TV boxes, sound systems, cameras, VCRs, earphones, and mobile hard drives.
4. Setup
4.1 Placement
Choose a suitable location for your projector. Ensure it is placed on a stable, flat surface or mounted securely. Maintain adequate ventilation around the projector.

The projection distance affects the screen size:
- Approximately 1.2m for a 32-inch screen.
- Approximately 2.5m for a 100-inch screen.
- Approximately 6.0m for a 200-inch screen.
The projector supports a projection screen size range of 32 to 200 inches.
4.2 Installation Methods
The projector offers diversified installation methods to suit various environments:
- Desktop: Place the projector on a table or flat surface.
- Hoisting: Mount the projector to the ceiling (requires additional mounting hardware, not included).
- Wall Mounted: Attach the projector to a wall (requires additional mounting hardware, not included).
- Fall to the Ground: Place the projector on a low stand or directly on the floor.

4.3 Power Connection
- Connect the power cord to the projector's power input port.
- Plug the other end of the power cord into a power outlet (110V-240V, 50-60Hz).
4.4 Connecting Devices
Connect your desired input source (e.g., laptop, game console, USB drive) to the appropriate port on the projector (HDMI, USB, VGA, AV, TF).
4.5 Focus and Keystone Correction
- Focus: Rotate the focus ring on the lens until the projected image is clear and sharp.
- Keystone Correction: If the projected image appears trapezoidal, use the keystone correction dial (V±15°) to adjust the image shape until it is rectangular.
5. Operating Instructions
5.1 Powering On/Off
- Power On: Press the power button on the projector or the remote control. The indicator light will turn on.
- Power Off: Press the power button again. The projector will shut down. Always allow the projector to cool down properly before unplugging it.
5.2 Input Source Selection
Use the 'Source' button on the remote control or the projector's control panel to cycle through available input sources (HDMI, USB, VGA, AV, TF).
5.3 Menu Navigation
Use the navigation buttons on the remote control or projector to browse the on-screen display (OSD) menu. Press 'OK' or 'Enter' to confirm selections and 'Exit' or 'Return' to go back.
5.4 Language Settings
The projector supports multiple OSD languages including Italian, Portuguese, Russian, Polish, Arabic, Chinese, Turkish, Japanese, Thai, Vietnamese, English, French, German, Spanish, Dutch, Hungarian, Czech, Romanian, Greek, Finnish, Swedish, Norwegian, and Danish. You can change the language in the system settings menu.
6. Maintenance
- Lens Cleaning: Use a soft, lint-free cloth specifically designed for optical lenses to gently wipe the projector lens. Do not use abrasive cleaners.
- Ventilation: Regularly check and clean the ventilation grilles to prevent dust buildup, which can impede airflow and cause overheating. Use a soft brush or compressed air.
- Storage: When not in use for extended periods, store the projector in a cool, dry, dust-free environment.
- Lamp Life: The LED light source has a long life of approximately 50,000 hours. No regular lamp replacement is typically needed.
7. Troubleshooting
If you encounter issues with your projector, refer to the following common problems and solutions:
| Problem | Possible Cause | Solution |
|---|---|---|
| No image projected | Power not connected; Incorrect input source; Loose cable connection | Ensure power cord is securely plugged in; Select correct input source (HDMI, USB, etc.); Check all cable connections. |
| Image is blurry | Lens out of focus | Adjust the focus ring on the lens until the image is clear. |
| Image is trapezoidal | Projector not perpendicular to screen | Use the keystone correction dial to adjust the image shape. |
| No sound | Volume too low; Muted; External audio device not connected | Increase volume; Unmute; Ensure external speakers/headphones are properly connected to the AUX port. |
| Remote control not working | Batteries low/dead; Obstruction between remote and projector | Replace batteries; Remove any obstructions; Ensure you are within range. |
If the problem persists after trying these solutions, please contact customer support.
8. Specifications
Detailed technical specifications for the Tripsky T3 Projector:
| Feature | Specification |
|---|---|
| Brand | Genérico |
| Model No. | T3-Android version |
| Projection Technology | 4.0" LCD |
| Light Source Type | LED |
| Brightness (ANSI Lumens) | 120 ANSI lumens |
| LED Brightness | 5500 lumens |
| Native Resolution | 1920x1080p |
| Contrast Ratio | 2000:1 |
| Lamp Life | 50,000 hours |
| Aspect Ratio | 16:9 |
| Keystone Correction | Manual, V±15° |
| Projection Distance | 1.2m ~ 6m |
| System | Multimedia (Android version) |
| Lens | Manual focus |
| Projection Screen Size | 32-200 inches |
| Input Voltage | 110V-240V (±10%), 50-60Hz |
| Power Consumption | 55W |
| Speakers | Built-in BOX cavity speaker, 4Ω5W |
| Connectivity | HDMI, USB, VGA, AV, 3.5mm Audio, Bluetooth |
| Certifications | CE, FCC, RoHS |
| Dimensions (approx.) | 19.8cm x 15.3cm x 6.85cm |

9. Warranty and Support
For warranty information, please refer to the warranty card included with your product or contact your point of purchase. For technical support or service inquiries, please reach out to the retailer or manufacturer's customer service department.
Please retain your proof of purchase for warranty claims.
Ask a question about this manual
Ask about setup, troubleshooting, compatibility, parts, safety, or missing instructions. Manuals+ will review the question and use this page’s manual context to help answer it.