
1. Introduction
The Infomir MAG 544W3 is an advanced 4K Linux Set-Top Box designed for high-quality media streaming. Featuring a powerful Amlogic S905Y4-B chipset, 1GB DDR4 RAM, and built-in dual-band Wi-Fi (2.4G/5G), this device delivers a smooth and immersive viewing experience. It supports 4K HDR content at 60fps and HEVC codec for efficient streaming over various network conditions. This manual provides essential information for setting up, operating, and maintaining your MAG 544W3 device.
2. What's in the Box
Carefully unpack the box and ensure all items are present:
- Infomir MAG 544W3 Set-Top Box
- Remote Control
- Power Adapter
- HDMI Cable
- 2 AAA batteries (for remote control)
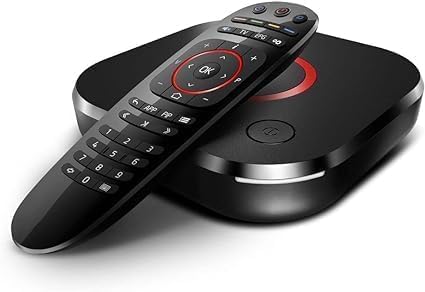
Image: The Infomir MAG 544W3 Set-Top Box and its accompanying remote control.
3. Setup
3.1 Connecting the Device
- Connect to TV: Use the provided HDMI cable to connect the HDMI port on the MAG 544W3 to an available HDMI input on your television.
- Connect to Network:
- Wired Connection: For a stable connection, plug an Ethernet cable from your router into the Ethernet port on the MAG 544W3.
- Wireless Connection: The device supports dual-band Wi-Fi (2.4G/5G). You will configure this during the initial setup on screen.
- Connect Power: Plug the power adapter into the DC 12V port on the MAG 544W3, then plug the adapter into a power outlet.

Image: Rear view of the MAG 544W3 showing the DC 12V power input, HDMI port, and Ethernet port.
3.2 Initial Power On
After connecting all cables, the device should power on automatically. If not, press the power button on the device or the remote control. Follow the on-screen instructions to complete the initial setup, including language selection, network configuration (if using Wi-Fi), and display settings.
4. Operating the Device
4.1 Remote Control Functions
The included remote control allows you to navigate the user interface and control media playback. Insert the 2 AAA batteries into the remote control before use.
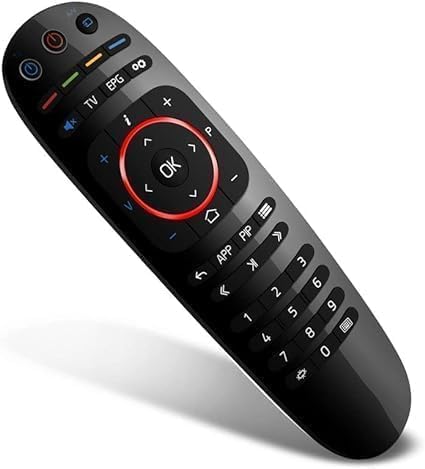
Image: Angled view of the Infomir MAG 544W3 remote control, highlighting its buttons.
- Power Button: Turns the device on or off.
- Navigation Buttons (Up, Down, Left, Right): Move through menus and options.
- OK Button: Confirms selections.
- Back/Exit Button: Returns to the previous screen or exits a menu.
- Home Button: Returns to the main menu.
- Volume Buttons (+/-): Adjust audio volume.
- Channel Buttons (CH +/-): Change channels (if applicable).
- Numeric Keypad: For direct input of numbers.
4.2 Basic Navigation
Use the navigation buttons on the remote to browse through the main interface. Select applications or settings by highlighting them and pressing the OK button. The device runs on Linux 4.9, providing a stable and customizable user experience.
5. Key Features
- Powerful Amlogic Chipset: Equipped with an Amlogic S905Y4-B chipset and a high-performance Quad Core ARM Cortex-A35 2,000Mhz CPU, offering enhanced processing power.
- 4K HDR and HEVC Support: Capable of handling 4K HDR 60fps content and supporting HEVC (High Efficiency Video Coding) for high-resolution streaming with optimized bandwidth usage.
- Dual Band Wi-Fi: Features built-in 802.11ac 2T2R dual-band Wi-Fi (2.4GHz/5GHz) for flexible and reliable wireless connectivity, alongside an Ethernet port for wired connections.
- 1GB DDR4 RAM: Provides efficient multitasking and smooth application performance.
- Dolby Digital Plus Sound: Supports Dolby Digital Plus for high-quality audio output, enhancing the cinematic experience with compatible audio systems.
6. Maintenance
- Cleaning: Use a soft, dry cloth to clean the device. Do not use liquid cleaners or abrasive materials.
- Ventilation: Ensure the device is placed in a well-ventilated area to prevent overheating. Do not block the ventilation holes.
- Power Off: If the device will not be used for an extended period, disconnect it from the power supply.
7. Troubleshooting
7.1 Device Not Powering On
- Verify that the power adapter is securely connected to both the device and a working power outlet.
- Ensure the power outlet is active. Try plugging another device into the same outlet to test it.
- Press the power button on the remote control or the device itself.
7.2 HDMI Connection Issues (No Signal/Flickering)
If you experience issues with the HDMI connection, such as no signal or an inconsistent connection, try the following steps:
- Check HDMI Cable: Ensure the HDMI cable is securely connected to both the MAG 544W3 and your TV. Try using a different HDMI cable if available.
- Try Different HDMI Port: Connect the device to a different HDMI port on your TV.
- Adjust HDMI Event Reaction: If you can access the device's menu, navigate to Settings > Video > HDMI Event Reaction and set it to Ignore.
- Adjust Video/Graphic Settings: In the inner portal settings (or Video/System settings), adjust the following:
- Set Video Output Mode to a specific resolution like 1080p or 1080i instead of Auto.
- Set Graphic Resolution to 1920x1080 or 1280x720.
8. Specifications
| Feature | Specification |
|---|---|
| Model Name | MAG 544W3 |
| Processor | Amlogic S905Y4-B Quad Core ARM Cortex-A35 2,000Mhz CPU |
| RAM Memory | 1 GB DDR4 |
| Storage Capacity | 4 GB |
| Operating System | Linux 4.9 |
| Video Output Resolution | 4K (3840 x 2160) |
| Video Codec | HEVC |
| Connectivity | Dual Band Wi-Fi (802.11ac 2T2R 2.4/5Ghz), Ethernet |
| Audio Support | Dolby Digital Plus |
| Ports | HDMI, Ethernet, DC 12V |
| Dimensions (L x W x H) | 4.53"L x 4.53"W x 1.1"H |
| Item Weight | 0.5 Kilograms |
9. Warranty and Support
For warranty information and technical support, please refer to the documentation included with your product or visit the official Infomir website. Keep your purchase receipt as proof of purchase for warranty claims.


