GardenJoy 21V Cordless Power Drill Set User Manual
Model: FH-6198S
1. Introduction
Thank you for choosing the GardenJoy 21V Cordless Power Drill Set. This versatile tool is designed to assist you with a wide range of home improvement and DIY projects, offering powerful performance and user-friendly features. With its 21V motor, 24+1 torque settings, and 2 variable speeds, it provides precise control for drilling into various materials like wood, metal, and plastic, as well as efficient screw driving. The lightweight and compact design, along with a comfortable soft rubber handle, ensures ease of use for all users. This manual contains important information regarding safety, setup, operation, maintenance, and troubleshooting to help you get the most out of your new drill. Please read it carefully before operation and keep it for future reference.
2. Package Contents
Image: Complete GardenJoy 21V Cordless Drill Set with included accessories.
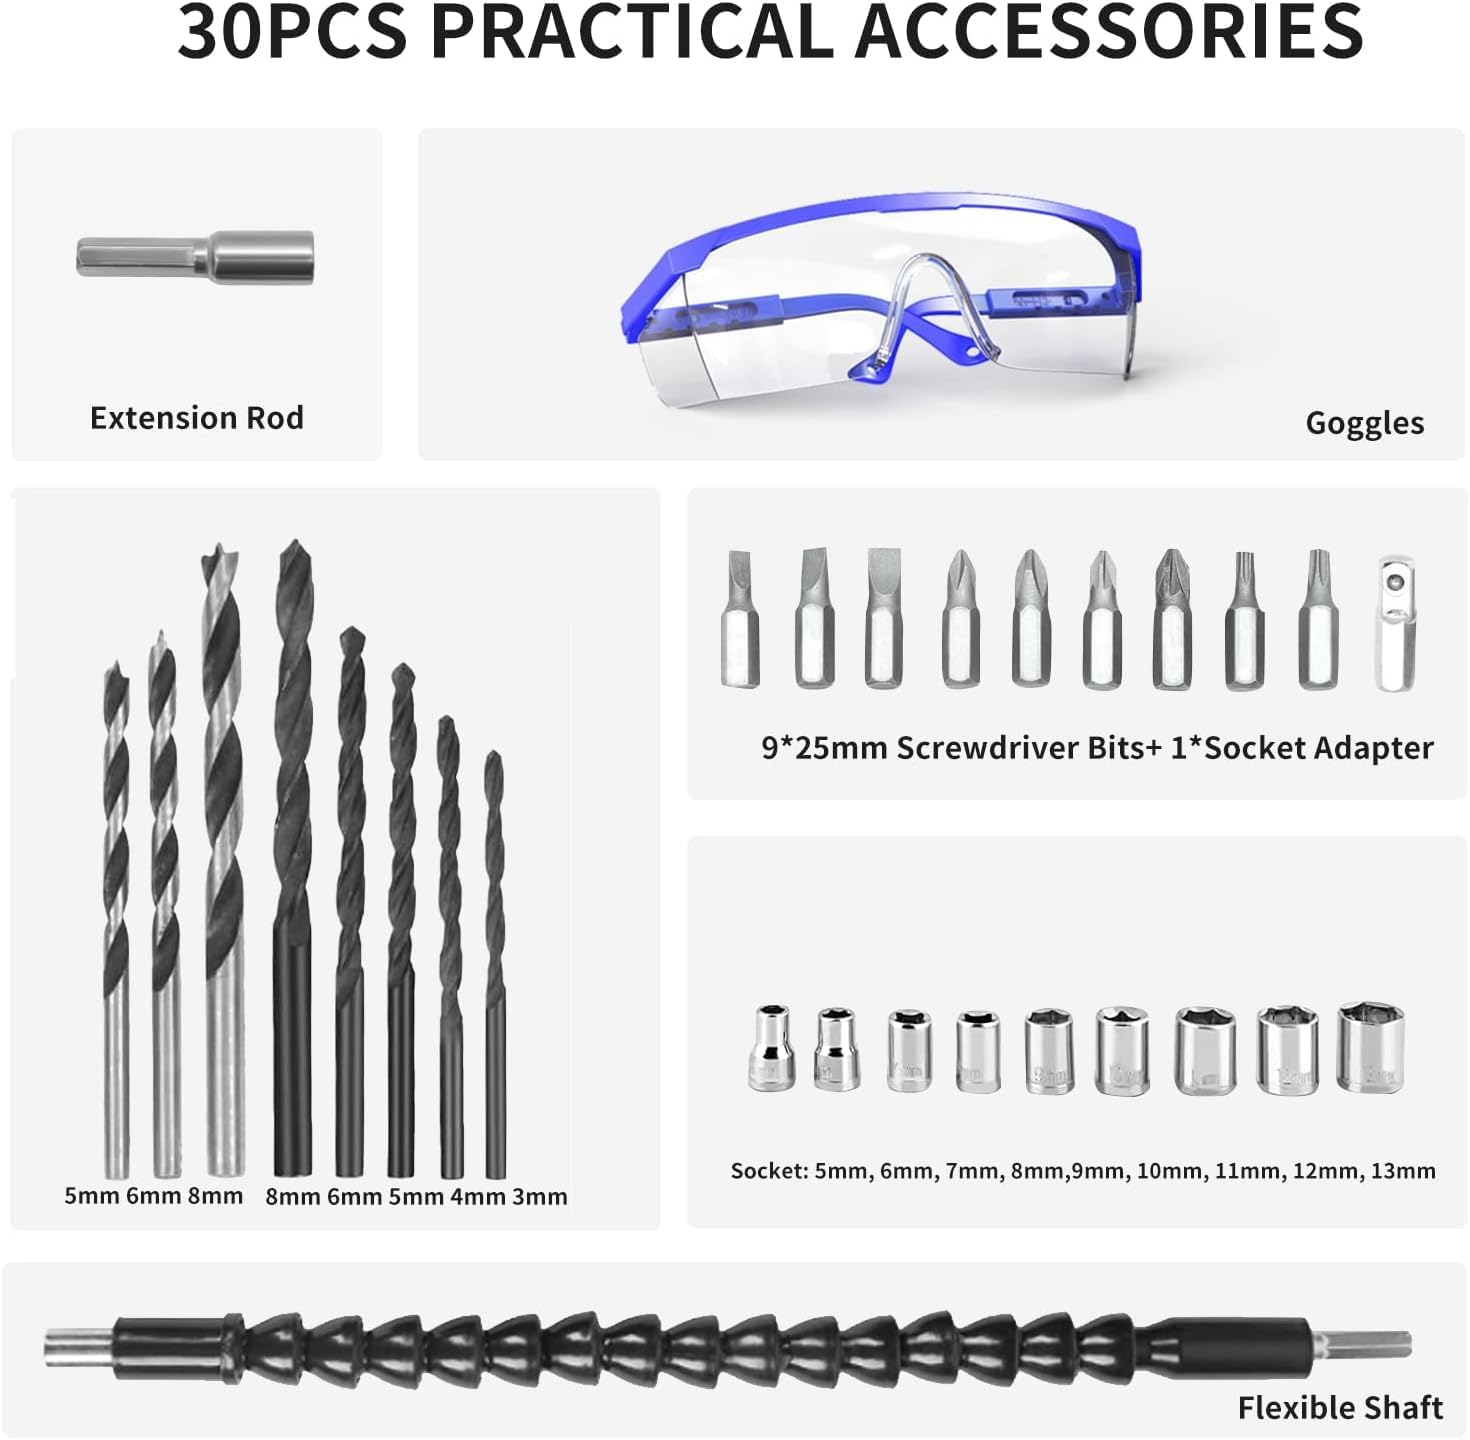
Your GardenJoy 21V Cordless Power Drill Set includes the following items:
1 x 21V Cordless Drill
1 x 1.5Ah Lithium-Ion Battery
1 x Fast Charger
5 x HSS Twist Drill Bits
3 x Wood Drill Bits
9 x Screwdriver Bits
1 x Socket Adapter
1 x Extension Rod
9 x Sockets
1 x Flexible Shaft
1 x Safety Goggles
1 x User Manual
3. Product Overview
Image: Detailed view of the drill with key components labeled.
Familiarize yourself with the main components of your cordless drill:
3/8" Keyless Chuck: Holds drill bits and screwdriver bits securely.
24+1 Torque Settings: Adjustable collar to select the desired torque for various applications.
2 Variable Speed Control: Switch on top of the drill to select between low (0-450 RPM) and high (0-1500 RPM) speeds.
Forward/Reverse Switch: Lever near the trigger to change the rotation direction for drilling or screw driving/removal.
Variable Speed Trigger: Controls the drill's speed based on pressure applied.
LED Light: Illuminates the work area for better visibility in dark or confined spaces.
Battery Pack Release Button: Releases the battery from the drill.
21V Li-ion Battery: Provides power to the drill.
Magnetic Function: Located at the back of the drill, allows for temporary storage of screws.
4. Safety Instructions
Always follow basic safety precautions when using power tools to reduce the risk of fire, electric shock, and personal injury.
Work Area Safety: Keep your work area clean and well-lit. Cluttered or dark areas invite accidents. Do not operate power tools in explosive atmospheres, such as in the presence of flammable liquids, gases, or dust.
Electrical Safety: Avoid body contact with grounded surfaces such as pipes, radiators, ranges, and refrigerators. Do not expose power tools to rain or wet conditions.
Personal Safety: Always wear eye protection (safety goggles included). Use hearing protection when operating the tool for extended periods. Dress properly; avoid loose clothing or jewelry that can get caught in moving parts.
Tool Use and Care: Do not force the power tool. Use the correct tool for your application. Ensure the switch is in the off-position before connecting to a power source, picking up, or carrying the tool.
Battery Use and Care: Recharge only with the charger specified by the manufacturer. Do not disassemble the battery pack. Do not short-circuit the battery pack.
Maintenance: Disconnect the battery pack from the tool before making any adjustments, changing accessories, or storing power tools.
5. Setup
5.1 Battery Charging
Image: The 21V Lithium-Ion battery pack.
Ensure the battery is fully charged before first use.
Connect the fast charger to a standard power outlet.
Insert the battery into the charger. The indicator light on the charger will show the charging status.
A full charge typically takes 1-2 hours. Do not overcharge the battery.
Remove the battery from the charger once fully charged.
5.2 Installing and Removing Battery
To install: Align the battery pack with the base of the drill and slide it in until it clicks securely into place.
To remove: Press the battery pack release button located at the front of the battery, and slide the battery out.
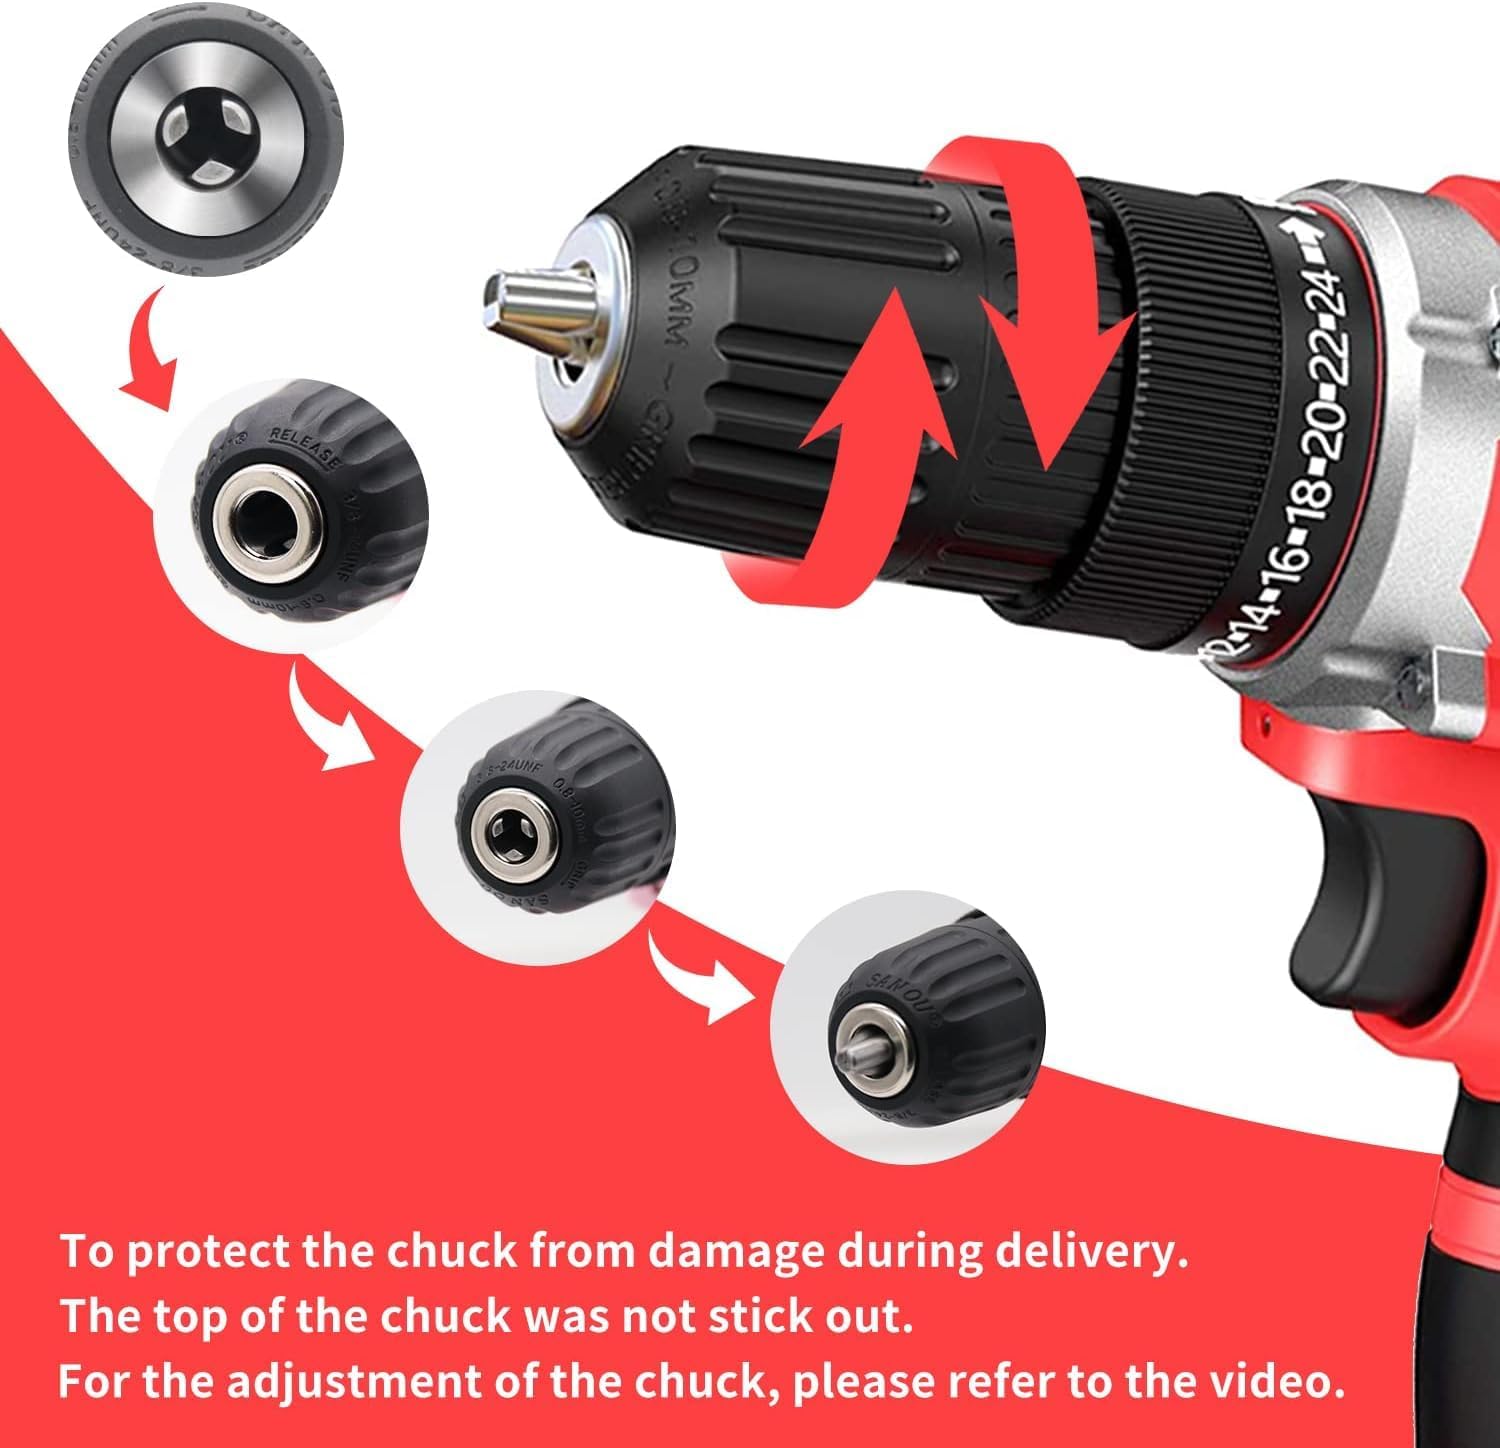
5.3 Installing and Removing Drill Bits
Image: Adjusting the keyless chuck to insert or remove a bit.
To install: Rotate the chuck counter-clockwise until the jaws are wide enough to insert the bit. Insert the desired drill bit or screwdriver bit fully into the chuck. Rotate the chuck clockwise until the bit is firmly secured.
To remove: Rotate the chuck counter-clockwise to loosen the jaws and pull the bit out.
Video: Demonstrates how to adjust the chuck and install drill bits for the GardenJoy cordless drill.
6. Operating Instructions
6.1 Power On/Off and Variable Speed Trigger
To turn on the drill, press the variable speed trigger. The speed of the drill increases as you apply more pressure to the trigger.
To turn off, release the trigger.
6.2 Forward/Reverse Switch
The forward/reverse switch is located above the trigger.
Push the switch to the left for forward rotation (for drilling and driving screws).
Push the switch to the right for reverse rotation (for removing screws).
When the switch is in the center position, the trigger is locked, preventing accidental operation.
6.3 Torque Settings (24+1 Position Clutch)
Image: The torque adjustment ring with 24+1 settings.
The torque adjustment ring allows you to select the amount of torque applied. Settings range from 1 (minimum torque) to 24 (maximum torque).
The drill icon (next to 24) is for drilling mode, which provides full torque without clutch action.
Choose a lower torque setting for smaller screws or softer materials to prevent over-driving or stripping.
Use higher torque settings for larger screws or harder materials.
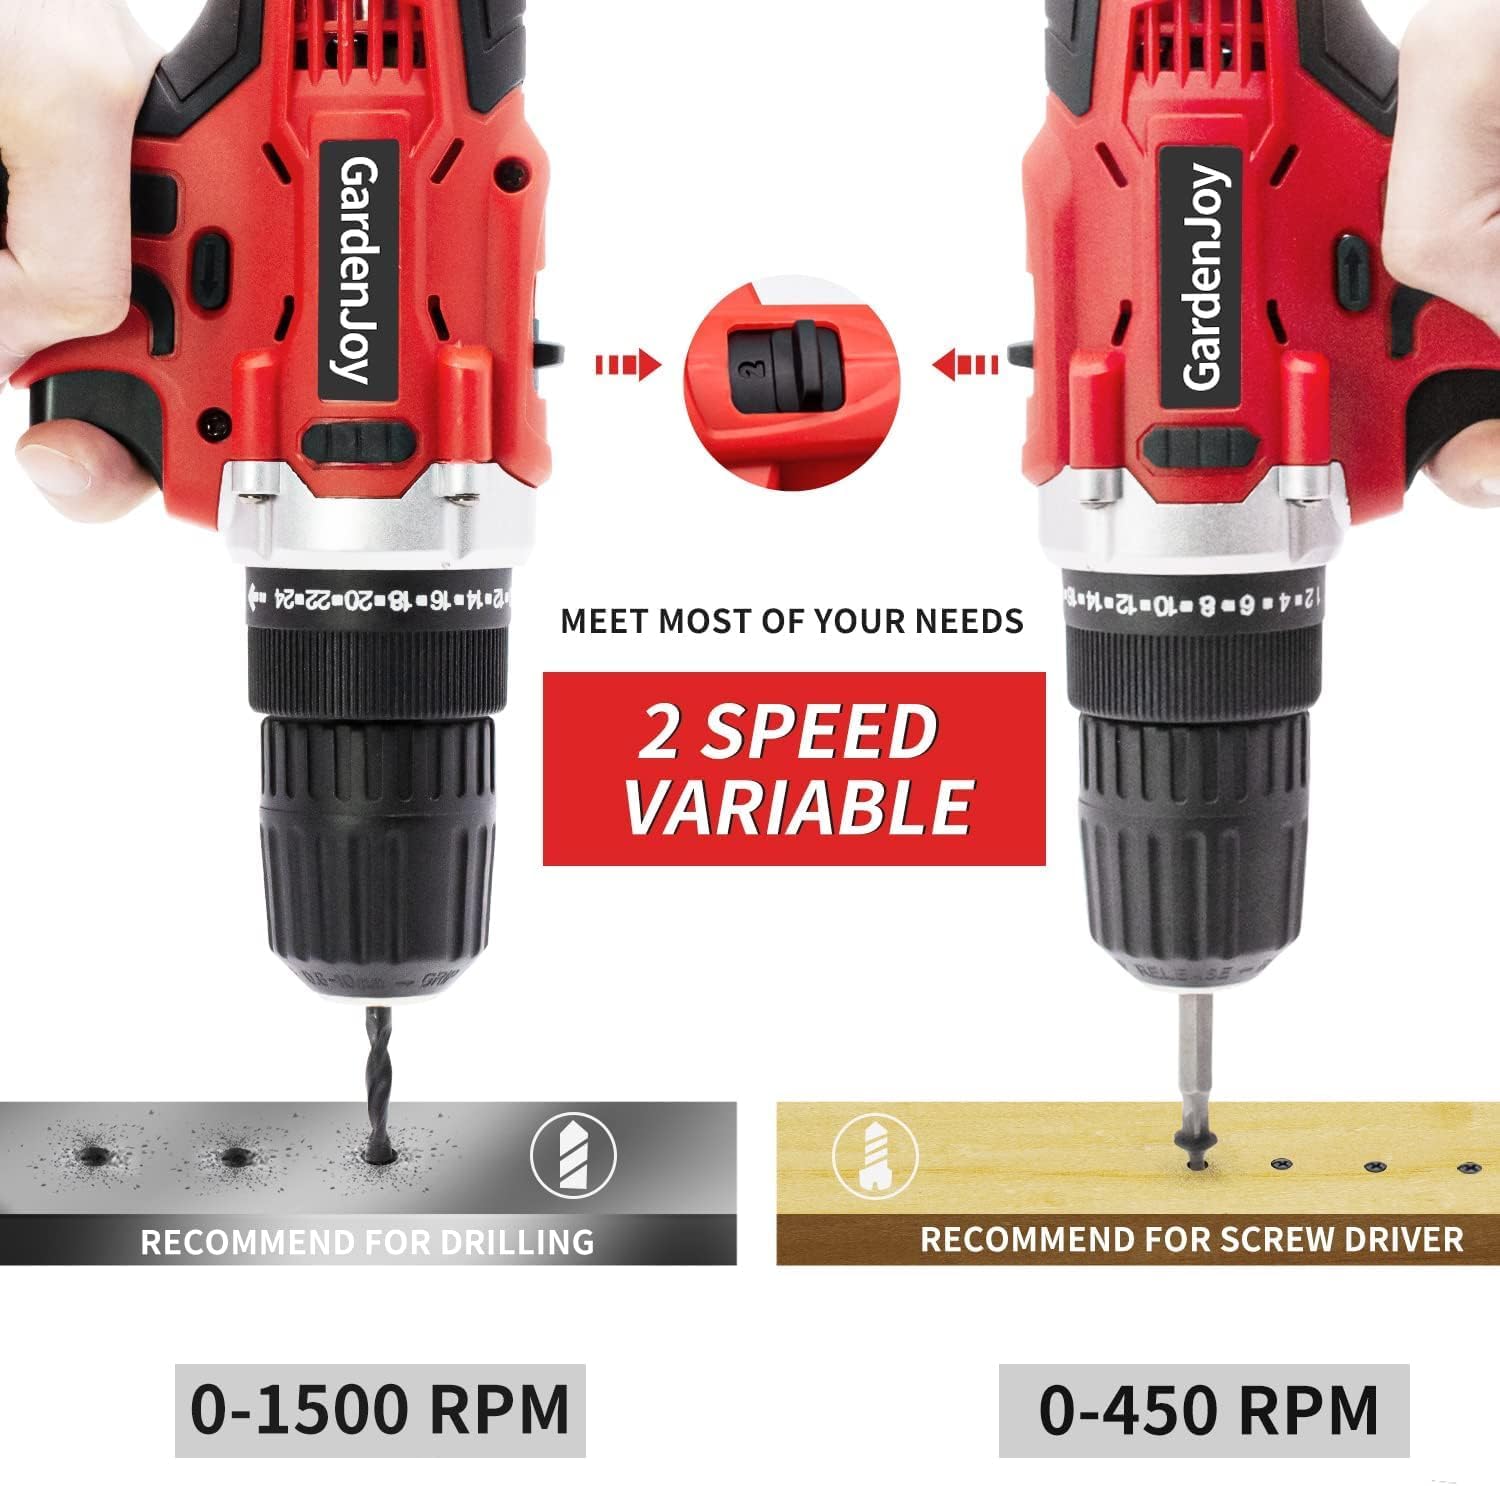
6.4 2-Speed Gear Selector
Image: The 2-speed gear selector switch.
The gear selector switch is located on top of the drill.
Position '1' (low speed, 0-450 RPM) is ideal for high-torque applications like driving screws or drilling large holes.
Position '2' (high speed, 0-1500 RPM) is suitable for fast drilling in softer materials or when less torque is required.
6.5 LED Work Light
Image: The built-in LED light in action, illuminating a tight space.
The integrated LED light automatically activates when the trigger is pressed.
It provides illumination for working in dimly lit areas or confined spaces, improving visibility and accuracy.
6.6 Flexible Shaft Usage
The flexible shaft accessory allows you to reach screws or drilling points in awkward or tight angles where the drill itself cannot fit.
Simply insert the flexible shaft into the drill's chuck and secure it. Then, insert your desired screwdriver or drill bit into the other end of the flexible shaft.
Video: Overview of the GardenJoy Cordless Power Drill Set in various applications, demonstrating its versatility.
Video: A test video showcasing the GardenJoy 21V Max Cordless Drill's performance.
Video: Demonstrates the features and capabilities of the 21V Cordless Power Drill Set.
7. Maintenance
Regular maintenance ensures the longevity and optimal performance of your GardenJoy drill.
Cleaning: After each use, wipe down the drill with a clean, damp cloth. Do not use harsh chemicals or abrasive cleaners. Keep the ventilation openings clear of dust and debris.
Storage: Store the drill and its accessories in a dry, cool place, away from direct sunlight and moisture. Ensure the battery is removed from the drill before storage.
Battery Care: For long-term storage, charge the battery to approximately 50% capacity. Recharge the battery every 3-6 months if not in use to maintain its health.
Chuck Maintenance: Periodically check the chuck for any debris or wear. Clean the jaws if necessary to ensure proper bit gripping.
8. Troubleshooting
If you encounter any issues with your drill, refer to the table below for common problems and solutions.
Problem
Possible Cause
Solution
Drill does not turn on
Battery not charged or improperly installed; Forward/Reverse switch in center (locked) position.
Charge battery fully and ensure it is clicked into place; Move the Forward/Reverse switch to either forward or reverse position.
Loss of power during operation
Battery low on charge; Overload due to excessive pressure or material.
Recharge the battery; Reduce pressure or use a higher torque setting/lower speed.
Bit slips in chuck
Chuck not tightened sufficiently; Bit shank is dirty or damaged.
Tighten chuck firmly by hand; Clean or replace the bit.
Drill overheats
Continuous heavy use; Blocked ventilation slots.
Allow the drill to cool down; Clear any obstructions from the ventilation slots.
9. Specifications
Feature
Specification
Brand
GardenJoy
Model Number
FH-6198S
Power Source
Battery Powered
Voltage
21 Volts (DC)
Battery Capacity
1.5Ah Lithium Ion
Maximum Rotational Speed
1500 RPM
Number of Speeds
2 (0-450 RPM / 0-1500 RPM)
Maximum Torque
280 in-lbs (30 NM)
Torque Settings
24+1 Position Clutch
Maximum Chuck Size
3/8 Inches (Keyless)
Product Dimensions
7.5"L x 2.9"W x 8.3"H
Item Weight
2.02 Pounds
Special Features
Built-In LED Working Light, Lightweight, Variable Speed, Cordless, Keyless Chuck, Magnetic Function
Material
Plastic, Metal
10. Warranty and Support
GardenJoy stands behind the quality of its products. Your Cordless Power Drill Set comes with a 2-year machine warranty to ensure your satisfaction and provide peace of mind.
If you have any questions, concerns, or require assistance with your product, please do not hesitate to contact our customer service team. We are committed to providing excellent support and respond to all inquiries within 24 hours.
For support, please refer to the contact information provided on your purchase receipt or visit the official GardenJoy website.
Related Documents - FH-6198S
GardenJoy Cordless Lawn Trimmer Installation Guide Step-by-step installation instructions for the GardenJoy cordless lawn trimmer. Learn how to assemble your weed wacker, including attaching the blade, extension bar, handle, and battery for efficient yard maintenance.
Artificial Tree FH-GLS/FH-RS Series - Safety and Technical Specifications Comprehensive safety advice and technical specifications for the Artificial Tree FH-GLS and FH-RS series, including models FH-GLS150, FH-RS150, FH-GLS180, FH-RS180, FH-GLS210, and FH-GLS240. Information on flammability, usage, and dimensions.
OMRON FH Series Vision System Macro Customize Functions Programming Manual This manual details the advanced capabilities of the OMRON FH Series Vision System, focusing on its powerful Macro Customize Functions. It serves as a comprehensive guide for engineers and developers to extend system functionality, create custom logic, handle complex data processing, and integrate with automation components for industrial applications.
Rolf Prima XR Rear Hub: Center Lock - Exploded View & Conversion Kits Explore the Rolf Prima XR Rear Hub with Center Lock. This document provides a detailed exploded view of the hub components and a comprehensive list of conversion kits for various axle standards and freehub bodies.