1. Introduction
This manual provides essential information for the safe and effective operation of your YESPER X1 Jump Starter with Air Compressor. Please read this manual thoroughly before using the device and retain it for future reference.

Figure 1: YESPER X1 Jump Starter with Air Compressor
2. Safety Information
Observe the following safety precautions to prevent injury or damage to the device:
- Do not use the jump starter if the battery clamps or cables are damaged.
- Ensure correct polarity when connecting to a vehicle battery (red clamp to positive, black clamp to negative). The device features anti-spark and reverse polarity protection, indicated by green/red lights for correct/incorrect connection.
- Avoid jump-starting a vehicle continuously at a high frequency. Allow the unit to cool for at least 1 minute between each start attempt.
- Do not expose the device to extreme temperatures outside its operating range of -4℉ to 140℉ (-20℃ to 60℃). Prolonged exposure to high temperatures is prohibited.
- Keep the device away from moisture, water, and flammable materials.
- The unit includes comprehensive protections: short circuit, AI software, overcharge, over-discharge, overcurrent, over-temperature, over-voltage, reverse polarity, anti-charge, and low self-consumption protection.
- For optimal battery health, charge the jump starter every 3 months if not in regular use.

Figure 2: Comprehensive Safety Protections

Figure 3: Wide Working Temperature Range
3. Package Contents
Verify that all items are present in the package:
- YESPER X1 Portable Car Lithium Battery Starter
- Smart Battery Clamp (Jumper Cables)
- Mobile Phone Adapter Cable (USB-C to USB-A)
- User Manual
- Multi-function Gas Nozzle
- Pump Tube
Note: A charging adapter is not included.

Figure 4: Included Package Contents
4. Product Overview
The YESPER X1 is a versatile device combining a powerful jump starter, an air compressor, a portable power bank, and an LED flashlight. It features a digital display for monitoring status and settings.

Figure 5: Digital Display and Multifunctionality
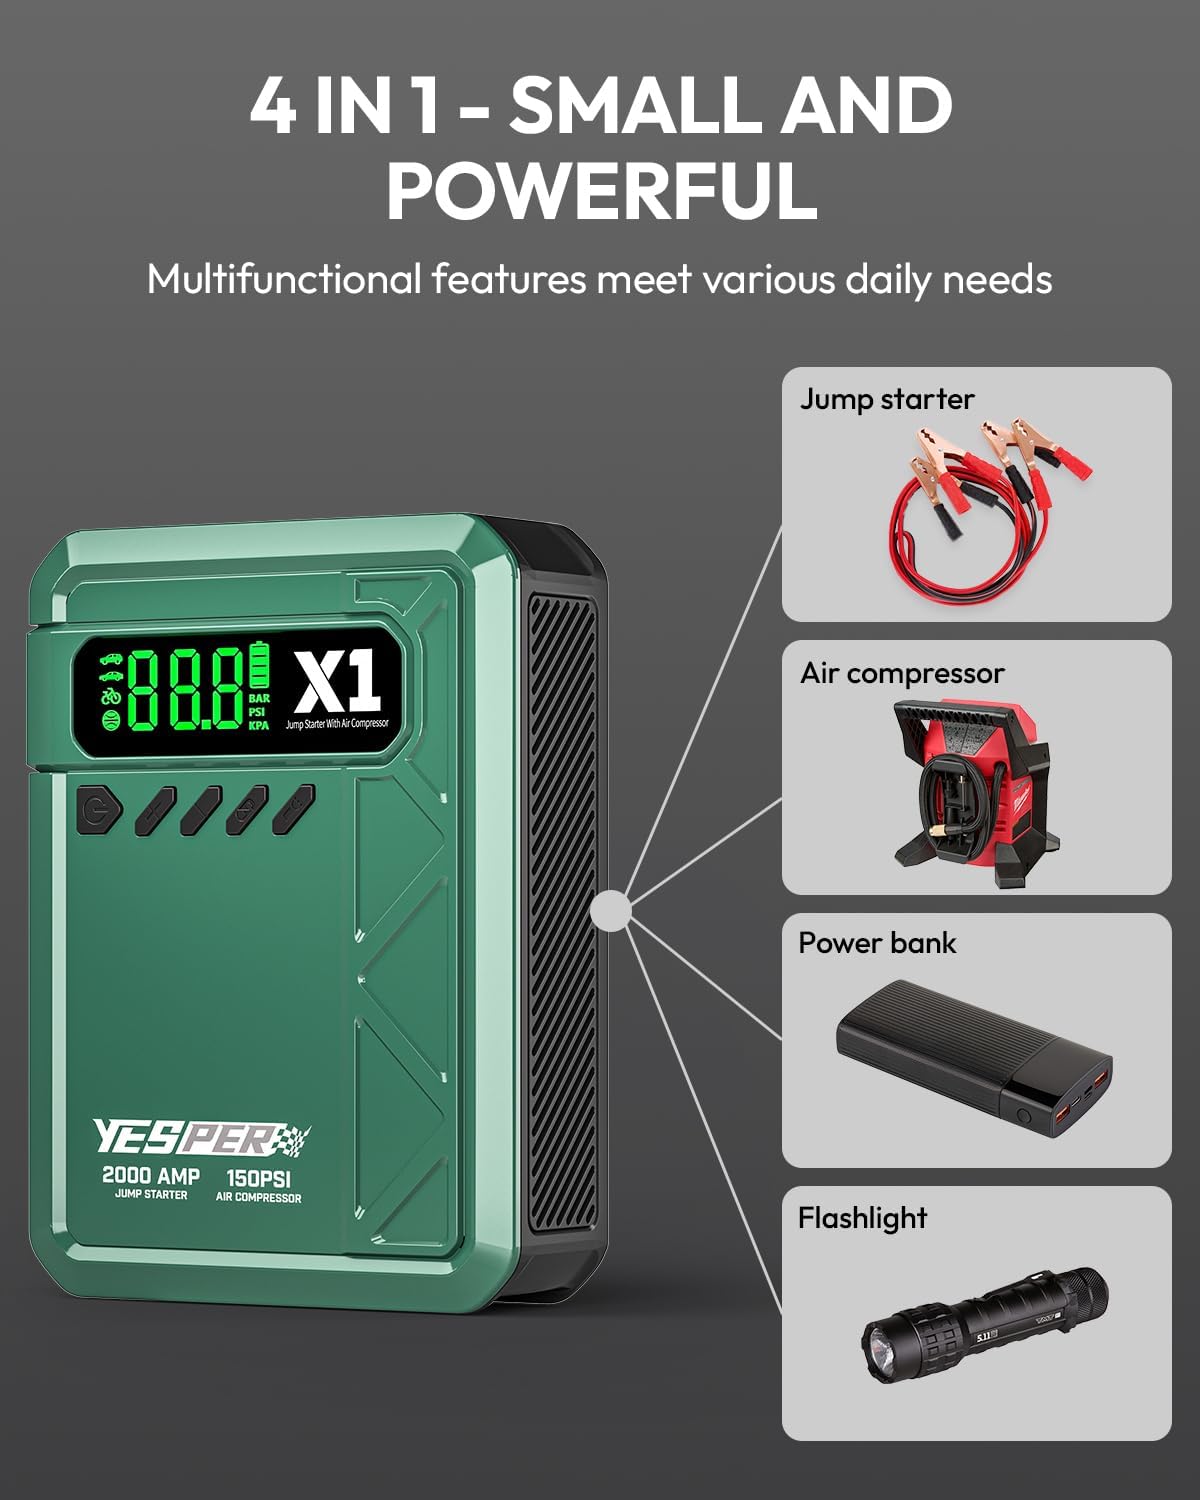
Figure 6: 4-in-1 Multifunctionality

Figure 7: Key Features and Versatility
5. Setup
Before first use, fully charge the YESPER X1 unit. Connect the provided USB-C cable to the input port on the device and the other end to a suitable USB power adapter (not included). The digital display will indicate the charging status. Ensure the device is fully charged for optimal performance, especially before jump-starting a vehicle.
6. Operating Instructions
6.1. Jump Starting a Vehicle
The YESPER X1 can jump-start 12V vehicles with up to 8.0L gasoline or 6.0L diesel engines, including cars, SUVs, motorcycles, trucks, and motorboats.
- Connect Clamps: Attach the red positive (+) clamp to the positive terminal of the vehicle's battery. Attach the black negative (-) clamp to the negative terminal of the vehicle's battery.
- Verify Connection: The smart battery clamp will indicate a correct connection (typically a green light). If a red light or warning is displayed, check the connections for correct polarity and secure contact.
- Start Vehicle: Once the connection is verified as correct, start your vehicle's ignition.
- Disconnect: After the vehicle starts, immediately disconnect the black clamp first, then the red clamp from the vehicle battery.

Figure 8: Jump Starting Capability

Figure 9: Supported Vehicle Types and Engine Sizes

Figure 10: Jump Start Procedure
6.2. Using the Air Compressor
The integrated air compressor can inflate tires up to 150 PSI with an airflow of 35L/Min. It includes 3 different nozzles and 4 preset modes for various items like car tires, bike tires, and sports balls. The auto-stop function prevents over-inflation.
- Connect Air Hose: Screw the pump tube onto the air compressor port on the device. Attach the appropriate nozzle to the item you wish to inflate.
- Select Mode and Preset Values: Use the controls on the device to select the desired inflation mode (e.g., car, bike, ball) and set the target pressure. The LCD will display the current and target pressure.
- Inflate: Press the start button to begin inflation. The compressor will automatically stop once the preset pressure is reached.

Figure 11: Air Compressor in Use

Figure 12: Inflation for Various Items

Figure 13: Air Compressor Procedure
6.3. Using as a Power Bank
The YESPER X1 features a 12000mAh capacity and a 5V/2.1A USB output port, allowing you to charge mobile phones, tablets, and other USB-powered devices.
- Connect your device's charging cable to the USB output port on the jump starter.
- The jump starter will automatically begin charging your device.

Figure 14: Portable Power Bank Function

Figure 15: 12000mAh Power Bank for Outdoor Use
6.4. Using the LED Flashlight
The built-in LED work light offers three modes for various situations:
- Flashlight Mode: Provides steady illumination for general use.
- Strobe Light Mode: Emits flashing light for signaling or attracting attention.
- SOS Light Mode: Flashes the international Morse code signal for distress.
Refer to the device's controls to cycle through these lighting modes.

Figure 16: LED Emergency Flashlight

Figure 17: Built-in LED Flashlight Modes
7. Maintenance
Proper maintenance ensures the longevity and reliability of your YESPER X1 Jump Starter:
- Regular Charging: If the unit is not used for an extended period, charge it every three months to maintain battery health.
- Cleaning: Wipe the device with a dry, soft cloth. Do not use harsh chemicals or abrasive cleaners.
- Storage: Store the device in a cool, dry place, away from direct sunlight and extreme temperatures.
- Cable Inspection: Periodically inspect the jumper cables and air hose for any signs of wear or damage. Replace if necessary.
8. Troubleshooting
If you encounter issues with your YESPER X1, refer to the following common problems and solutions:
| Problem | Possible Cause | Solution |
|---|---|---|
| Unit does not turn on. | Battery is depleted. | Charge the unit fully. |
| Vehicle does not jump start. | Incorrect clamp connection; vehicle battery severely discharged; engine size exceeds capacity. | Ensure clamps are connected correctly (green light); allow unit to charge vehicle battery for a few minutes before attempting to start; verify vehicle engine size is within specifications. |
| Air compressor not inflating. | Hose not securely connected; target pressure not set; unit battery low. | Ensure pump tube and nozzle are securely attached; set desired pressure on the digital display; charge the unit. |
| Digital display not working. | Unit is off; battery is depleted. | Press the power button to turn on; charge the unit. |
9. Specifications
| Feature | Specification |
|---|---|
| Brand | YESPER |
| Model | X1 (JS-507) |
| Peak Output Current | 2000 Amps |
| Air Compressor Max Pressure | 150 PSI |
| Air Compressor Airflow | 35 L/Min |
| Battery Type | Lithium Polymer |
| Power Bank Output | 5V/2.1A USB |
| Product Dimensions | 2.36"D x 3.77"W x 9.37"H |
| Item Weight | 600 Grams (1.32 pounds) |
| Operating Temperature | -4℉ to 140℉ (-20℃ to 60℃) |
10. Warranty and Support
YESPER is committed to providing high-quality products and customer satisfaction. Your YESPER X1 Jump Starter is backed by comprehensive support services.
- Customer Service: Enjoy 24-hour online response for any inquiries.
- Replacement Service: A 365-day replacement service is available for eligible issues.
- After-sales Support: Lifetime after-sales support is provided for your product.
For further assistance or to learn more about YESPER products, please visit the official YESPER store or website:
Visit the YESPER Store on Amazon

Figure 18: Dedicated Customer Support


