
rackchoice 5U Rackmount Server Chassis
Contents
RackChoice 5U Rackmount Server Chassis User Manual
Model: 5U Rackmount Server Chassis (Black)
Introduction
This manual provides comprehensive instructions for the installation, operation, and maintenance of your RackChoice 5U Rackmount Server Chassis. Designed for robust server environments, this chassis offers extensive compatibility with various motherboard sizes and advanced cooling solutions, including liquid cooling. Please read this manual thoroughly before proceeding with any installation or operation to ensure proper functionality and safety.
Product Overview
The RackChoice 5U Rackmount Server Chassis is engineered to house high-performance server components within a standard 19-inch rack. Its design prioritizes airflow, component compatibility, and ease of access for maintenance. Key features include support for large liquid cooling radiators, multiple drive bays, and a front-panel thermal LCD for real-time monitoring.

Figure 1: Front-side view of the RackChoice 5U Rackmount Server Chassis, showcasing its robust black metal construction and front panel features.

Figure 2: The 5U Rackmount Server Chassis integrated into a typical server room setup, demonstrating its intended use in professional environments.
Features
- Liquid Cooling Radiator Support: Accommodates radiators up to 360mm for efficient thermal management.
- Motherboard Compatibility: Supports EATX, ATX, MicroATX, and Mini-ITX motherboard sizes.
- Drive Bays: Includes 2 internal 3.5-inch drive bays with an option for 2 additional 3.5-inch bays.
- Cooling System: Features 3 x 120mm fan mounts in the front for liquid cooling, 2 x 120mm pre-installed fans in the middle, and optional 1 x 120mm & 2 x 80mm fan mounts at the rear.
- PSU Support: Compatible with 1 standard PS2 ATX power supply and 1 SFX power supply.
- Front Panel Thermal LCD: Integrated display on the front panel provides real-time temperature and fan status monitoring.
Specifications
| Attribute | Value |
|---|---|
| Product Dimensions (D x W x H) | 19.68 x 19 x 8.75 inches (500mm x 482mm x 220mm) |
| Item Weight | 31.4 pounds |
| Material | Metal |
| Compatible Devices | Server components (Motherboards: EATX/ATX/MicroATX/Mini-ITX) |
| Color | Black |
| PSU Support | 1x Standard PS2 ATX, 1x SFX |
| Drive Bays | 2x 3.5" (internal) + 2x 3.5" (optional) |
| Liquid Cooling Support | Up to 360mm radiators (front), 240mm (middle), 120mm (rear) |

Figure 3: Rear view of the chassis illustrating its external dimensions (19 inches / 482mm width, 500mm depth, 220mm height).
Setup and Installation
Before beginning installation, ensure you have all necessary components and tools. Always handle components with care and observe anti-static precautions.
1. Preparing the Chassis
- Unpack the chassis and inspect for any shipping damage.
- Remove the top cover by unscrewing the retaining screws.
- Familiarize yourself with the internal layout.

Figure 4: Internal top view of the chassis, showing the layout for component installation, including fan mounts and drive bays.
2. Motherboard Installation
- Install the I/O shield into the rear opening of the chassis.
- Align the motherboard with the standoffs inside the chassis. Ensure all standoffs match the motherboard's mounting holes.
- Secure the motherboard using appropriate screws.
3. Power Supply Unit (PSU) Installation
The chassis supports one standard PS2 ATX PSU and one SFX PSU.
- Mount the PS2 ATX PSU into its designated bay at the rear of the chassis. Secure with screws.
- If installing an SFX PSU, utilize the dedicated bracket.

Figure 5: Internal view highlighting the ATX PSU space (220.8mm between SFX PSU bracket and rear panel) and cable routing options.
4. Drive Installation
The chassis provides bays for 3.5-inch drives.
- Install 3.5-inch HDDs into the designated internal drive bays.
- For optional 3.5-inch drives, use the additional mounting points.
- Secure drives with screws.
5. Cooling System Installation
The chassis supports various fan configurations and liquid cooling solutions.
- Front Radiator/Fan Installation: Mount up to a 360mm liquid cooling radiator or three 120mm fans in the front.
- Middle Fan Installation: Two 120mm fans are pre-installed in the middle section.
- Rear Fan Installation: Optionally install one 120mm fan and two 80mm fans at the rear.

Figure 6: Internal view demonstrating the ample space for liquid cooling radiators, including 2x360mm or 1x360mm + 1x240mm in the front, and 1x240mm in the middle section.

Figure 7: Rear panel view indicating optional fan mounting points for one 120mm or 140mm fan and two 80mm fans.
6. Cable Management
Route all cables neatly to ensure optimal airflow and ease of future maintenance. Utilize cable ties and routing points within the chassis.
7. Final Assembly
- Once all components are installed and cables managed, replace the top cover and secure it with screws.
- Install the chassis into your 19-inch server rack using appropriate rackmount screws.
Operating Instructions
After successful installation, connect the power cables and peripheral devices. The chassis is designed for continuous operation in a controlled server environment.
Front Panel Thermal LCD
The integrated thermal LCD on the front panel provides real-time monitoring of internal temperature and fan status.

Figure 8: Front view of the chassis, with a red outline indicating the location of the thermal LCD display.
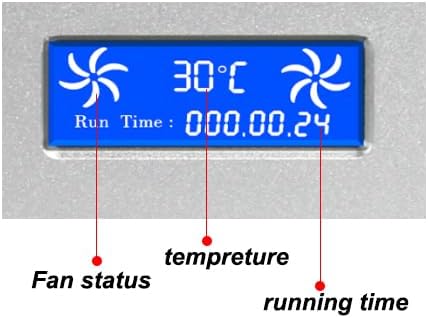
Figure 9: Close-up view of the thermal LCD display, showing indicators for fan status, temperature (e.g., 30°C), and running time.
- Temperature Display: Shows the internal temperature, typically in Celsius.
- Fan Status: Indicates the operational status of connected fans.
- Run Time: Displays the cumulative operational time of the system.
Monitor these readings to ensure your server components are operating within safe temperature limits.
Maintenance
Regular maintenance ensures the longevity and optimal performance of your RackChoice 5U Rackmount Server Chassis and the components housed within it.
- Dust Removal: Periodically open the chassis and use compressed air to remove dust buildup from fans, radiators, and internal components. Dust can impede airflow and lead to overheating.
- Fan Inspection: Check all fans for proper operation. Ensure they are spinning freely and quietly. Replace any noisy or non-functional fans.
- Cable Management Check: Verify that all cables remain neatly routed and do not obstruct airflow.
- Physical Inspection: Inspect the chassis for any signs of damage, loose screws, or corrosion.
- Air Filters: If your setup includes air filters, clean or replace them regularly according to their manufacturer's recommendations.
Troubleshooting
This section addresses common issues you might encounter with your server chassis.
| Problem | Possible Cause | Solution |
|---|---|---|
| System Overheating | Insufficient airflow, dust buildup, fan failure, improper component installation. |
|
| Front Panel LCD Not Displaying | Loose cable connection, power issue, faulty display. |
|
| Unusual Noise from Chassis | Loose components, vibrating panels, faulty fans. |
|
| Difficulty Installing Components | Incorrect component size, misalignment, insufficient force. |
|
Warranty and Support
RackChoice products are manufactured to high quality standards. For specific warranty information, please refer to the warranty card included with your purchase or visit the official RackChoice website. For technical support, troubleshooting assistance, or inquiries regarding replacement parts, please contact RackChoice customer service through the contact information provided on their official website or your purchase documentation.
Online Resources:
- RackChoice Store on Amazon: Visit Store
- Optional 20" Rail: Product Link
- White Color Model: Product Link
Documents and downloads
Ask a question about this manual
Ask about setup, troubleshooting, compatibility, parts, safety, or missing instructions. Manuals+ will review the question and use this page’s manual context to help answer it.