1. Introduction
This manual provides comprehensive instructions for the safe and efficient operation, maintenance, and troubleshooting of your KATOOL KT-T830 Tire Changer and KT-B760 Wheel Balancer Combo Machine. This professional-grade equipment is designed for tire repair and maintenance, offering robust performance for various wheel and tire sizes.
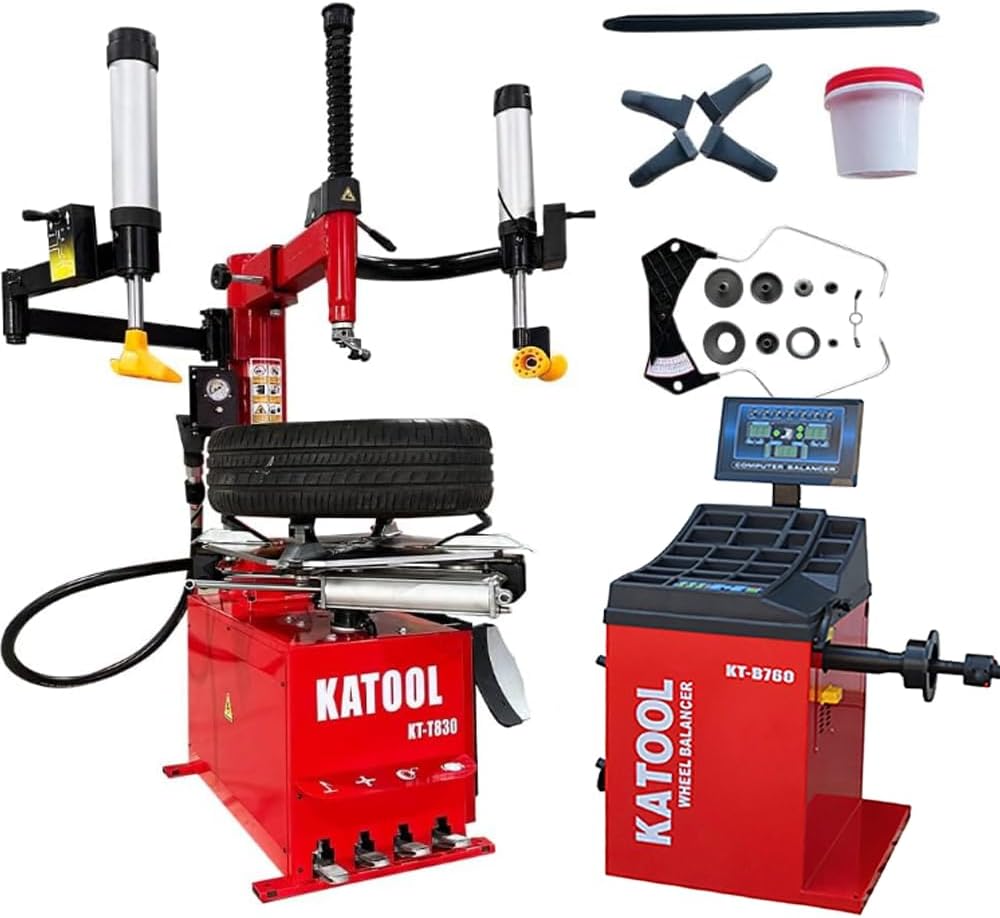
Figure 1: KATOOL KT-T830 Tire Changer and KT-B760 Wheel Balancer Combo Machine.
2. Safety Information
Always prioritize safety when operating heavy machinery. Read and understand all safety warnings and instructions before use. Failure to do so may result in serious injury or equipment damage.
- Ensure the machine is installed on a level, stable surface.
- Always wear appropriate personal protective equipment (PPE), including safety glasses, gloves, and steel-toed boots.
- Disconnect power before performing any maintenance or adjustments.
- Keep hands and clothing clear of moving parts.
- Do not exceed the specified maximum wheel dimensions or weight.
- Ensure proper air pressure supply for the tire changer.
- Only trained personnel should operate this equipment.
3. Setup and Installation
3.1 Unpacking and Inspection
Carefully unpack all components. Verify that all items listed in the "What's in the Box" section are present and undamaged. Report any discrepancies to your supplier immediately.
- Tire Changer KT-T830
- Wheel Balancer KT-B760
- Mounting head with plastic cover
- Bead breaker spade cover
- Inflation gauge
- Assist arm components
- Wheel balancer accessories (cones, quick-release nut, calipers, weights, etc.)

Figure 2: KT-T830 Tire Changer highlighting larger disk, easier operation, and stronger material.
3.2 Site Preparation
Choose a location with sufficient space for operation and maintenance, a stable concrete floor, and access to appropriate power and air supply.

Figure 3: Dimensional drawing for installation planning.
3.3 Electrical and Air Connections
- Connect the tire changer and wheel balancer to a dedicated 120V 1PH power supply.
- Connect the tire changer to an air compressor capable of supplying 0.8-1.0 Mpa (116-145 psi) of air pressure. Ensure an air filter/lubricator is installed in the air line.
3.4 Assembly
Assemble the assist arm, mounting head, and other components as per the assembly diagrams provided in the separate assembly guide (not included in this manual). Ensure all fasteners are securely tightened.
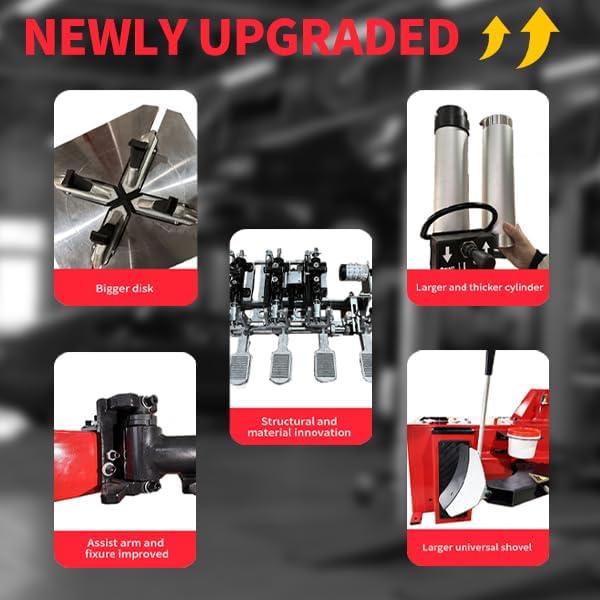
Figure 4: Overview of newly upgraded components including bigger disk, larger cylinder, and improved assist arm.
4. Operating Instructions
4.1 KT-T830 Tire Changer Operation
- Preparation: Ensure the tire changer is powered on and connected to the air supply. Lubricate the tire bead and rim edge.
- Bead Breaking: Position the wheel on the turntable. Use the bead breaker shovel and pedal control to break both the upper and lower beads from the rim.
- Clamping: Place the wheel on the turntable and use the foot pedals to clamp the rim securely from the outside (12"-22") or inside (14"-24").
- Tire Removal: Position the mounting head. Use the assist arm if necessary. Pry the tire bead over the mounting head using a tire lever while rotating the turntable via the foot pedal. Repeat for the second bead.
- Tire Installation: Lubricate the new tire's beads. Position the tire on the rim. Use the mounting head and assist arm to guide the tire onto the rim while rotating the turntable.
- Inflation: Inflate the tire using the integrated inflation gauge with pedal control. Ensure the bead seats properly. Do not overinflate.
4.2 KT-B760 Wheel Balancer Operation

Figure 5: KT-B760 Wheel Balancer featuring automatic measurement ruler for inputting A and D values.
- Mounting the Wheel: Select the appropriate cone and mount the wheel securely onto the balancer shaft. Tighten the quick-release nut.
- Inputting Data: Use the automatic measurement ruler to input the A (distance), D (diameter), and W (width) values. Select the desired balancing mode (e.g., static, dynamic, ALU modes).
- Starting Measurement: Lower the wheel guard (if equipped) and press the START button. The wheel will spin and the machine will calculate the imbalance.
- Applying Weights: The display will indicate the amount and location of weights required. Rotate the wheel to the indicated position and apply the correct weights to the inner and outer rim flanges.
- Re-check: Spin the wheel again to verify the balance. Repeat the process if necessary until the display shows zero or minimal imbalance.

Figure 6: KT-B760 Wheel Balancer in operation with a wheel mounted.
5. Maintenance
Regular maintenance ensures the longevity and optimal performance of your KATOOL equipment.
- Daily: Clean the machine surfaces. Check air lines and connections for leaks.
- Weekly: Lubricate moving parts of the tire changer, especially the clamping jaws and assist arm pivots. Check the oil level in the air lubricator.
- Monthly: Inspect all electrical connections for wear or damage. Check the tightness of all bolts and fasteners. Clean the wheel balancer shaft and cones.
- Annually: Perform a self-calibration on the wheel balancer. Inspect the motor and belts for wear.
6. Troubleshooting
This section provides solutions to common issues. For problems not listed here, contact KATOOL customer support.
| Problem | Possible Cause | Solution |
|---|---|---|
| Tire Changer not clamping | Low air pressure; clogged air filter; worn cylinder seals. | Check air supply; clean/replace air filter; contact service for seal replacement. |
| Wheel Balancer inaccurate readings | Incorrect data input; machine not calibrated; dirty shaft/cones; unstable mounting. | Verify input values; perform self-calibration; clean shaft/cones; re-mount wheel securely. |
| Machine not powering on | No power supply; tripped circuit breaker; faulty power switch. | Check power outlet/cord; reset breaker; contact service. |
7. Specifications
7.1 KT-T830 Tire Changer
| Specification | Value |
|---|---|
| Max Wheel Diameter | 41" / 1040mm |
| Max Wheel Width | 15" / 380mm |
| Outside Clamp | 12" - 22" |
| Inside Clamp | 14" - 24" |
| Power Supply | 120V 1PH |
| Motor Power | 2.0HP / 1.5KW |
| Rotation Speed | 6.8 r/min |
| Air Pressure | 0.8 - 1.0 Mpa (116-145 psi) |
| Net Weight | 240 KG |
7.2 KT-B760 Wheel Balancer
| Specification | Value |
|---|---|
| Rim Diameter | <30" |
| Wheel Width | 3" - 12" |
| Wheel Diameter | <880mm |
| Balancing Speed | 180 rpm |
| Power Supply | 120V 1PH |
| Motor Power | 0.25KW |
| Rim Center Hole Dia. | <135mm |
| Wheel Weight | <65KG |
| Balancing Accuracy | ±1g |
| Measuring Time | 7 seconds |

Figure 7: Comparison of KATOOL's latest features against other models, highlighting superior specifications.
8. Warranty and Support
KATOOL provides a 12-month warranty on all parts for both the KT-T830 Tire Changer and the KT-B760 Wheel Balancer from the date of purchase. This warranty covers defects in materials and workmanship under normal use.
For technical support, warranty claims, or spare parts, please contact KATOOL customer service through the vendor from whom you purchased the product or visit the official KATOOL website for contact information.
Please have your model number (KT-T830 & KT-B760) and purchase date available when contacting support.


