1. Introduction
This manual provides essential information for the installation, operation, and maintenance of your Diyeeni LGA 1155 DDR3 Motherboard. Please read these instructions carefully before proceeding with installation to ensure proper functionality and to prevent damage.
Package Contents
- 1 x Diyeeni DDR3 Motherboard
- 1 x I/O Bracket
- 1 x SATA Cable
- 1 x User Manual

Figure 1.1: Top-down view of the Diyeeni LGA 1155 DDR3 Motherboard.
2. Setup and Installation
Proper installation is crucial for the stability and performance of your computer system. Always handle the motherboard by its edges and avoid touching components directly to prevent electrostatic discharge (ESD) damage. It is recommended to wear an anti-static wrist strap during installation.
2.1 CPU Installation
- Locate the LGA 1155 CPU socket on the motherboard.
- Gently push down the load lever and pull it to the side to open the CPU socket cover.
- Carefully align the CPU with the socket, ensuring the gold triangle on the CPU matches the indicator on the socket. Do not force the CPU into the socket.
- Lower the load plate and secure it with the load lever.
Important: Incorrect CPU installation can bend pins, rendering the motherboard unusable. Verify CPU compatibility and alignment carefully.
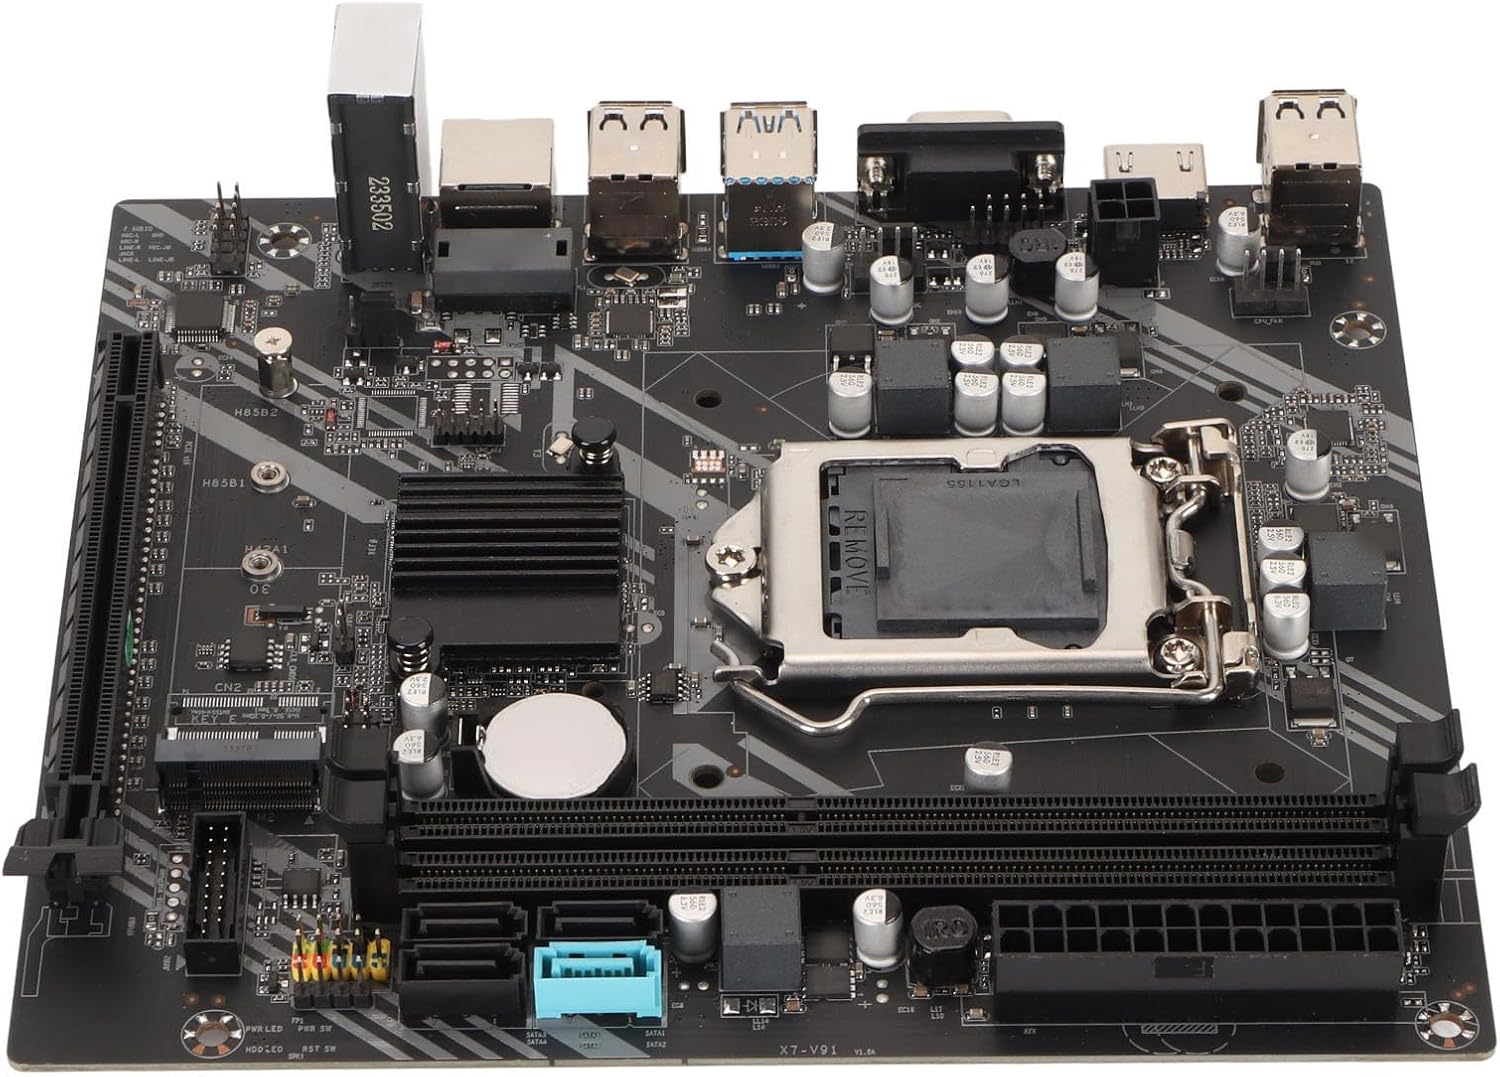
Figure 2.1: Close-up view of the LGA 1155 CPU socket and DDR3 memory slots.
2.2 Memory (RAM) Installation
- Open the clips at both ends of the DDR3 memory slots.
- Align the notch on the DDR3 memory module with the key in the memory slot.
- Press down firmly on both ends of the memory module until the clips snap into place.
2.3 Storage Device Installation
- SATA Drives: Connect SATA data cables from your storage devices (HDDs/SSDs) to the SATA 2.0 or SATA 3.0 interfaces on the motherboard. Connect SATA power cables from your power supply to the drives.
- M.2 NVMe SSD: Insert the M.2 NVMe SSD into the dedicated M.2 slot (PCIe channel) and secure it with the provided screw.
2.4 Graphics Card Installation (PCIe X16)
- Locate the PCIe X16 graphics card slot.
- Remove the corresponding expansion slot cover from your PC case.
- Align your graphics card with the slot and press down firmly until it is seated correctly and the retention clip locks.
- Secure the graphics card to the case with a screw.
2.5 Power Connections
- Connect the 24-pin ATX power connector from your power supply to the 24-pin power interface on the motherboard.
- Connect the 4-pin CPU power connector from your power supply to the 4-pin power socket near the CPU.
2.6 Front Panel and I/O Connections
Connect the front panel headers (power button, reset button, HDD LED, power LED) and USB 2.0/3.0 headers to their respective pins on the motherboard. Refer to the motherboard's silkscreen labels for correct pin assignments.

Figure 2.2: Angled view of the motherboard, highlighting expansion slots and connectors.
3. Operating Your Motherboard
Once all components are installed and connected, you can power on your system. The Diyeeni LGA 1155 DDR3 Motherboard provides a stable platform for your computing needs.
3.1 Integrated Graphics and Audio
This motherboard features an integrated graphics card and a 6-channel audio chip. For video output, connect your display to the VGA or HD Multimedia Interface (HDMI) port on the I/O panel. For audio, use the integrated audio jacks.

Figure 3.1: Detailed view of the I/O panel, including audio, LAN, and USB ports.
3.2 Connectivity
- USB Ports: Utilize the 4 x USB 2.0 and 2 x USB 3.0 ports for connecting peripherals.
- Network: The integrated RJ45 port provides reliable high-speed internet connectivity.
3.3 BIOS/UEFI Setup
To access the BIOS/UEFI setup utility, press the designated key (usually DEL or F2) during system startup. Here you can configure boot order, system time, and other advanced settings.
4. Maintenance
To ensure the longevity and optimal performance of your motherboard, consider the following maintenance tips:
- Keep it Clean: Regularly clean dust from inside your PC case, especially around the motherboard and CPU cooler, using compressed air. Dust accumulation can lead to overheating.
- Proper Ventilation: Ensure your PC case has adequate airflow to dissipate heat generated by components.
- BIOS Updates: Periodically check the manufacturer's website for BIOS/UEFI updates. Updates can improve compatibility, stability, and performance.
- Battery Replacement: The motherboard uses a CR2032 button battery for the CMOS. If you experience issues with system time or BIOS settings resetting, the battery may need replacement.
5. Troubleshooting
If you encounter issues with your motherboard, refer to the following common troubleshooting steps:
- No Power/No Boot:
- Check all power connections (24-pin ATX, 4-pin CPU) are securely seated.
- Ensure the power supply is functional and switched on.
- Verify the front panel power button connection to the motherboard.
- No Display:
- Ensure your monitor is connected to the correct video output (either integrated graphics or a dedicated graphics card).
- Reseat the graphics card and RAM modules.
- Try booting with only one RAM stick.
- System Instability/Crashes:
- Check for proper CPU cooler installation and thermal paste application.
- Ensure RAM modules are correctly seated and compatible.
- Update drivers for your components (chipset, graphics, audio).
- CPU Pin Damage: As noted by some users, incorrect CPU installation can lead to bent pins. Always align the CPU carefully with the socket's orientation marks and avoid applying excessive force. If pins are bent, professional repair may be required.
6. Specifications
Below are the detailed technical specifications for the Diyeeni LGA 1155 DDR3 Motherboard:
| Feature | Specification |
|---|---|
| Item Type | DDR3 Motherboard |
| Material | Printed Circuit Board |
| CPU Platform | For Core 2nd and 3rd Gen |
| CPU Socket | LGA 1155 |
| Chipset Type | Intel H77 Express (Compatible with B75) |
| Memory Type | DDR3 1600/1333/1066 MHz |
| Memory Slots | 2 x DDR3 |
| Graphics Card Slot | 1 x PCIe X16 |
| M.2 Slot | 1 x M.2 NVMe (PCIe Channel) |
| SATA Interfaces | 3 x SATA 2.0, 1 x SATA 3.0 |
| USB 2.0 Ports | 4 (Rear I/O) + 1 x USB 2.0 Pin (Internal) |
| USB 3.0 Ports | 2 (Rear I/O) + 1 x USB 3.0 Pin (Internal) |
| Video Output | 1 x VGA Port, 1 x HD Multimedia Interface (HDMI) |
| LAN Port | 1 x RJ45 Port |
| Audio Chip | Integrated 6 Channel Sound Chip |
| Power Sockets | 1 x 4-Pin, 1 x 24-Pin |
| Power Supply Phase | 3 Phase Power Supply |
| CMOS Battery | 1 x CR2032 Button Battery (240mAh) |
| Dimensions (Approx.) | 27 x 21 x 5 cm |
| Weight (Approx.) | 528 g |
7. Warranty and Support
For warranty information, technical support, and further assistance, please refer to the retailer where you purchased this product or visit the official Diyeeni brand store.
Diyeeni Store: https://www.amazon.ca/stores/Diyeeni/page/1195A89A-7EEE-4D74-A4F7-05DAA074380B