VINGLI cooler007
VINGLI 60QT Rolling Ice Chest Instruction Manual
Model: cooler007
Introduction
This manual provides instructions for the assembly, operation, maintenance, and troubleshooting of your VINGLI 60QT Rolling Ice Chest. Please read this manual thoroughly before use to ensure proper function and longevity of your product.
Safety Information
- Keep children away from the cooler during assembly. Small parts may pose a choking hazard.
- Ensure all parts are securely fastened before use.
- Do not overload the cooler. Refer to the capacity specifications.
- Use caution when moving the cooler, especially when full. Ensure wheels are locked when stationary to prevent unintended movement.
- Do not use abrasive cleaners or harsh chemicals, as these may damage the finish.
- Always drain water completely after use to prevent mold and mildew.
Parts List
Before assembly, verify that all components listed below are present and undamaged.
- Cooler Basin (60QT capacity)
- Rolling Cart Frame
- Lids (2, dual-access)
- Wheels (4, 2 with locks)
- Bottom Storage Shelf
- Bottle Opener with Cap Catcher
- Drain Plug with Detachable Water Pipe
- Handles (2, side-mounted)
- Assembly Hardware (screws, washers, wrench)
Setup and Assembly
Follow these steps to assemble your VINGLI Rolling Ice Chest.
Step 1: Attach Wheels to Cart Frame
Secure the four wheels to the bottom of the rolling cart frame using the provided hardware. Ensure the two lockable wheels are positioned on the same side for easier access when locking.

Image: Man pushing the cooler, highlighting the wheels with a lock.

Image: Detail of a lockable caster wheel.
Step 2: Assemble Cart Frame and Bottom Shelf
Connect the vertical supports to the wheeled base and attach the bottom storage shelf. Use the appropriate screws and tighten them securely.
Step 3: Place Cooler Basin onto Cart Frame
Carefully place the cooler basin onto the assembled cart frame. The basin is designed to sit securely on the frame but is detachable for portability.

Image: Detachable cooler basin being removed from the cart.
Step 4: Attach Bottle Opener and Cap Catcher
Mount the bottle opener and its accompanying cap catcher to the side of the cooler basin using the designated attachment points and hardware.

Image: Detail of the bottle opener and cap catcher.
Step 5: Install Drain Pipe
Attach the detachable water pipe to the drain plug on the cooler basin. Ensure it is securely fitted to prevent leaks.

Image: Detail of the drain hole and detachable pipe.
Operating Instructions
Filling the Cooler
Open the dual-access lids by lifting the ergonomic lid handles. Place beverages and ice into the cooler basin. The 60QT capacity can hold up to 75 cans or 40 bottles.
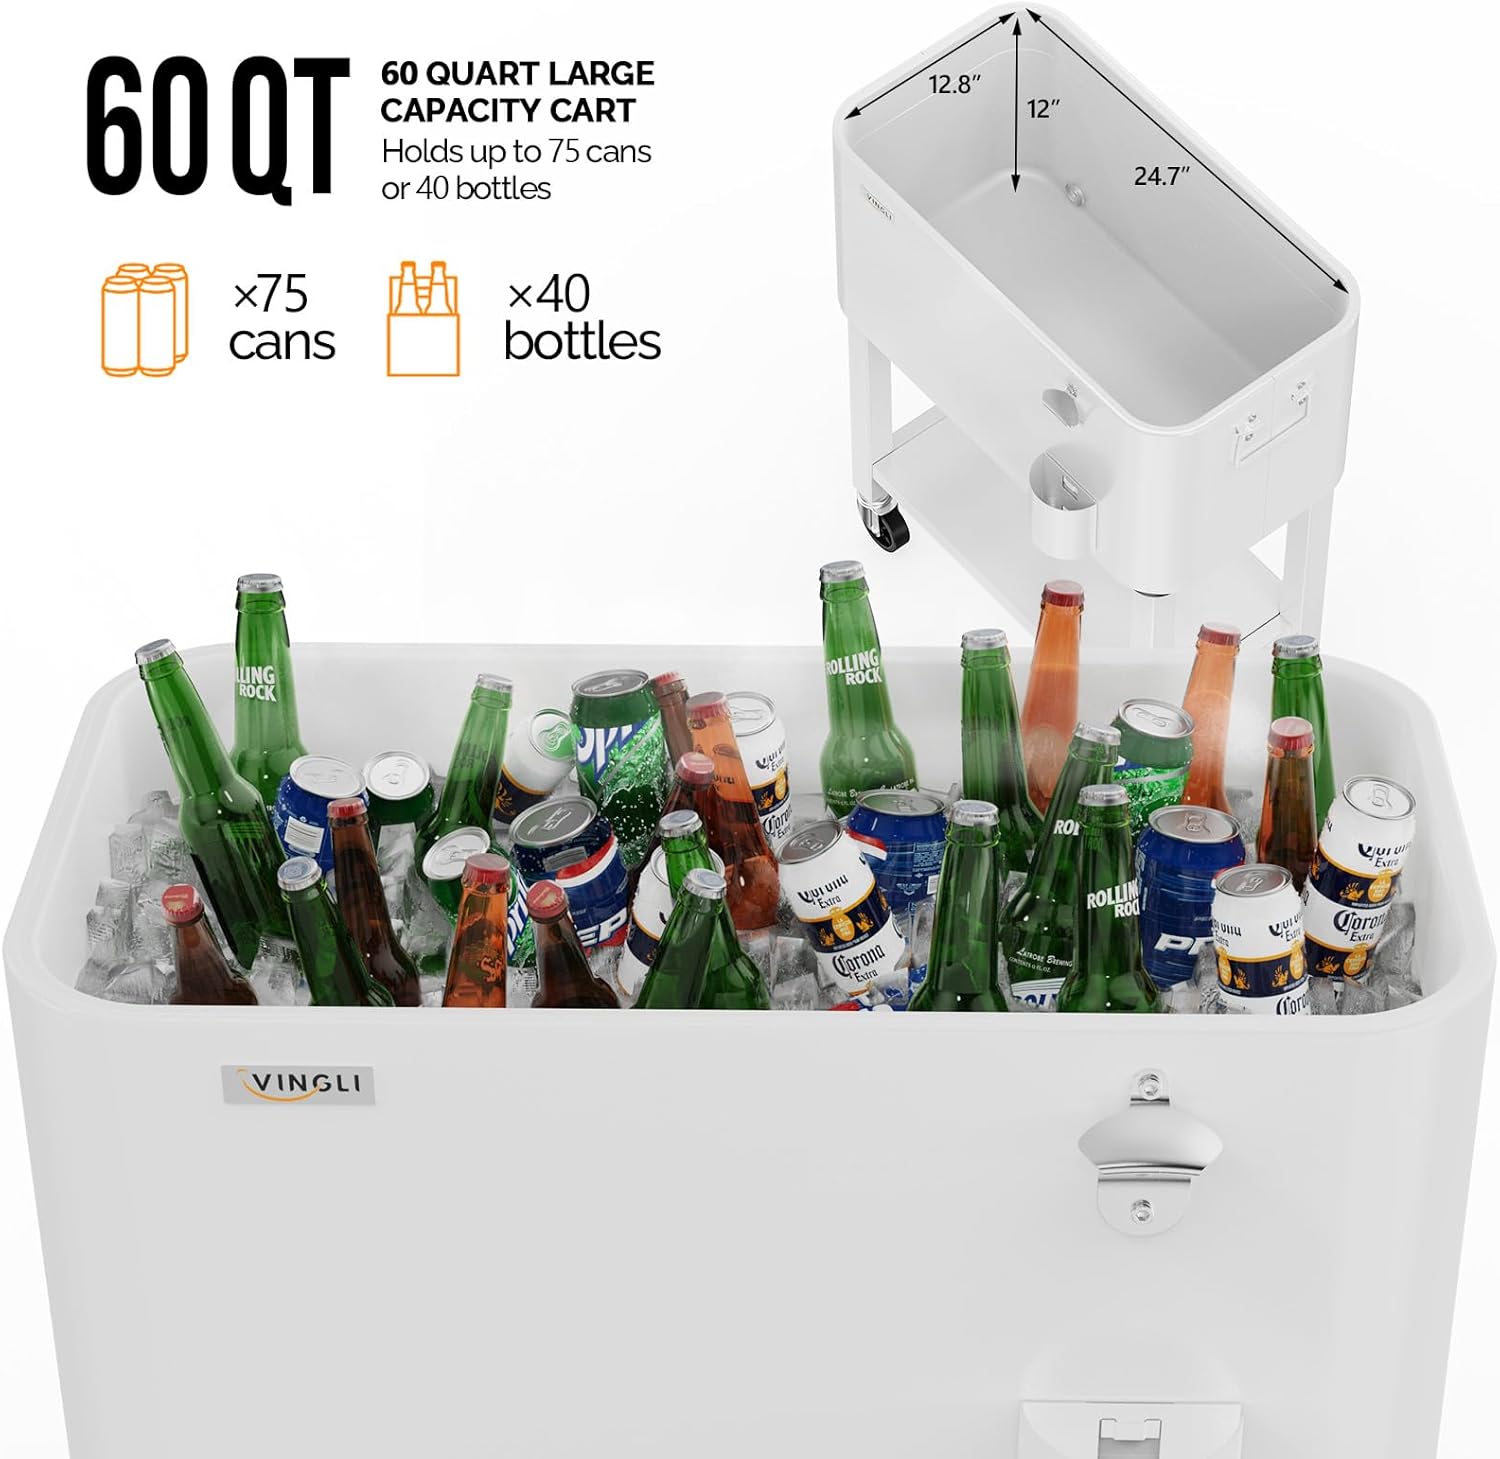
Image: Cooler filled with beverages and ice, demonstrating capacity.
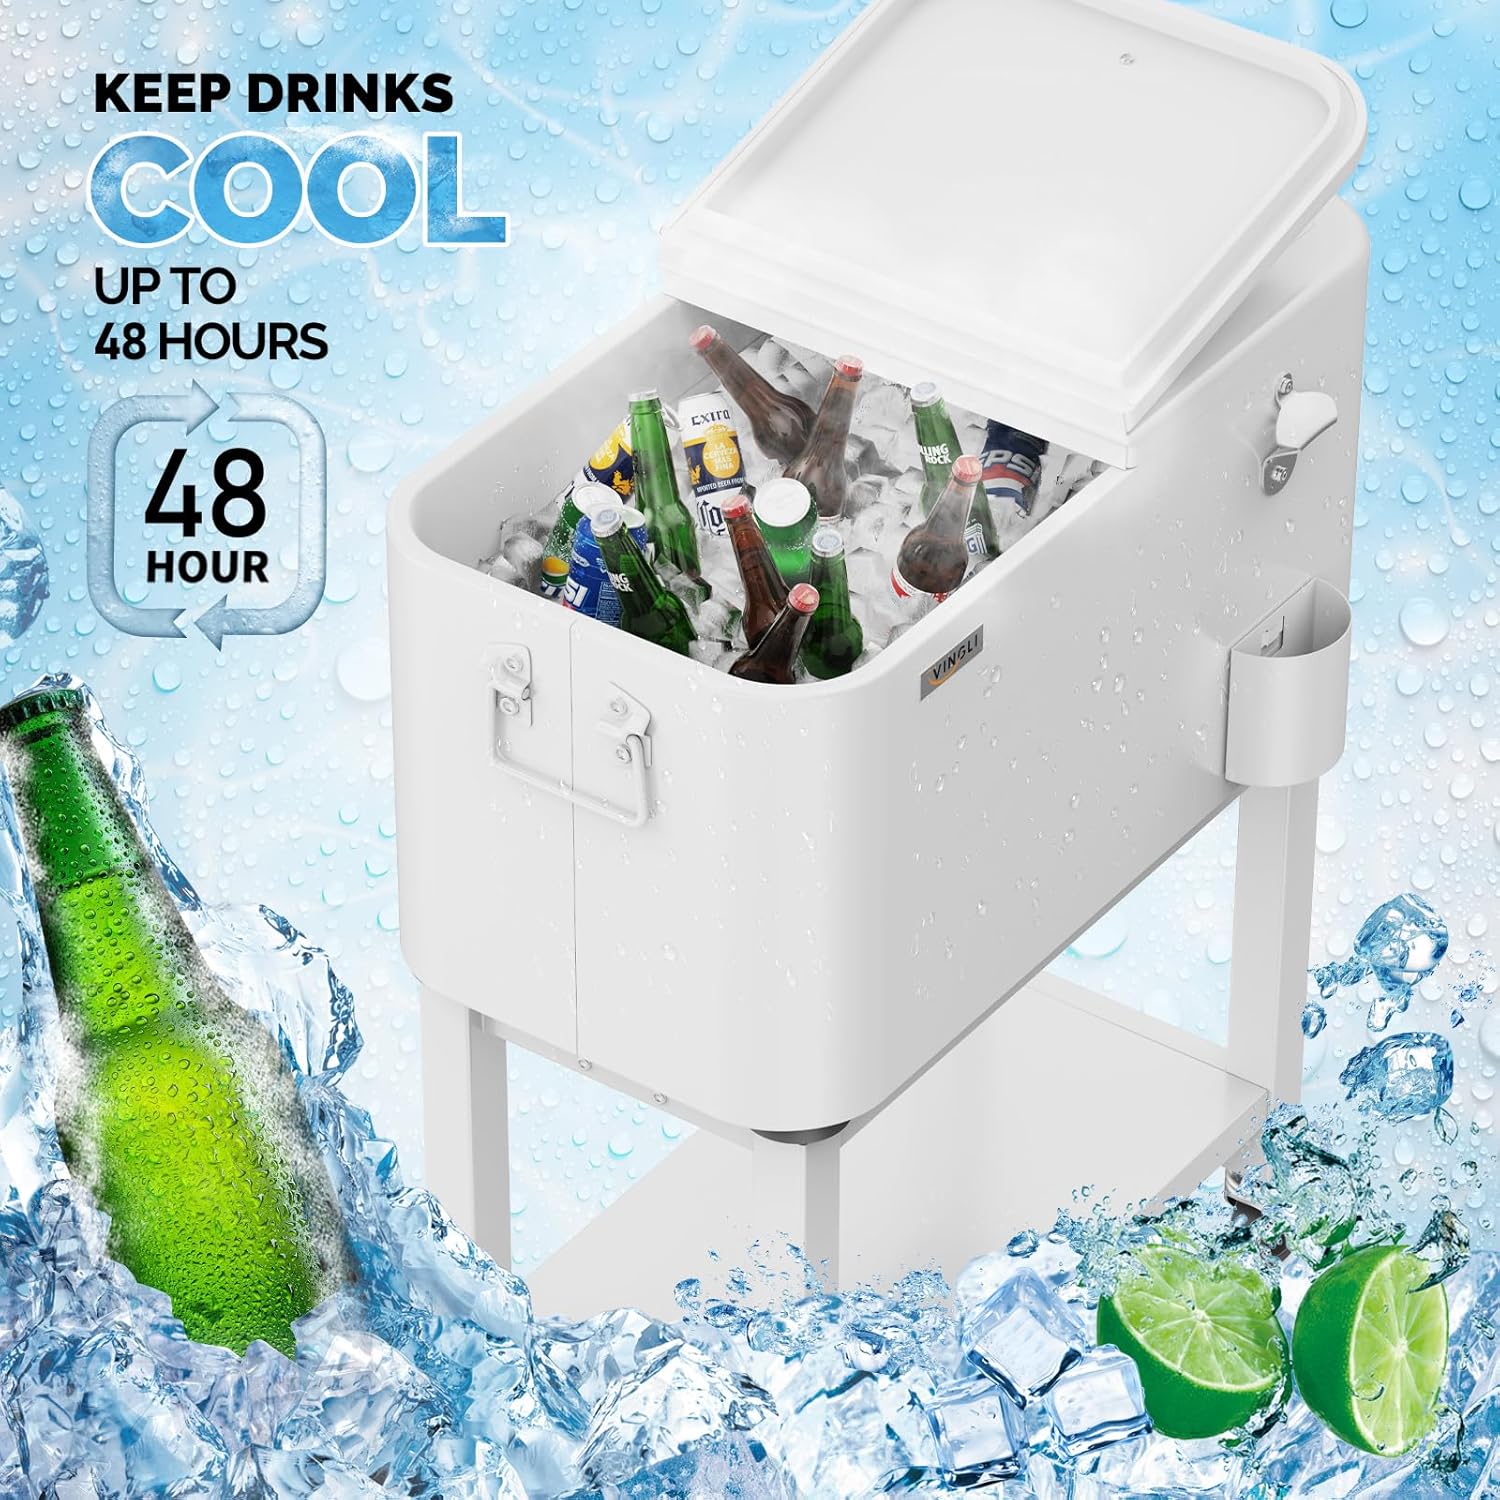
Image: Cooler with ice and drinks, highlighting its 48-hour cooling capability.
Maintaining Temperature
The cooler is designed to keep contents cool for up to 48 hours and warm for up to 8 hours. For optimal performance, pre-chill the cooler before adding cold items and minimize lid opening.
Using the Bottle Opener
The built-in bottle opener is located on the side of the cooler. Use it to open bottled beverages. Bottle caps will fall into the attached cap catcher for easy disposal.
Mobility and Stability
Use the multi-directional rolling wheels to move the cooler. When the cooler is in its desired position, engage the locks on the two lockable wheels to prevent movement.
Draining the Cooler
After use, remove the drain plug and attach the detachable water pipe to drain melted ice water. Ensure the cooler is positioned to allow water to flow away from the unit.
Maintenance
- Cleaning: Clean the interior and exterior of the cooler with mild soap and water after each use. Rinse thoroughly and dry completely to prevent odors and mildew.
- Storage: Store the cooler in a dry, cool place when not in use. Ensure the lids are slightly ajar to allow for air circulation and prevent moisture buildup.
- Wheel Care: Periodically check the wheels for debris and ensure they roll smoothly. Lubricate if necessary.
- Drain Plug: Ensure the drain plug is clean and free of obstructions for efficient draining.
Troubleshooting
| Problem | Possible Cause | Solution |
|---|---|---|
| Cooler not keeping items cold/warm effectively. | Lids not fully closed; cooler not pre-chilled; excessive lid opening; insufficient ice. | Ensure lids are securely closed. Pre-chill the cooler before use. Minimize lid opening. Use adequate amount of ice. |
| Water leakage from drain. | Drain plug not securely closed; drain pipe not properly attached. | Ensure drain plug is tightly sealed. Verify the detachable water pipe is correctly fitted. |
| Wheels not rolling smoothly or locking. | Debris in wheels; locking mechanism obstructed or damaged. | Clean wheels of any debris. Check locking mechanism for obstructions. If damaged, contact support. |
| Cooler basin difficult to detach/reattach. | Misalignment; debris in connection points. | Ensure proper alignment when detaching/reattaching. Clear any debris from the connection points. |
Specifications
| Feature | Detail |
|---|---|
| Brand | VINGLI |
| Model Name | cooler007 |
| Capacity | 60 Quarts (approx. 75 cans or 40 bottles) |
| Color | White |
| Material | Iron, Plastic (Insulation: Polyurethane Foam) |
| Product Dimensions (D x W x H) | 16.9" x 32.3" x 33.5" |
| Special Features | Built-In Bottle Opener, Cap Catcher, Drain Hole, Insulated, Wheeled (2 lockable casters), Detachable Basin, Bottom Storage Shelf |
| Cooling Performance | Keeps cool for 48 hours |
| Warming Performance | Keeps warm for 8 hours |

Image: Dimensional diagram of the 60QT Rolling Cooler Cart.
Warranty Information
This VINGLI product comes with a 1-Year Warranty from the date of purchase. This warranty covers manufacturing defects and workmanship. It does not cover damage caused by misuse, accidents, unauthorized modifications, or normal wear and tear. Please retain your proof of purchase for warranty claims.
Customer Support
For further assistance, parts replacement, or warranty inquiries, please contact VINGLI customer support. You can find more information and contact details on the official VINGLI store page:
Ask a question about this manual
Ask about setup, troubleshooting, compatibility, parts, safety, or missing instructions. Manuals+ will review the question and use this page’s manual context to help answer it.