1. Setup
Before first use, ensure all components are present and properly assembled. The grinder features a safety mechanism that prevents operation unless the bean hopper and powder container are correctly installed.
1.1 Unpacking and Component Identification
Carefully remove all parts from the packaging. Verify that you have the main grinder unit, bean hopper, bean hopper lid, ground coffee container, and ground coffee container lid.
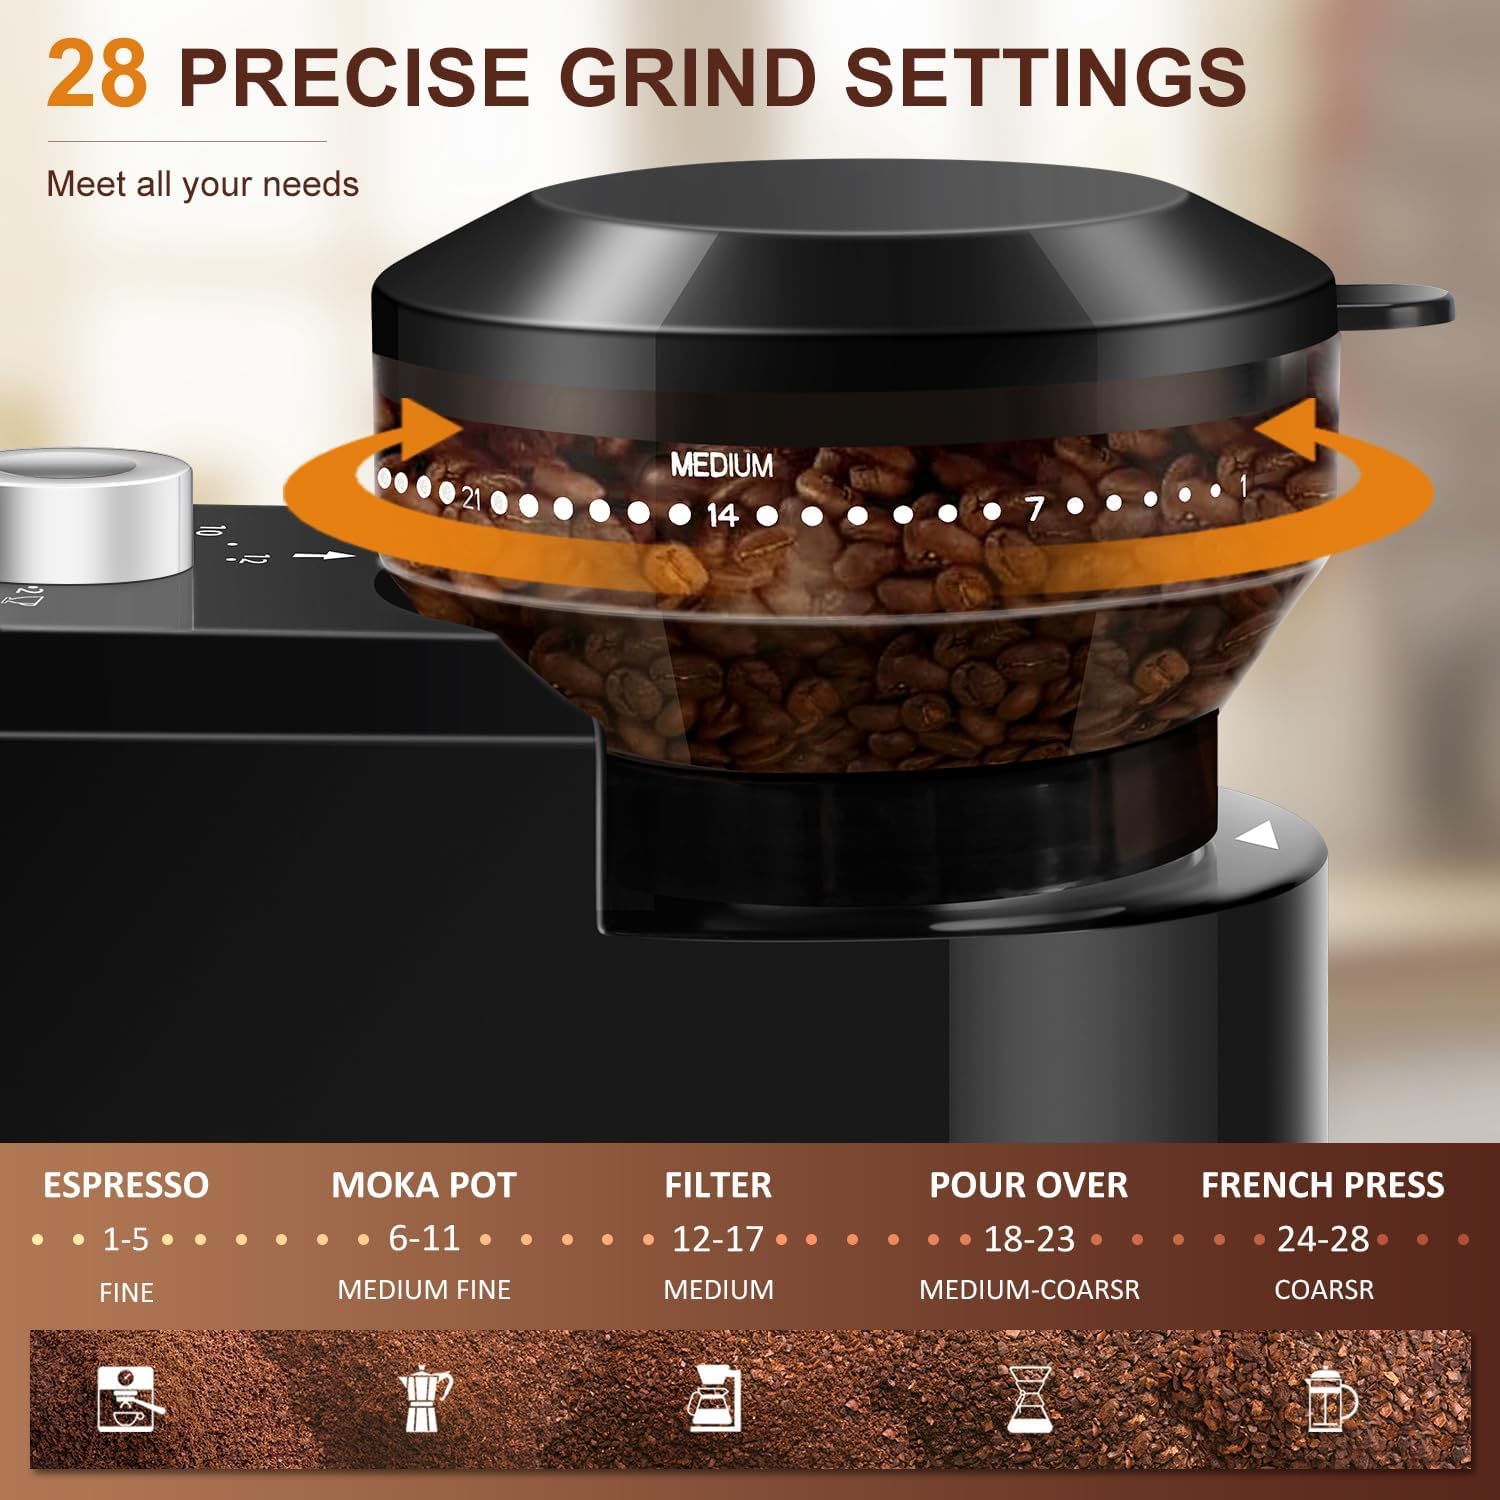
Image: All components of the KIRAINAFLY Flat Electric Burr Coffee Grinder, including the main unit, bean hopper, and ground coffee container, are displayed on a table.
1.2 Assembly
- Install the Bean Hopper: Place the bean hopper onto the top of the main grinder unit. Rotate it clockwise until it locks securely into place. Ensure it can be adjusted smoothly after installation.
- Install the Ground Coffee Container: Slide the ground coffee container into the designated slot at the front of the grinder. Ensure it clicks into place, confirming proper placement.
- Connect Power: Plug the power cord into a suitable electrical outlet. The power light should illuminate, indicating the grinder is ready. If the power light does not come on, recheck the installation of the bean hopper and ground coffee container.
Video: Demonstrates the proper installation of the bean hopper and ground coffee container, highlighting the safety features and power light indication.
2. Operating Instructions
Follow these steps to grind your coffee beans for various brewing methods.
2.1 Adding Coffee Beans
Open the bean hopper lid and pour your desired amount of whole coffee beans into the hopper. Close the lid securely.

Image: Coffee beans being poured into the grinder's bean hopper.
2.2 Selecting Grind Setting
Rotate the bean hopper to select your desired grind setting. The grinder offers 28 precise settings, ranging from fine to coarse, suitable for different brewing methods:
- Espresso: Settings 1-5 (Fine)
- Moka Pot: Settings 6-11 (Medium Fine)
- Filter Coffee: Settings 12-17 (Medium)
- Pour Over: Settings 18-23 (Medium-Coarse)
- French Press: Settings 24-28 (Coarse)

Image: Detailed view of the 28 grind settings on the bean hopper, with corresponding brewing methods.
2.3 Selecting Cup Quantity
Use the cup selection dial on the front panel to choose the number of cups you wish to grind, typically ranging from 2 to 12 cups.

Image: The cup selection dial on the grinder, set to grind for 12 cups.
2.4 Starting the Grinding Process
Press the power button to begin grinding. The grinder will automatically stop once the selected quantity has been processed.

Image: A hand pressing the power button to start the grinding process.
3. Maintenance
Regular cleaning ensures optimal performance and extends the life of your coffee grinder.
3.1 Cleaning the Burr Grinders
- Unplug the Grinder: Always disconnect the power cord before cleaning.
- Remove Bean Hopper: Twist the bean hopper counter-clockwise and lift it off the unit.
- Clean Burrs: Use the provided cleaning brush to remove any residual coffee grounds from the burrs and the grinding chamber.
- Wipe Down: Use a dry cloth to wipe the exterior of the grinder. Do not immerse the main unit in water.

Image: Cleaning the burr mechanism with the included brush.
3.2 Cleaning the Ground Coffee Container
The ground coffee container and its lid can be washed with warm, soapy water. Rinse thoroughly and ensure they are completely dry before reassembling.
4. Troubleshooting
If you encounter issues with your grinder, refer to the following common problems and solutions.
4.1 Grinder Does Not Start
- Check Power Connection: Ensure the grinder is securely plugged into a working electrical outlet.
- Verify Safety Mechanism: The grinder will not operate if the bean hopper or ground coffee container are not properly installed and locked.
- Ensure the bean hopper is twisted clockwise until it clicks into place.
- Ensure the ground coffee container is fully inserted and clicks into its slot.
- Power Light: When properly assembled and plugged in, a red power light should illuminate. If it does not, recheck the installation of the bean hopper and ground coffee container.
Video: Demonstrates checking the power light and proper installation of the bean hopper to resolve startup issues.
4.2 Inconsistent Grind
- Clean Burrs: Accumulated coffee oils and grounds can affect grind consistency. Refer to the Maintenance section for cleaning instructions.
- Check Bean Quality: Ensure you are using fresh, high-quality whole coffee beans. Stale or oily beans can impact grinding performance.
5. Specifications
| Model Number | YMCCBG-8001 |
| Brand | KIRAINAFLY |
| Product Dimensions | 6.7 x 4.3 x 7.5 inches |
| Item Weight | 2.4 pounds |
| Wattage | 200 watts |
| Voltage | 109.99 Volts |
| Capacity | 4 ounces (coffee beans) |
| Grind Settings | 28 precise settings (Fine to Coarse) |

Image: Dimensions of the KIRAINAFLY Flat Electric Burr Coffee Grinder.
6. Warranty Information
This KIRAINAFLY product is covered by a manufacturer's warranty. Please refer to the product packaging or contact customer support for specific warranty terms and conditions.
7. Customer Support
For further assistance, technical support, or inquiries regarding your KIRAINAFLY Flat Electric Burr Coffee Grinder, please contact the manufacturer's customer service. Contact details can typically be found on the product packaging or the official KIRAINAFLY website.