
1. Introduction
This manual provides instructions for the proper installation, operation, and maintenance of your Rhinowalk Bike Handlebar Bag, model RK9300. This lightweight, waterproof roll bag is designed for bicycle handlebars and includes a shoulder strap for versatile use. Please read these instructions carefully before use to ensure optimal performance and longevity of your product.
2. Product Components and Dimensions
The Rhinowalk RK9300 Handlebar Bag consists of a mounting harness and a waterproof inner bag, along with accessories. Refer to the diagram below for component identification and dimensions.

Figure 2.1: RK9300 Handlebar Bag Components and Dimensions. Includes harness (30cm x 27.5cm), inner bag (82cm x 27cm), straps (40cm, 35cm, 35cm), shoulder strap (150cm x 3.8cm), and EVA cushioning spacers (6cm x 5cm x 2cm).
Included Accessories:
- Mounting harness x 1
- Waterproof inner bag x 1
- Straps x 3
- Shoulder strap x 1
- EVA cushion spacer x 4
3. Setup and Installation
Proper installation ensures the stability and security of your handlebar bag. Please follow these steps carefully.
3.1 Handlebar Compatibility
For road bikes equipped with drop handlebars, ensure sufficient clearance:
- Vertical Clearance: The distance from the bottom of the handlebar to the top of the front tire should be greater than 26 cm. Insufficient clearance may cause the bag to rub against the front tire.
- Horizontal Clearance: The distance measured from the innermost point of the drops should be greater than 45 cm. Insufficient clearance may interfere with the operation of the shifters.

Figure 3.1: Handlebar Compatibility Guide for RK9300.
3.2 Installation Steps
For a visual guide, please watch the official installation video below. Detailed steps are also provided.
Video 3.2.1: Official installation guide for the Rhinowalk RK9300 Waterproof Bike Handlebar Bag. This video demonstrates how to securely attach the bag to your bicycle's handlebars.
- Attach Harness to Handlebar: Position the mounting harness on your handlebar. Use the provided straps to secure the top part of the harness around the handlebar. Ensure the straps are tightened securely.
- Secure Bottom of Harness: Thread the Velcro straps through the MOLLE webbing underneath the bag mounting kit and around the bicycle's head tube or fork crown. Tighten these straps to prevent the bag from swinging.
- Insert EVA Spacers: Place the EVA cushioning spacers between the harness and your handlebars/head tube as needed. These spacers help cushion shock and prevent friction, increasing stability.
- Load Inner Bag: Place your items into the waterproof inner bag. Roll down the closures at both ends of the inner bag to ensure a watertight seal.
- Attach Inner Bag to Harness: Slide the loaded inner bag into the mounting harness. Use the buckles and straps on the harness to firmly secure the inner bag. The front panel of the harness helps stabilize the bag.

Figure 3.2: Inserting EVA Cushioning Spacers for enhanced stability and protection.

Figure 3.3: Attaching the replaceable inner bag to the harness.

Figure 3.4: The front panel provides stability and allows for hanging additional items.
4. Operating Instructions
4.1 Waterproofing
The inner bag features high-frequency welded, taped waterproof seams and dual roll-down closures. To ensure maximum waterproofing, roll down the ends of the inner bag at least three times before buckling them securely. This prevents rain infiltration.

Figure 4.1: Waterproof design with high-frequency welded seams and roll-down closures.
4.2 Combination Design
The handlebar mounting harness and inner bag are designed to be separated. This allows for easy access to your belongings without detaching the entire harness from the bike. The harness can also carry other items like tents, sleeping bags, or clothing directly, offering versatility.

Figure 4.2: The combination design allows for separate use of the harness and inner bag.
4.3 Shoulder Strap Functionality
The included shoulder strap allows the inner bag to be converted into a single shoulder bag for convenient off-bike transport. Simply attach the shoulder strap to the D-rings on the inner bag.
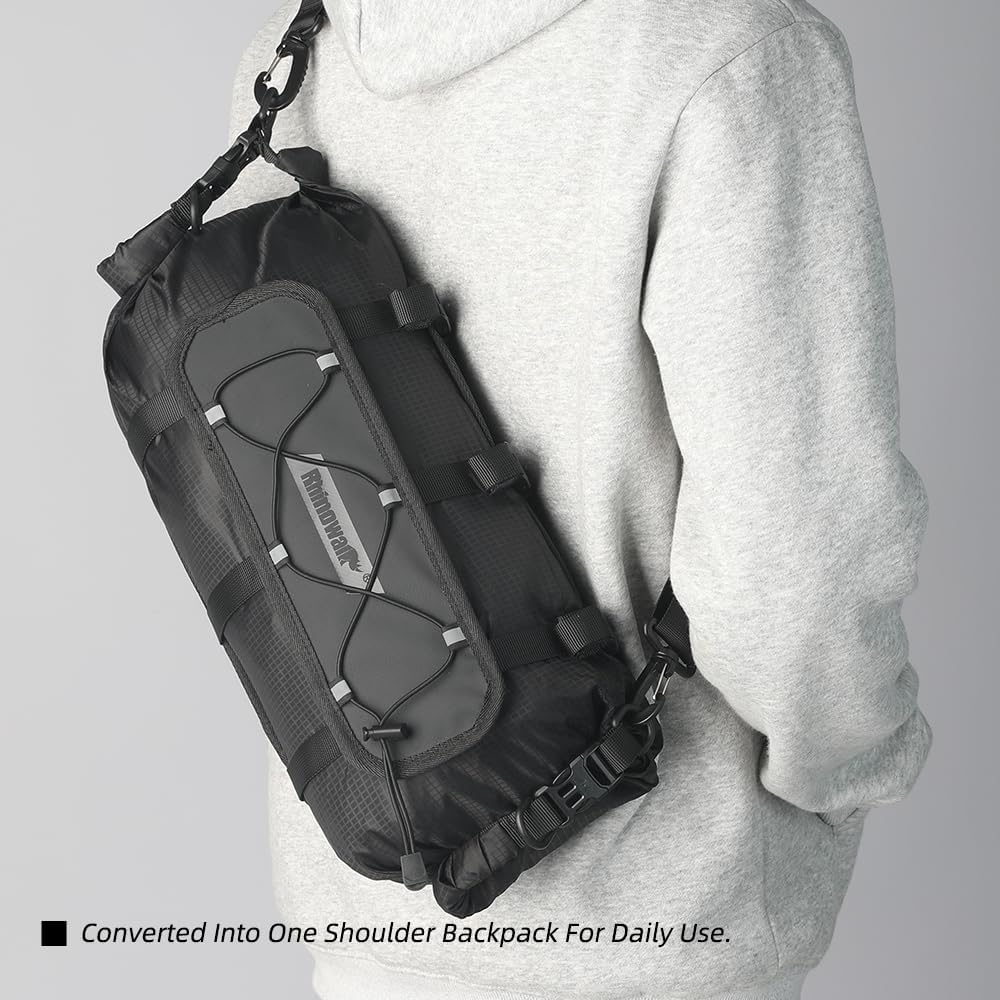
Figure 4.3: Bag converted into a shoulder bag for off-bike use.
4.4 External Storage
The front panel of the harness features an elastic rope system. This allows you to secure additional items, such as lightweight jackets or small gear, to the outside of the bag for quick access.
5. Maintenance
- Cleaning: Wipe the bag with a damp cloth and mild soap. Do not use harsh chemicals or abrasive cleaners. Rinse thoroughly and allow to air dry completely before storage.
- Storage: Store the bag in a cool, dry place away from direct sunlight when not in use.
- Inspect Straps and Buckles: Regularly check all straps, buckles, and seams for any signs of wear or damage. Replace any damaged components to ensure secure attachment.
6. Troubleshooting
- Bag feels unstable or swings:
- Ensure all straps, especially those around the head tube/fork, are tightened securely.
- Verify that the EVA cushioning spacers are correctly positioned to provide a snug fit and prevent movement.
- Distribute weight evenly within the inner bag.
- Bag rubs against front tire or shifters:
- Check handlebar compatibility (Section 3.1). Your handlebars may not provide sufficient clearance.
- Adjust the position of the bag on the handlebars to maximize clearance.
- Ensure the bag is not overpacked, which could cause it to expand and interfere with components.
- Water infiltration:
- Ensure the roll-down closures of the inner bag are rolled at least three times and securely buckled.
- Inspect the inner bag for any punctures or tears.
7. Specifications
| Feature | Detail |
|---|---|
| Brand | Rhinowalk |
| Model Number | RK9300 |
| Material | Polyester |
| Color | Black |
| Capacity | 12 Liters (adjustable via roll design) |
| Harness Size (L*W*H) | 30cm * 0.5cm * 27.5cm (11.81"L x 10.63"W x 10.83"H) |
| Inner Bag Size (L*W) | 82cm * 27cm |
| Item Weight | 520g |
| Mounting Type | Handlebar Mount |
| Closure Type | Roll-top (inner bag), Buckles (harness) |
| Special Features | Waterproof inner bag, Removable shoulder strap, EVA cushioning spacers, External elastic rope |
8. Warranty and Support
For warranty information or technical support, please refer to the official Rhinowalk website or contact the retailer where the product was purchased. Keep your proof of purchase for any warranty claims.
