1. Safety Information
Always prioritize safety when operating the FLARING Plasma Cutter. Failure to follow safety guidelines can result in serious injury or property damage.
- Personal Protective Equipment (PPE): Always wear appropriate PPE, including a welding helmet with a suitable shade, flame-resistant clothing, heavy-duty gloves, and safety shoes.
- Ventilation: Ensure adequate ventilation in the work area to disperse fumes and gases produced during cutting. Avoid working in confined spaces.
- Fire Hazards: Keep flammable materials away from the cutting area. Have a fire extinguisher readily available. Sparks and molten metal can travel significant distances.
- Electrical Safety: Connect the machine to a properly grounded power supply. Do not operate in wet conditions. Inspect cables and connections for damage before each use.
- Compressed Air: Use clean, dry, oil-free compressed air. Ensure air pressure is within the recommended range.
- Hot Surfaces: The torch and workpiece will become extremely hot during operation. Allow them to cool before handling.
2. Product Overview
The FLARING FC650D is a versatile and portable 65 Amp plasma cutter designed for efficient and clean cutting of various metal types. It features advanced IGBT inverter technology and dual voltage capability for flexible power options.

The FLARING FC650D Plasma Cutter and its included accessories.

Illustration of key features including large capacitance, dual voltage, strong heat dissipation, fast cutting, and ease of use.
Key Features:
- High Efficiency Cutting: Max severance cut up to 4/5" (20 mm), ideal clean cut 1/2" (12.7mm) with 60% duty cycle.
- Dual Voltage: Operates on both 120V and 240V (50/60 Hz) power sources without manual relinking.
- Wide Application: Suitable for cutting aluminum, magnesium alloys, brass, stainless steel, cast iron, steel, copper, titanium, and other metal materials.
- Portable and Lightweight: Weighs only 8.4 pounds, making it easy to transport.
- Stable and Durable: Features automatic arc control for consistent cutting, reducing user fatigue.

The plasma cutter utilizes an Original IGBT chip for reliable performance.

An efficient cooling fan ensures strong heat dissipation during operation.
3. Components and Panel Introduction
Your FLARING FC650D Plasma Cutter comes with the following components:
- FC650D Plasma Cutter Unit
- PT31 Torch (9.9ft)
- Heavy-duty ground clamp with cable
- Air regulator and hose
- 7 Electrodes
- 7 Tips
- Gas Hose
- Conversion line 120V to 240V

A visual representation of the upgraded FC650D accessories included with your plasma cutter.
Panel Introduction:

Detailed view of the plasma cutter's control panel and connections.
- LED Digital Display
- Current Adjustable Knob
- Torch Connector
- Torch Switch
- Earth Clamp Connector
- Power Switch
- Power Cable
- Pressure Control Knob
- Cooling Fan
- Pressure Gauge
4. Setup
- Power Connection: Connect the power cable to a suitable 120V or 240V (50/60 Hz) power outlet. The machine automatically detects the voltage. Use the provided conversion line if necessary.
- Air Supply Connection: Connect your compressed air source to the air regulator. Attach the air hose from the regulator to the plasma cutter's air inlet. Ensure the air supply is clean, dry, and oil-free. Set the air pressure using the Pressure Control Knob and monitor with the Pressure Gauge.
- Torch Connection: Connect the PT31 Torch to the Torch Connector on the front panel. Ensure it is securely fastened.
- Ground Clamp Connection: Attach the heavy-duty ground clamp to the Earth Clamp Connector. Securely clamp the ground clamp to the workpiece or a clean, bare metal part of the work table, ensuring good electrical contact.
- Consumables Check: Verify that the torch tip and electrode are correctly installed and in good condition. Replace if worn.
5. Operating Instructions
Follow these steps for effective and safe plasma cutting:
- Power On: Flip the Power Switch to the 'ON' position. The LED Digital Display will illuminate.
- Adjust Current: Use the Current Adjustable Knob to set the desired cutting current (Amps) based on the material type and thickness. Refer to the specifications table for recommended settings.
- Adjust Air Pressure: Ensure the air pressure is set correctly for optimal cutting performance. The recommended range is typically indicated on the machine or in the specifications.
- Prepare Workpiece: Ensure the workpiece is clean and free of rust, paint, or other contaminants that could interfere with the arc.
- Initiate Arc: Position the torch nozzle close to the edge of the workpiece. Press the Torch Switch to initiate the pilot arc.
- Begin Cutting: Once the pilot arc is established, move the torch steadily across the material. Maintain a consistent travel speed and standoff distance for a clean cut. The machine's automatic arc control helps maintain the arc, even over expanded metal.
- Cutting Various Materials: The FC650D is capable of cutting a wide range of metals, including steel, stainless steel, aluminum, copper, brass, and cast iron. Adjust current and speed accordingly.
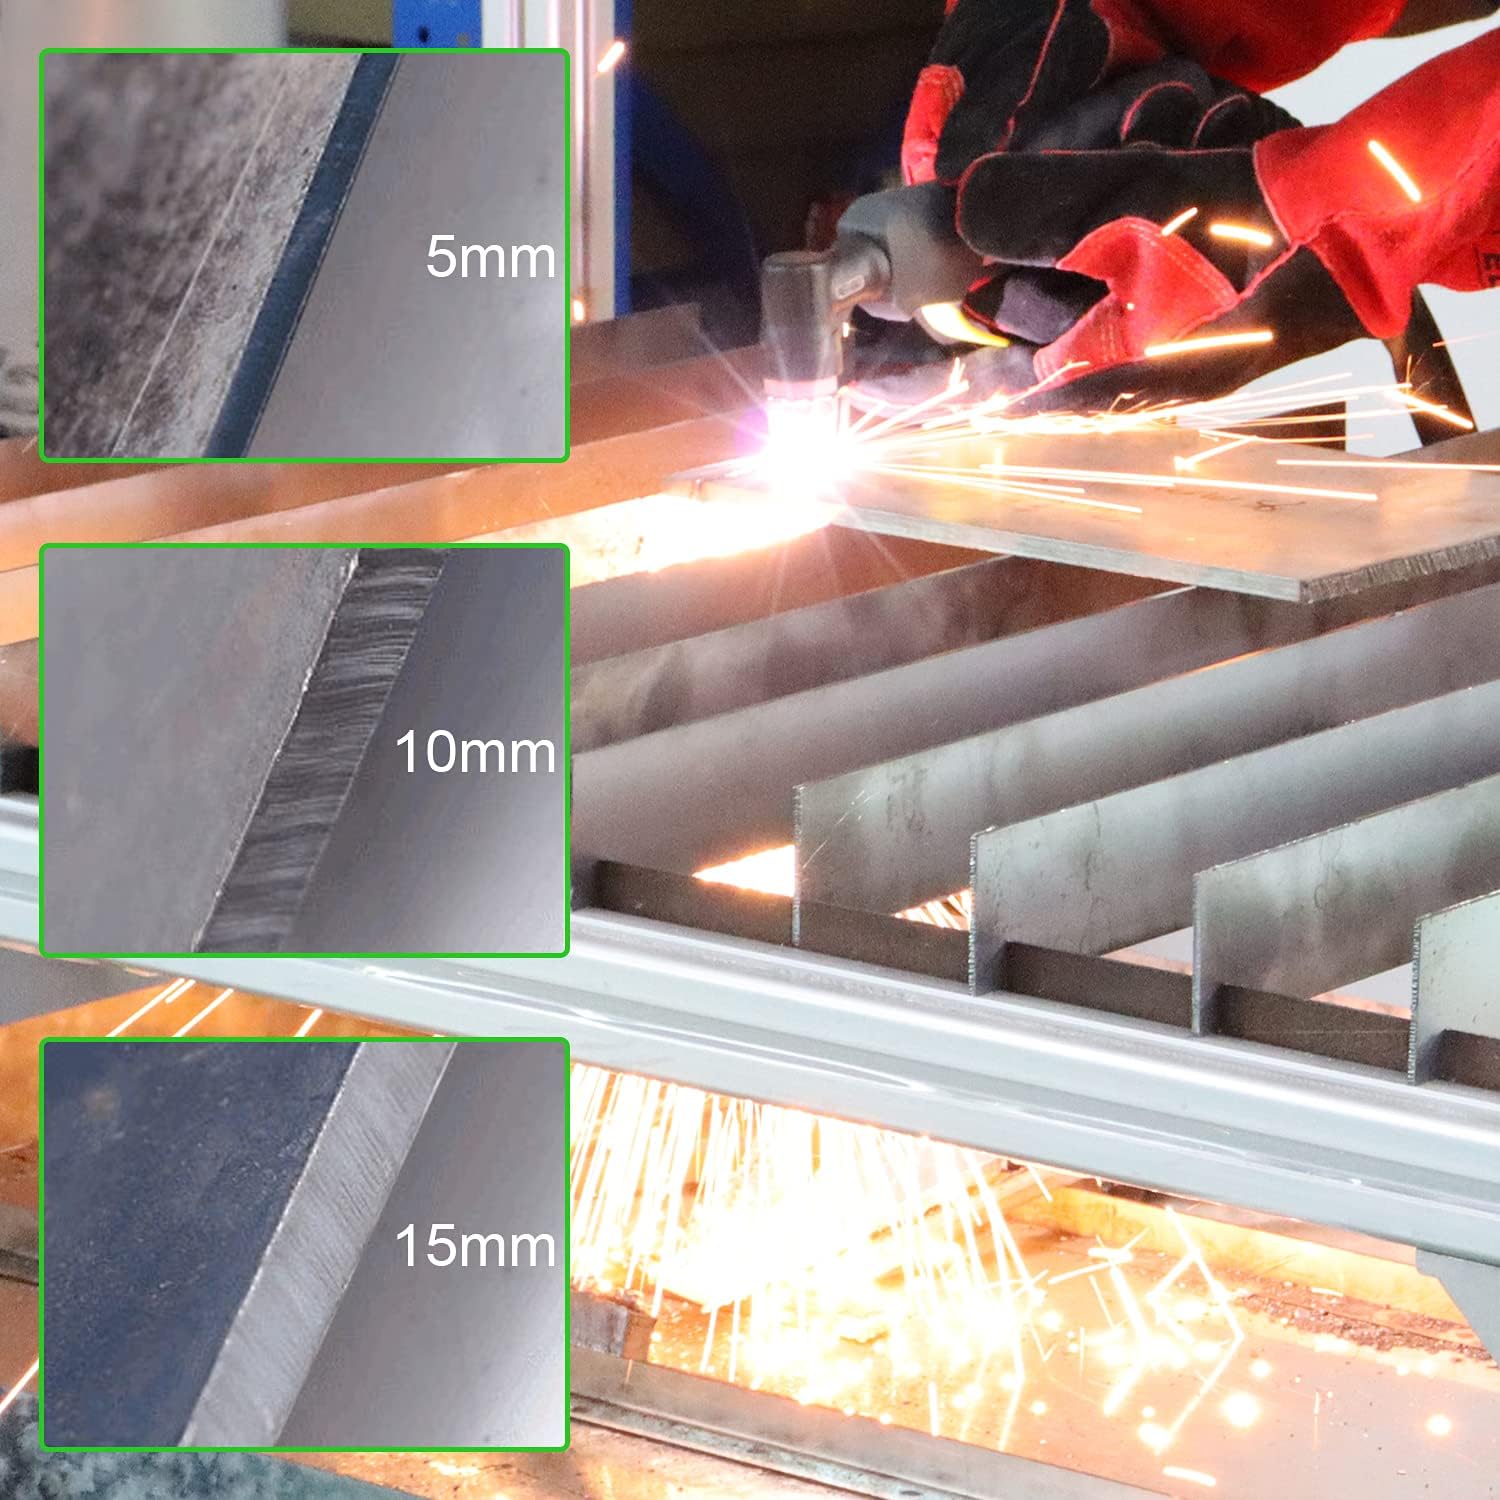
Examples of plasma cutting on different metal thicknesses (5mm, 10mm, 15mm).

The plasma cutter is suitable for a wide range of applications, including various metals and alloys.
Demonstration Video:
This video demonstrates the FLARING Touch Arc Plasma Cutter in action, specifically cutting aluminum sheet metal. It showcases the machine's capability and the cutting process.
6. Maintenance
Regular maintenance ensures the longevity and optimal performance of your plasma cutter.
- Consumable Replacement: Regularly inspect and replace worn torch tips and electrodes. Worn consumables can lead to poor cut quality and damage to the torch.
- Air Filter/Regulator: Periodically check and drain any moisture from the air filter/regulator. Ensure the filter element is clean to prevent contaminants from entering the torch.
- Cleaning: Keep the machine clean and free of dust and metal particles. Use compressed air to blow out internal components if necessary, ensuring the machine is unplugged.
- Cable Inspection: Inspect all cables (power, torch, ground) for cuts, abrasions, or loose connections. Repair or replace damaged cables immediately.
7. Troubleshooting
If you encounter issues with your plasma cutter, refer to the following common problems and solutions:
| Problem | Possible Cause | Solution |
|---|---|---|
| No Arc / Arc Fails to Start | No power, poor ground connection, worn consumables, insufficient air pressure. | Check power supply, ensure ground clamp is secure on bare metal, replace tip/electrode, verify air pressure. |
| Poor Cut Quality / Rough Cut | Worn consumables, incorrect cutting speed, incorrect current setting, improper standoff distance, contaminated air. | Replace consumables, adjust travel speed, adjust current, maintain correct torch distance, check air filter/dryer. |
| Machine Overheats | Exceeding duty cycle, blocked cooling vents, high ambient temperature. | Allow machine to cool down, ensure proper ventilation around the unit, operate within duty cycle limits. |
| Air Leaks | Loose air hose connections, damaged O-rings. | Tighten connections, inspect and replace O-rings if damaged. |
If problems persist after attempting these solutions, please contact FLARING customer support.
8. Specifications
Detailed technical specifications for the FLARING FC650D Plasma Cutter:

Official specification chart for the FC650D model.
| Attribute | Value |
|---|---|
| Manufacturer | FLARING |
| Part Number | FC650D |
| Item Weight | 15.17 pounds |
| Package Dimensions | 16 x 12.75 x 10.75 inches |
| Item Model Number | FC650D |
| Pattern | FC650D-65A-Touch ARC |
| Power Source | AC |
| Voltage | 120/240 Volts |
| Item Package Quantity | 1 |
| Included Components | 7 electrodes, 7 tips, Air regulator and hose, FC650D PLASMA CUTTER, Heavy-duty ground clamp with cable, PT31 Torch |
| Batteries Included? | No |
| Batteries Required? | No |
| Date First Available | April 25, 2024 |
9. Warranty and Support
For information regarding product warranty, technical support, or service, please refer to the documentation provided with your purchase or contact FLARING customer service directly. You can often find contact details on the manufacturer's official website or through your point of purchase.


