1. Introduction
This manual provides detailed instructions for the installation, operation, and maintenance of your Linptech G6L-TY Self-Powered Wireless Doorbell and Smart Wifi Relay Remote Switch. Please read this manual thoroughly before use to ensure proper functionality and safety.
2. Product Overview
The G6L-TY system combines a self-powered wireless doorbell with a smart Wi-Fi relay, offering a versatile solution for home automation and notification. The doorbell (G4L) requires no batteries, generating its own power from the press of the button. The smart relay (R10) integrates with your Wi-Fi network for remote control and smart home compatibility.
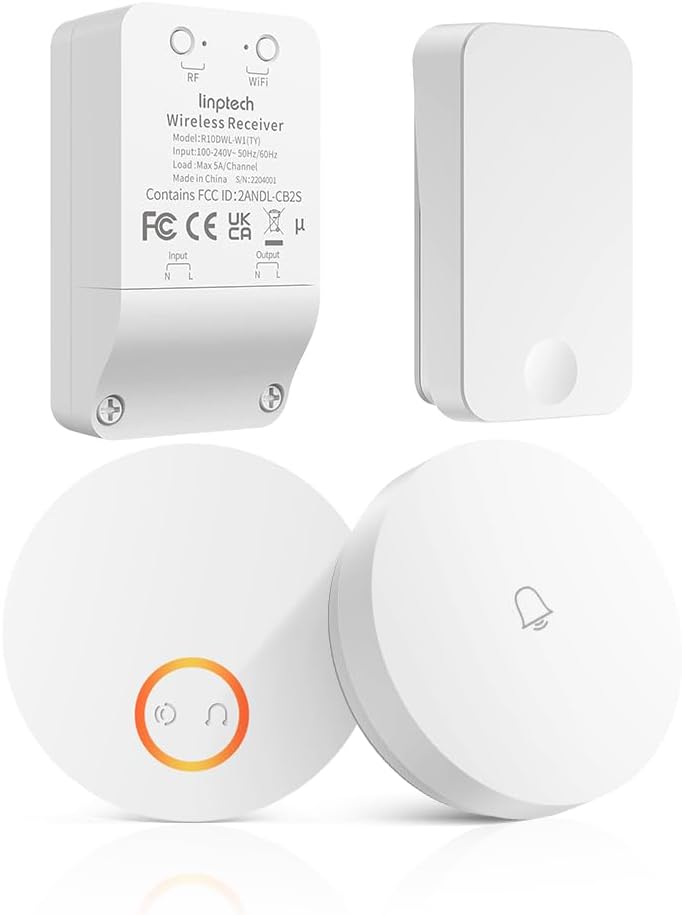
Figure 2.1: Overview of the Linptech G6L-TY system components, showing the wireless receiver (relay) and the self-powered doorbell button.

Figure 2.2: Detailed view of the Linptech Wireless Receiver (R10), highlighting RF and WiFi indicators, model information, and input/output terminals.
3. Setup and Installation
3.1. Wireless Doorbell (G4L) Installation
- Choose Location: Select a flat, clean surface near your entrance for the doorbell button. Ensure it is easily accessible to visitors.
- Mounting:
- Adhesive Method: Clean the mounting surface thoroughly. Peel off the protective film from the adhesive pad on the back of the doorbell button and firmly press it onto the desired location for 30 seconds.
- Screw Method: If preferred, use the provided screws and anchors to secure the doorbell button to the wall. Mark the drill points, drill pilot holes, insert anchors, and then screw the doorbell into place.
- Pairing (if necessary): The doorbell and receiver are usually pre-paired. If re-pairing is needed, refer to Section 4.2.

Figure 3.1: Illustration of the self-powered wireless doorbell button, ready for installation on a wall.
3.2. Smart Wifi Relay (R10) Installation
The R10 Smart Wifi Relay is designed to replace a traditional wall switch or integrate into an existing electrical circuit. Professional installation is recommended for electrical wiring. Ensure power is OFF before proceeding.
- Safety First: Turn off the main power supply to the circuit you will be working on at your circuit breaker. Verify power is off using a voltage tester.
- Wiring:
- Connect the Live (L) and Neutral (N) wires from your power supply to the "Input" terminals of the R10 relay.
- Connect the Live (L) and Neutral (N) wires of the appliance or light fixture you wish to control to the "Output" terminals of the R10 relay.
- Refer to the wiring diagram provided with the product for specific connections.
- Mounting: The compact design allows the R10 relay to be installed inside a standard electrical box or junction box. Ensure adequate space and ventilation.
- Restore Power: Once wiring is complete and secure, restore power at the circuit breaker. The relay's indicator light should illuminate.

Figure 3.2: Example of a wiring diagram for the Smart Wifi Relay, showing connections for input power and output to a load.

Figure 3.3: Illustration of the Smart Wifi Relay installed within a standard electrical wall box, demonstrating its compact fit.

Figure 3.4: Visual comparison highlighting the simplicity of installing the Linptech Wireless Switch system compared to traditional wired switches, showing reduced wiring complexity and key features.
3.3. App Configuration (for R10 Smart Wifi Relay)
To utilize the smart features of the R10 relay, you need to connect it to your home Wi-Fi network via the Tuya Smart or Smart Life app.
- Download App: Download the "Tuya Smart" or "Smart Life" app from your smartphone's app store (iOS App Store or Google Play Store).
- Register/Login: Open the app and register for a new account or log in if you already have one.
- Add Device:
- Tap the "+" icon in the top right corner of the app to add a device.
- Select "Electrical" or "Switch (Wi-Fi)" from the device list.
- Follow the on-screen instructions to put the R10 relay into pairing mode (usually by pressing and holding a button on the relay until the indicator light blinks rapidly).
- Enter your Wi-Fi network name and password. Ensure your phone is connected to a 2.4GHz Wi-Fi network.
- The app will search for and connect to the device. Once connected, you can rename the device and assign it to a room.

Figure 3.5: Screenshot illustrating the Tuya Smart app interface, showing how the smart relay can be controlled remotely via a smartphone.
4. Operating Instructions
4.1. Wireless Doorbell (G4L) Operation
- Ringing the Doorbell: Simply press the doorbell button. The kinetic energy from the press generates enough power to send a wireless signal to the R10 receiver, which will then chime.
- Chime Selection: The R10 receiver typically has multiple chime melodies. Refer to the receiver's specific instructions (or app settings) to cycle through and select your preferred chime.
- Volume Adjustment: The R10 receiver allows for volume adjustment. This can usually be done via a button on the receiver or through the connected app.

Figure 4.1: Visual representation of doorbell customization options, including 40 chimes, LED flash, mute function, 9 volume levels (0-105dB), and memory function.

Figure 4.2: Detailed illustration of doorbell volume ranges (90-120 dB, 60-90 dB, 30-60 dB, 0-30 dB) and accessibility features like mute mode for baby sleep and LED flash alerts for the hearing-impaired.
4.2. Pairing Doorbell Button with Receiver (if needed)
If your doorbell button and receiver are not paired, or if you wish to add additional buttons:
- Enter Pairing Mode: On the R10 receiver, press and hold the pairing button (often a small button on the side or back) for a few seconds until the indicator light starts blinking rapidly or a specific sound is heard.
- Press Doorbell Button: Within the pairing window (usually 5-10 seconds), press the G4L doorbell button once.
- Confirmation: The receiver will typically chime or its indicator light will stop blinking to confirm successful pairing.
4.3. Smart Wifi Relay (R10) Operation
- Manual Control: The R10 relay may have a physical button for manual on/off control of the connected appliance.
- App Control: Use the Tuya Smart or Smart Life app to remotely turn the connected appliance on or off from anywhere with an internet connection.
- Voice Control: Integrate the R10 relay with voice assistants like Amazon Alexa or Google Assistant for hands-free control.
- Alexa Integration: Enable the "Tuya Smart" or "Smart Life" skill in the Alexa app. Discover devices. Then, you can say commands like, "Alexa, turn on [Device Name]."
- Google Assistant Integration: Link your Tuya Smart/Smart Life account in the Google Home app. Then, you can say commands like, "Hey Google, turn off [Device Name]."
- Scheduling and Timers: Use the app to set schedules for automatic on/off times, or create countdown timers for specific operations.
- Group Control: If you have multiple smart devices, the app allows you to group them for simultaneous control.
Figure 4.3: Overview of Linptech Wireless Switch features, including 10A Max load, safe material, smartphone control, voice control, scheduling timer, and group control.
5. Maintenance
- Cleaning: Wipe the doorbell button and receiver with a soft, dry cloth. Do not use abrasive cleaners or solvents.
- Environmental Conditions: The doorbell button is designed for outdoor use and is IP55 waterproof and dustproof. However, extreme temperatures or prolonged direct exposure to harsh weather may affect its lifespan. The relay should be installed indoors in a dry environment.
- Firmware Updates: Periodically check the Tuya Smart/Smart Life app for firmware updates for the R10 relay to ensure optimal performance and security.
Figure 5.1: Information on the doorbell's safety and weather resistance, indicating CE, RoHS, FCC certification, operating temperature range (-4°F to 140°F / -20°C to 60°C), dustproof, and IP55 waterproof ratings.
6. Troubleshooting
| Problem | Possible Cause | Solution |
|---|---|---|
| Doorbell not chiming. |
|
|
| Smart Relay (R10) not connecting to Wi-Fi. |
|
|
| Voice control not working. |
|
|
7. Specifications
| Feature | Detail |
|---|---|
| Model | G6L-TY (G4L Doorbell + R10 Relay) |
| Brand | Linptech |
| Doorbell Power Source | Self-powered (Kinetic Energy) |
| Relay Input Voltage | 100-240V~, 50/60Hz |
| Relay Max Load | Max 5A/Channel (10A Max total for some models, refer to product label) |
| Wireless Frequency | 433MHz (Doorbell to Relay), 2.4GHz Wi-Fi (Relay to Router) |
| Operating Temperature | -4°F to 140°F (-20°C to 60°C) for doorbell |
| Waterproof Rating | IP55 (Doorbell Button) |
| Certifications | CE, RoHS, FCC |
| App Compatibility | Tuya Smart / Smart Life |
| Voice Assistant Support | Amazon Alexa, Google Assistant |
8. Warranty and Support
For warranty information and technical support, please refer to the documentation included with your purchase or visit the official Linptech website. You may also contact customer service through the retailer where the product was purchased.
Contact Information: Please check the product packaging or the manufacturer's website for the most up-to-date contact details.


