Introduction
The XO Dash Cam XJ03 is a versatile 3-in-1 dash camera designed to provide comprehensive surveillance for your vehicle. Featuring 1080P high-resolution recording, a flexible rotatable lens for front and interior views, 24-hour parking monitoring, seamless loop recording, and G-sensor technology, this device ensures critical moments are captured and preserved. Its compact design and user-friendly interface make it an essential tool for enhancing driving safety and security.
What's in the Box

Image: The XO Dash Cam XJ03 with its suction cup mount, rear camera, and car charger cable.
- 1 x XO Dash Cam (Main Unit)
- 1 x User Manual
- 1 x Rear Camera
- 1 x Car Charger (Type-C)
- 1 x Mount (Suction Cup)
Setup
1. Mounting the Dash Cam

Image: The compact dash cam mounted on a car's windshield, demonstrating its unobtrusive placement.
- Clean the area on your windshield where you intend to mount the dash cam. Ensure it does not obstruct your view.
- Attach the suction cup mount to the dash cam.
- Press the suction cup firmly against the cleaned windshield and engage the locking mechanism to secure it.
- Adjust the angle of the dash cam to ensure it captures the desired view of the road ahead.
2. Power Connection
- Connect the Type-C end of the car charger cable to the dash cam's power input port.
- Plug the other end of the car charger into your vehicle's cigarette lighter socket.
- Route the cable neatly along the windshield trim to avoid interference with driving.
3. Rear Camera Installation (Optional)
- Connect the rear camera cable to the designated port on the main dash cam unit.
- Mount the rear camera on your rear windshield, ensuring a clear view.
- Route the cable discreetly to the front unit.
4. Insert Micro SD Card
- Before first use, insert a compatible Micro SD card (not included, maximum support 64GB) into the designated slot on the dash cam. Ensure the card is formatted within the device settings for optimal performance.
Operating Instructions
1. Power On/Off
- The dash cam will automatically power on and begin recording when your vehicle's ignition is turned on.
- It will automatically power off when the ignition is turned off.
- To manually power on/off, press and hold the power button.
2. 1080P High-Resolution Recording
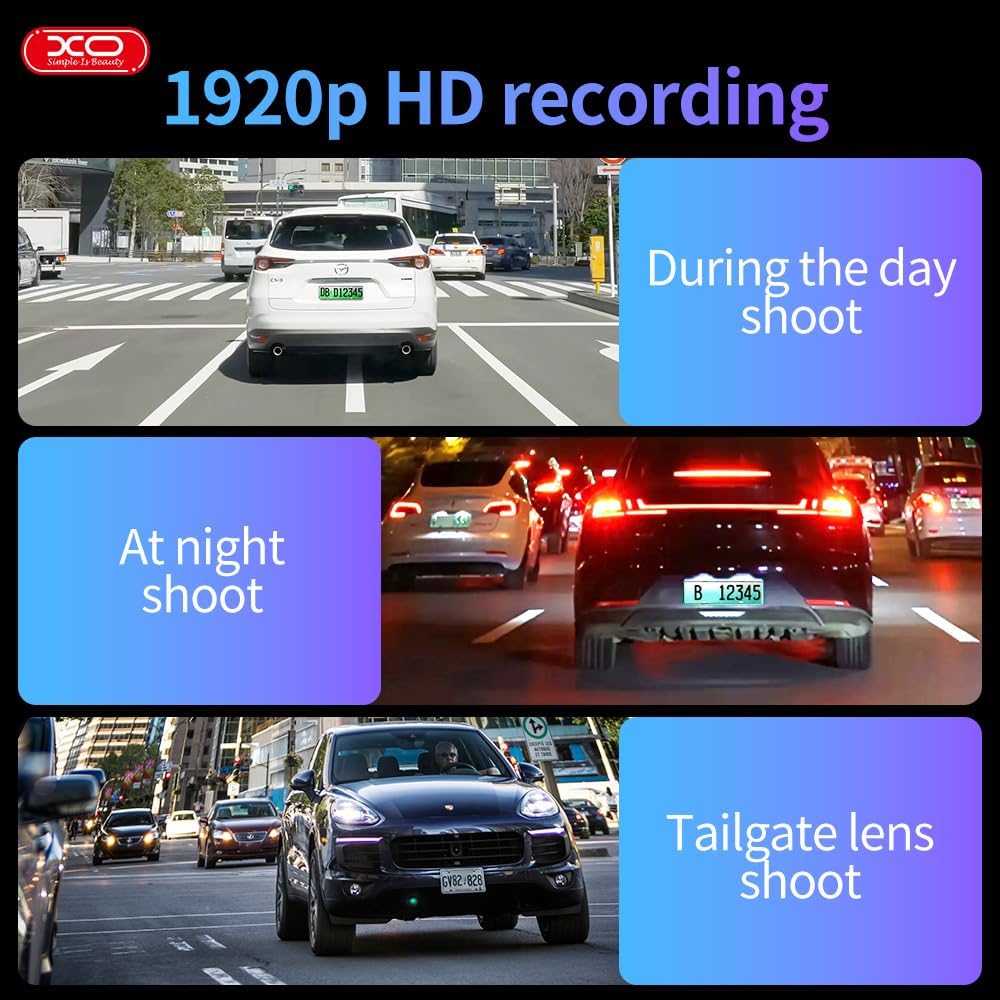
Image: Visual examples of the dash cam's 1920p HD recording capability in various lighting conditions and perspectives.
The dash cam records in crystal-clear 1920x1080P resolution at 30 frames per second, ensuring all details like license plates and street signs are captured clearly. This high resolution provides crucial evidence in case of incidents.
3. Flexible Rotatable Lens

Image: The dash cam unit with an arrow indicating the 60-degree rotation capability of the lens.
The built-in lens can be rotated up to 60 degrees, allowing you to record either the front view of the road or the interior of the vehicle. Adjust the lens manually to suit your recording needs.
4. 24-Hour Parking Monitoring

Image: A graphic illustrating the 24-hour parking monitoring feature, showing the dash cam active while the car is parked.
When your car is parked and the engine is off, the dash cam automatically activates its parking monitor. Using built-in sensors, it detects motion or impact and records footage to a separate file, providing continuous security for your vehicle.
5. Seamless Loop Recording & G-Sensor Technology

Image: A visual representation of loop recording, showing older files being overwritten, and a lock icon symbolizing G-sensor protection.
The loop recording feature ensures uninterrupted recording by automatically overwriting the oldest files when the storage card is full. The built-in G-sensor detects sudden collisions or impacts, automatically locking the current video file to prevent it from being overwritten, preserving it as critical evidence.
6. Motion Detection
When enabled, motion detection allows the dash cam to automatically start recording if it detects movement near the vehicle while parked. Recording stops if no motion is detected, conserving storage space.
7. Time Lapse Functionality (Parking Mode)
In parking mode, the dash cam can utilize a time-lapse feature to record continuously over extended periods at a reduced frame rate. This saves storage and battery power while still providing a detailed, accelerated view of prolonged events.
8. 2" Built-In Display
The integrated 2-inch display allows for convenient management and playback of recordings directly on the device. You can review footage, adjust settings, and ensure proper functionality without needing external equipment.
Maintenance
- Cleaning: Use a soft, dry cloth to clean the dash cam's lens and screen. Avoid using abrasive cleaners or solvents.
- Storage: If storing the dash cam for an extended period, remove the Micro SD card and store the device in a cool, dry place away from direct sunlight.
- Micro SD Card: Periodically format your Micro SD card (at least once a month) within the dash cam's settings to ensure optimal performance and prevent data corruption. Back up any important recordings before formatting.
- Firmware Updates: Check the official XO website for any available firmware updates to ensure your dash cam has the latest features and bug fixes.
Troubleshooting
| Problem | Possible Cause | Solution |
|---|---|---|
| Dash cam does not power on. | No power supply; faulty cable; battery drained. | Check car charger connection and vehicle's power outlet. Ensure the car charger is functional. Charge the dash cam if it has an internal battery. |
| Recording stops or freezes. | Micro SD card full or corrupted; low-quality SD card; firmware issue. | Format the Micro SD card. Use a high-speed (Class 10 or U1/U3) Micro SD card. Update firmware if available. |
| Video quality is poor. | Dirty lens; protective film still on lens; incorrect resolution settings. | Clean the lens with a soft cloth. Remove any protective film. Check settings to ensure 1080P resolution is selected. |
| G-sensor is too sensitive/not sensitive enough. | G-sensor sensitivity setting is too high/low. | Adjust the G-sensor sensitivity level in the dash cam's settings menu. |
| Parking monitor not working. | Parking monitor feature disabled; insufficient power supply in parking mode. | Ensure parking monitoring is enabled in settings. Check if the dash cam is receiving continuous power (e.g., via hardwire kit for 24H monitoring). |
Specifications

Image: A diagram detailing the product's dimensions, input, battery, memory, and other technical specifications.
| Feature | Detail |
|---|---|
| Model Name | XJ03 |
| Video Resolution | 1920x1080P (Front Camera) |
| Rear Camera Resolution | VGA (640*480) |
| Display Screen | 2 inches |
| Lens Rotation | 60 degrees (Rotatable) |
| G-Sensor | Built-in (Vibration sensor DA 360) |
| Loop Recording | Supported |
| Parking Monitoring | Supported (24-hour) |
| Motion Detection | Supported |
| Memory Card Support | Micro SD, 8-64GB (Max 64GB) |
| Connectivity | Type-C |
| Product Dimensions | 4 x 10 x 4 cm |
| Weight | 500 g |
| Battery | 1 Lithium Polymer (included) |
| Manufacturer | XO |
| Country of Origin | China |
Warranty and Support
The XO Dash Cam XJ03 comes with a 1-Year XOUAE Warranty, providing coverage for repairs and replacements as needed. For any technical support, warranty claims, or inquiries, please contact XOUAE customer service through their official channels.
Extended warranty options are also available:
- 1-Year Extended Warranty by Salama Care
- 2-Year Extended Warranty by Salama Care
Please refer to the warranty card included in your package or the product listing on Amazon for detailed terms and conditions regarding warranty coverage and support contact information.