1. Introduction
The Miboxer B3 4-Zone Panel Remote is a battery-powered wireless controller designed for managing RGBW LED lighting systems. It features a capacitive touch interface, 2.4G RF wireless transmission, and a magnetic holder for convenient placement. This manual provides detailed instructions for installation, operation, and maintenance of your B3 remote.
2. Product Features
- High precision capacitive touch IC for responsive control.
- Magnetic installation for flexible mounting without wiring.
- Utilizes 2.4G RF wireless transmission technology.
- Compatible with MiBoxer/Mi-Light 2.4G series products.
- Control distance up to 100 feet (30 meters).
- Offers 16 million colors for diverse lighting options.
- Adjustable brightness and color temperature.
3. Package Contents
- Miboxer B3 4-Zone Panel Remote (1 unit)
Note: AAA batteries are not included and must be purchased separately.
4. Product Overview

Figure 4.1: Front view of the Miboxer B3 remote, showing the color and brightness touch sliders, and control buttons for White, Mode, Speed-, Speed+, All, and four individual zones (1, 2, 3, 4).

Figure 4.2: Back view of the Miboxer B3 remote, displaying the battery compartment cover and product information label including model number B3, working voltage, transmitting power, and frequency.
The remote features a sleek, minimalist design with a touch-sensitive surface for color and brightness adjustments. Below the touch sliders are dedicated buttons for White light, Mode selection, Speed adjustment, and individual zone control (All, 1, 2, 3, 4).
5. Setup and Installation
5.1 Battery Installation

Figure 5.1: Back view of the Miboxer B3 remote with the battery compartment open, showing the slots for two AAA batteries.
- Gently remove the battery compartment cover on the back of the remote.
- Insert two (2) AAA batteries, ensuring correct polarity (+/-) as indicated inside the compartment.
- Replace the battery compartment cover securely.
5.2 Mounting the Remote

Figure 5.2: Step-by-step visual guide for installing the Miboxer B3 remote using its magnetic holder. Steps include removing tape, sticking the holder, installing batteries, and attaching the remote.
- Prepare the Surface: Choose a clean, flat surface for mounting the magnetic holder.
- Attach Holder: Peel off the protective film from the adhesive backing of the magnetic holder. Firmly press the holder onto the desired position on the wall or surface.
- Install Remote: After installing the batteries (as per Section 5.1), align the remote with the magnetic holder. The remote will snap into place due to the magnetic connection.
The magnetic holder allows for easy removal and reattachment of the remote for portable use or battery replacement.
5.3 Linking/Pairing with Lights
To control your MiBoxer/Mi-Light compatible lighting products, the remote must be linked to them. The linking process typically involves these steps:
- Ensure the light fixture or controller you wish to pair is powered off.
- Power on the light fixture or controller.
- Within 3 seconds of powering on, press the 'ON' button (the circle at the bottom) for the desired zone on the B3 remote three times. For example, to link to Zone 1, press the 'ON' button for Zone 1 three times.
- The light should flash three times slowly, indicating successful linking.
If the light does not flash, repeat the linking process. If you wish to unlink a light, power it on and within 3 seconds, press the 'ON' button for the linked zone five times. The light will flash ten times quickly, indicating successful unlinking.
6. Operating Instructions
6.1 Basic Controls
- Zone Selection: Press the 'ON' button (circle) for zones 1, 2, 3, or 4 to select a specific zone. Press the 'All' button to control all linked zones simultaneously.
- Power On/Off: Press the 'ON' button (circle) for a selected zone or 'All' to turn lights on. Press the 'OFF' button (vertical line) for a selected zone or 'All' to turn lights off.
- Color Selection: Slide your finger across the top color touch slider to select a desired color.
- Brightness Adjustment: Slide your finger across the lower brightness touch slider to adjust the light intensity.
- White Light: Press the 'White' button to switch the lights to pure white mode.
6.2 Dynamic Modes

Figure 6.1: The Miboxer B3 remote highlighting its capability to access 9 different dynamic lighting modes.
- Mode Button: Press the 'Mode' button to cycle through the available dynamic lighting modes. The remote supports 9 distinct dynamic modes.
- Speed Adjustment: Use the 'Speed-' and 'Speed+' buttons to decrease or increase the speed of the currently selected dynamic mode.
6.3 Individual Zone Control
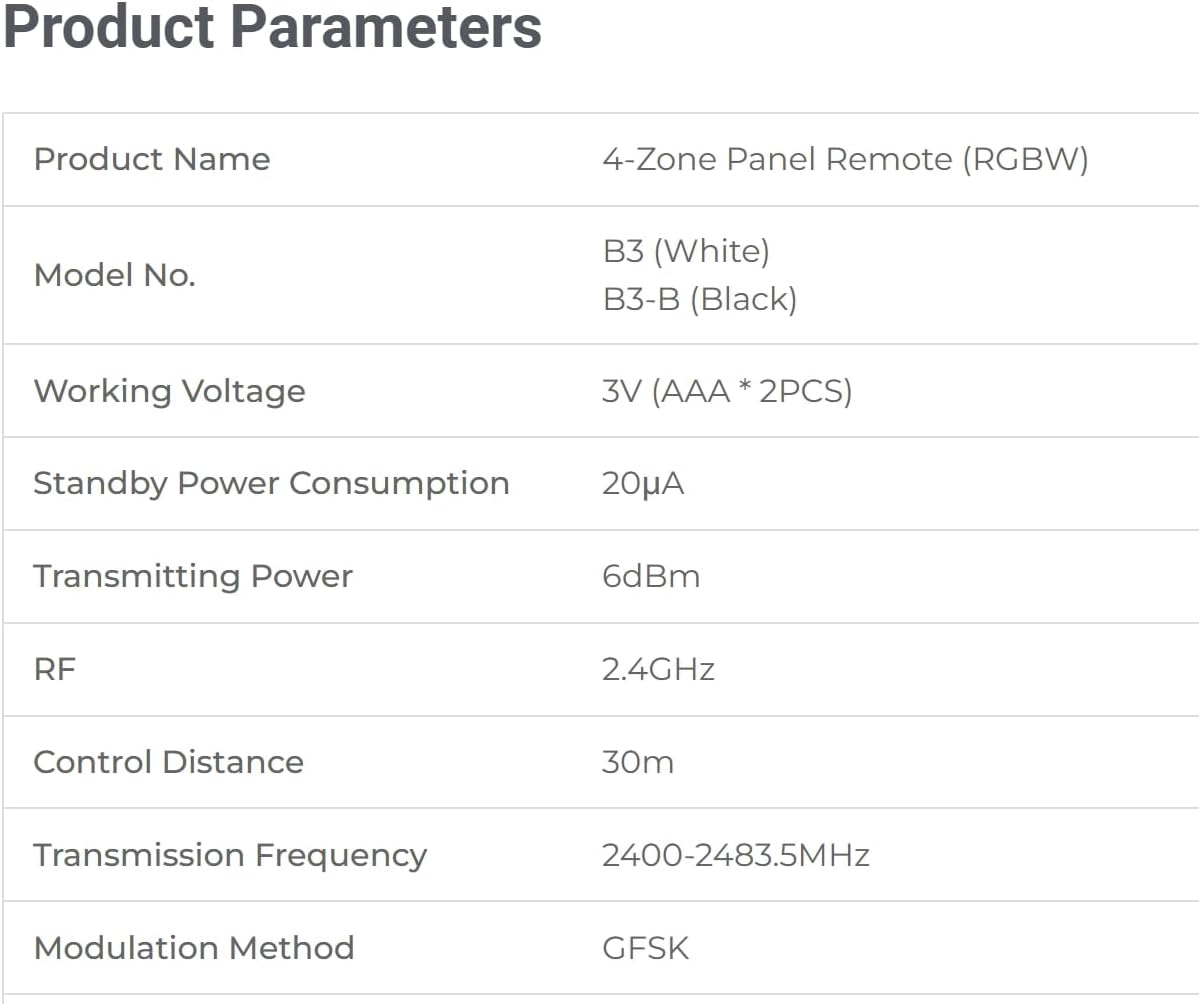
Figure 6.2: An illustration showing the Miboxer B3 remote controlling lighting in four separate zones, representing different rooms or areas.
The B3 remote allows for individual control of up to four separate lighting zones. Each zone can control numerous lamps or controllers linked to it. This enables you to customize lighting in different areas independently or control them all together using the 'All' button.
7. Maintenance
7.1 Battery Replacement
When the remote's performance degrades or it becomes unresponsive, it is likely time to replace the batteries. Follow the steps in Section 5.1 to replace the two AAA batteries. Always use fresh, high-quality batteries for optimal performance.
7.2 Cleaning
To clean the remote, gently wipe the surface with a soft, dry cloth. Avoid using abrasive cleaners, solvents, or excessive moisture, as these can damage the device.
8. Troubleshooting
- Remote not responding:
- Check battery level and replace if necessary.
- Ensure the remote is within the 100-foot control range of the receiver.
- Verify there are no significant obstructions (e.g., thick walls, metal objects) between the remote and the receiver.
- Lights not linking/unlinking:
- Ensure the linking/unlinking steps (Section 5.3) are followed precisely, especially the timing (within 3 seconds of power-on).
- Confirm the light fixture/controller is compatible with MiBoxer/Mi-Light 2.4G series.
- Inconsistent control:
- Interference from other 2.4G devices might occur. Try to minimize other wireless activity or reposition the remote/receiver.
- Ensure the remote's batteries are not low.
9. Specifications
| Parameter | Value |
|---|---|
| Product Name | 4-Zone Panel Remote (RGBW) |
| Model Number | B3 (also known as 2830A) |
| Working Voltage | 3V (2*AAA Batteries) |
| Standby Power Consumption | 20µA |
| Transmitting Power | 6dBm |
| RF Frequency | 2.4GHz |
| Control Distance | 30m (100 feet) |
| Transmission Frequency | 2400-2483.5MHz |
| Modulation Method | GFSK |
| Product Dimensions | 3.4 x 3.4 x 0.7 inches |
| Item Weight | 4.8 ounces |
| Compatible Devices | FUT037W+ Controller (and other MiBoxer/Mi-Light 2.4G series) |
| Manufacturer | Miboxer |
10. Warranty and Support
For warranty information and technical support, please refer to the documentation provided with your specific MiBoxer lighting products or visit the official Miboxer website. Keep your purchase receipt for warranty claims.


