1. Introduction
The ANDYCINE T6 is a professional 6-inch camera field monitor designed to enhance your filmmaking and photography experience. Featuring a durable aluminum housing, a 1920x1080 Full HD display, and support for 4K HDMI input/output, the T6 provides accurate monitoring and advanced analysis tools. This manual provides detailed instructions for setting up, operating, and maintaining your ANDYCINE T6 monitor.

Figure 1.1: The ANDYCINE T6 Camera Field Monitor shown with its complete accessory kit, including battery, charger, cables, sunhood, and carry case.
2. Package Contents
Please verify that all items listed below are included in your package. If any items are missing or damaged, please contact customer support.
- 1x ANDYCINE T6 Monitor
- 1x Sunhood
- 1x User Manual
- 1x Carry Case
- 1x Hot Shoe Mount
- 1x Micro HDMI Cable
- 1x USB-C Charging Cable
- 1x F550 Battery

Figure 2.1: Visual representation of the ANDYCINE T6 monitor's packing list, detailing all components included in the box.
3. Product Overview
3.1 Physical Features
The ANDYCINE T6 monitor is designed for portability and durability, featuring a lightweight aluminum alloy frame.

Figure 3.1: The ANDYCINE T6 monitor demonstrating its compact and lightweight design, easily fitting into a backpack for portability.
3.2 Ports and Controls
The monitor features essential ports for connectivity and power, along with intuitive controls for menu navigation.
- HDMI IN: Input for video signal from camera or other source.
- HDMI OUT: Output for looping through video signal to another monitor or device.
- DC IN 12V: Power input for external DC power supply (barrel connector).
- DC OUT 8.4V: Power output to power a DSLR or mirrorless camera.
- Type-C (5V): USB-C power input.
- 3.5mm Headphone Jack: For audio monitoring.
- Control Buttons: A series of buttons (typically 7) for menu navigation and function activation.

Figure 3.2: Close-up view of the ANDYCINE T6 monitor's HDMI input and output ports, supporting 4K 60Hz signals.
4. Setup and Connections
4.1 Mounting the Monitor
The ANDYCINE T6 can be mounted to your camera rig using the included hot shoe mount or other compatible mounting solutions.
- Attach the hot shoe mount to the monitor's 1/4-inch screw hole located at the bottom.
- Secure the hot shoe mount to your camera's hot shoe or a compatible rig accessory.
- Adjust the monitor's angle for optimal viewing.

Figure 4.1: Detail of the monitor's mounting screw hole, designed for secure attachment to camera setups.

Figure 4.2: The ANDYCINE T6 monitor mounted on a camera rig, showcasing its use with the included sunhood for improved visibility in bright conditions.
4.2 Powering the Monitor
The T6 monitor offers flexible power options:
- NP-F Battery: Insert the included NP-F battery into the battery slot on the back of the monitor. Ensure it clicks into place securely.
- DC 12V Input: Connect a compatible 12V DC power adapter (not included) to the DC IN 12V port.
- USB-C 5V Input: Connect a 5V/2A or higher USB-C power supply (e.g., power bank, wall adapter) to the Type-C (5V) port using the provided USB-C cable.
4.3 Connecting Video Sources
Use an HDMI cable to connect your camera or video source to the monitor.
- Connect one end of an HDMI cable (e.g., the included Micro HDMI cable) to your camera's HDMI output port.
- Connect the other end of the HDMI cable to the HDMI IN port on the ANDYCINE T6 monitor.
- If you need to loop the signal to another display, connect an HDMI cable from the HDMI OUT port on the T6 to your secondary display.
5. Operating Instructions
5.1 Power On/Off
Press and hold the power button (usually located on the side or top) for a few seconds to turn the monitor on or off.
5.2 Menu Navigation
The monitor's functions are accessed via the control buttons. Typically, there are dedicated buttons for menu access, navigation (up/down/left/right), and confirmation.
- Press the MENU button to open the main menu.
- Use the directional buttons to navigate through menu options.
- Press the OK/SET button to confirm a selection or enter a sub-menu.
- Press the EXIT/BACK button to return to the previous menu or exit the menu system.
5.3 Advanced Monitoring Features
The ANDYCINE T6 includes a suite of professional monitoring tools to assist with accurate focus, exposure, and framing.
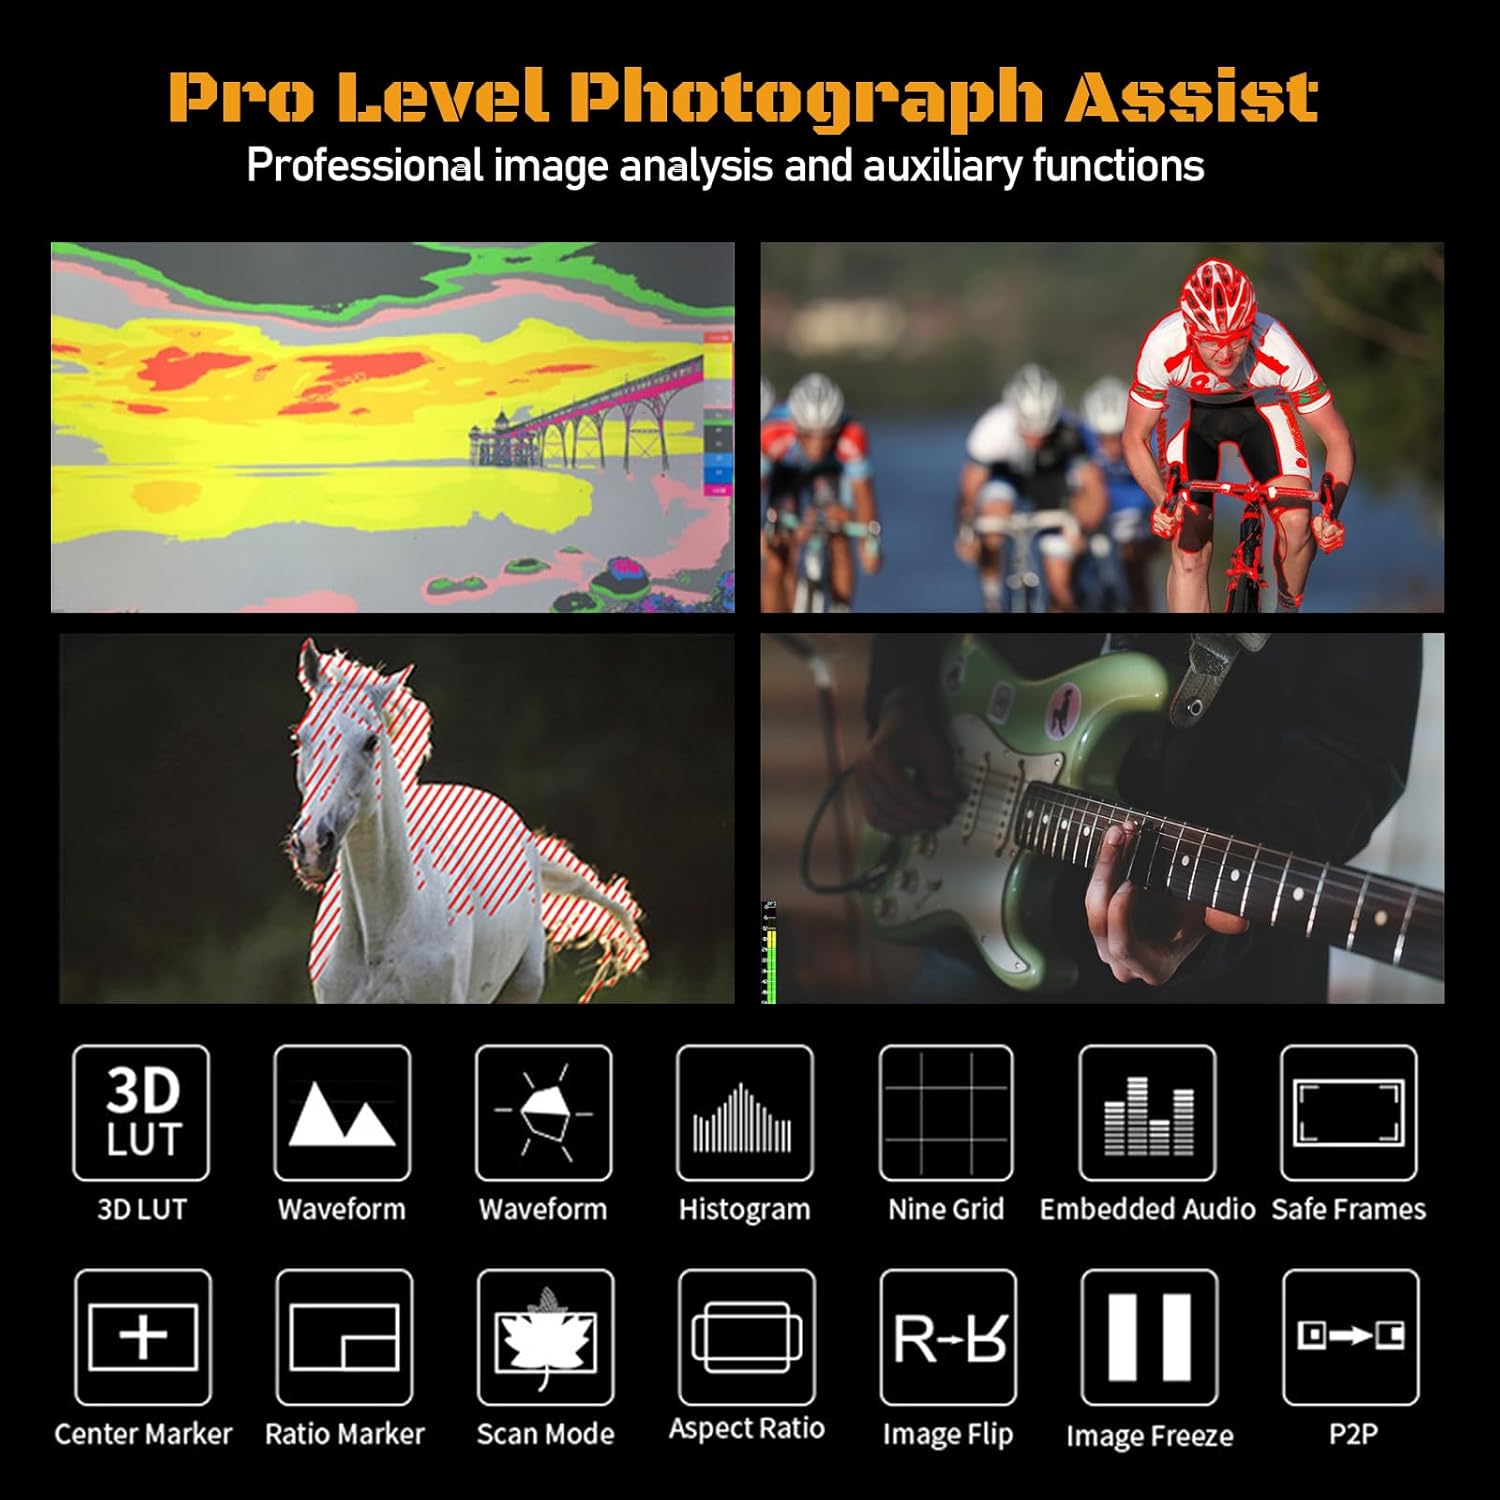
Figure 5.1: An illustration of the professional monitoring features available on the ANDYCINE T6, including 3D LUT, waveform, histogram, and various assist functions.
- 3D LUT: Load custom 3D Look-Up Tables to preview your footage with specific color grades in real-time.
- Waveform: Displays the luminance and chrominance levels of your video signal, helping to ensure proper exposure.
- Histogram: Shows the distribution of tones in your image, from shadows to highlights.
- Peaking Focus Assist: Highlights in-focus areas with a colored outline, aiding in precise manual focusing.
- False Color: Uses a spectrum of colors to represent different exposure levels, making it easy to identify over- or under-exposed areas.
- Image Flip: Flips the image horizontally or vertically, useful for various camera setups (e.g., inverted mounting).
- Center Marker & Ratio Marker: Aids in framing and composition.
- Anamorphic Mode: De-squeezes anamorphic footage for proper viewing.
- Zoom: Magnifies a portion of the image for critical focus checks.
Refer to the on-screen menu for specific settings and activation of each feature.
6. Specifications
Below are the detailed technical specifications for the ANDYCINE T6 Camera Field Monitor.
| Feature | Specification |
|---|---|
| Screen Size | 6 inches IPS Display |
| Resolution | 1920x1080 pixels |
| Brightness | 450 cd/m² |
| Contrast Ratio | 1000:1 |
| Viewing Angle | 80°/80°(L/R) 80°/80°(U/D) |
| Color Depth | 16.7M (8 bit) |
| HDMI Input/Output | HDMI 2.0 (Supports up to 4K 60FPS) |
| Supported HDMI Formats | 480i/576i/480p/576p, 720p (60/59.94/50/30/29.97/25/24/23.98), 1080i (60/59.94/50), 1080p (60/59.94/50/30/29.97/25/24/23.98), 3840×2160p (60/50/30/29.97/25/24/23.98), 4096×2160p (60/50/30/29.97/25/24/23.98) |
| Audio Output | 3.5mm Stereo Headphone Jack |
| Power Input | DC IN 12V (Barrel 5.5mm outer, 2.1mm inner), DC IN 5V (Type-C) |
| Power Output | DC OUT 8.4V (Barrel 5.5mm outer, 2.1mm inner) |
| Battery Type | NP-F series (1 Lithium Ion battery required) |
| Housing Material | Aluminum Shell |
| Item Weight | 1.76 pounds |
| Package Dimensions | 7.64 x 5.16 x 4.17 inches |
7. Care and Maintenance
Proper care will extend the life of your ANDYCINE T6 monitor.
- Cleaning: Use a soft, lint-free cloth to clean the screen and body. For stubborn smudges, a screen cleaning solution designed for electronics can be used sparingly. Avoid abrasive materials or harsh chemicals.
- Storage: When not in use, store the monitor in its included carry case to protect it from dust, scratches, and impacts. Store in a cool, dry place away from direct sunlight.
- Handling: Avoid dropping the monitor or subjecting it to strong vibrations. Do not expose it to extreme temperatures or high humidity.
- Battery Care: If storing for extended periods, remove the battery. Recharge the battery periodically to maintain its health.
8. Troubleshooting
If you encounter issues with your ANDYCINE T6 monitor, refer to the following common problems and solutions.
| Problem | Possible Cause / Solution |
|---|---|
| Monitor does not power on. |
|
| No video signal displayed. |
|
| Image is too dim or difficult to see outdoors. |
|
| Monitor freezes or becomes unresponsive. |
|
9. Warranty and Support
ANDYCINE products are manufactured with high-quality standards. For warranty information and technical support, please refer to the warranty card included with your product or visit the official ANDYCINE website. Keep your purchase receipt as proof of purchase for warranty claims.
For further assistance, you may contact ANDYCINE customer service through their official channels.


