1. Safety Information
Please read all instructions carefully before installation and use. Failure to follow these instructions may result in injury or damage to the product.
- Always wear appropriate personal protective equipment (PPE) such as gloves and safety glasses during installation.
- Ensure the installation area is clear of obstructions and hazards.
- Two people are recommended for installation due to the size and weight of the gate.
- Verify that the mounting surface (posts, walls) is structurally sound and capable of supporting the gate's weight and operational forces.
- Keep children and pets away from the installation area.
- Do not attempt to modify the gate or its components, as this may compromise its structural integrity and void the warranty.
- Regularly inspect the gate for any signs of wear, damage, or loose components.
2. Package Contents and Components
Before beginning installation, ensure all parts are present and undamaged. Refer to the list below and the accompanying diagrams.
2.1. Included Equipment
- Aluminum Gate Panel (1 unit)
- Handle (1 unit)
- Key Lock (1 unit)
- Stop Buffer (1 unit)
- Keys (5 units)
- Mounting Hardware (hinges, fasteners - specific quantities may vary, refer to packaging)
2.2. Component Overview
The NAZARIO gate consists of a robust aluminum panel designed for durability and privacy. Key components include the gate frame, horizontal slats, integrated handle, and key lock mechanism.
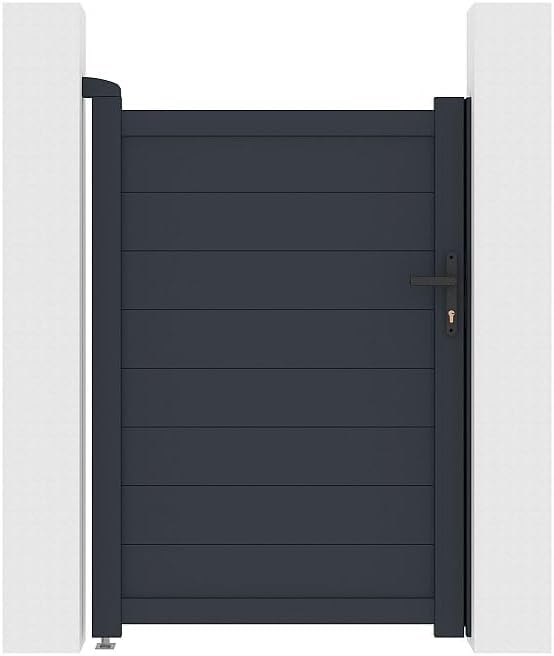
Figure 1: Exploded view of the NAZARIO gate components, illustrating the main panel, hinges, handle, and lock assembly.
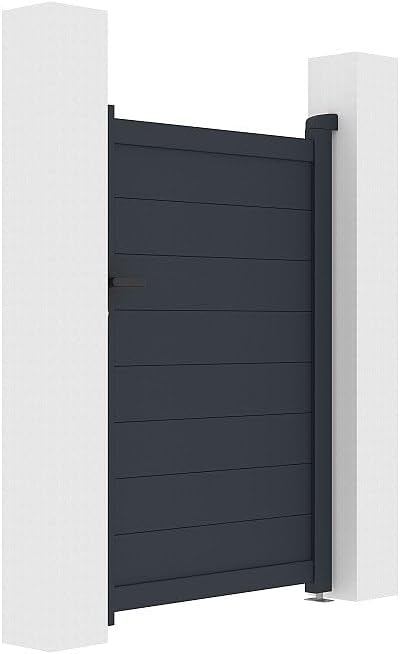
Figure 2: Dimensional diagram of the NAZARIO gate, showing overall length (103 cm), overall height (150 cm), gate panel height (145 cm), and depth (4.6 cm).
3. Installation Guide
This section provides general steps for installing your Vente-unique NAZARIO swinging gate. Professional installation is recommended for optimal safety and performance.
3.1. Tools Required (Not Included)
- Drill and appropriate drill bits for your mounting surface
- Level
- Measuring tape
- Pencil or marker
- Wrenches or socket set
- Screwdriver set
- Safety glasses and gloves
3.2. Pre-Installation Checks
- Inspect Site: Ensure the opening width is suitable for the 103 cm gate length, allowing for hinge and latch mechanisms. The height should accommodate the 150 cm overall height.
- Check Posts/Walls: Confirm that the existing or new gate posts/walls are sturdy, plumb, and capable of supporting the gate's weight (21 kg) and repeated swinging motion.
- Unpack Components: Carefully remove all components from the packaging and verify against the package contents list.
3.3. Installation Steps
- Attach Hinges to Gate: Securely fasten the hinges to the designated points on the gate frame using the provided hardware. Ensure they are aligned correctly for the desired swing direction (inward opening).
- Position Gate: With assistance, hold the gate in its desired closed position within the opening. Use shims or blocks to maintain the correct ground clearance (e.g., 2.8 cm as indicated in Figure 2).
- Mark Hinge Locations: Mark the precise locations for the hinges on the gate post or wall. Use a level to ensure the gate is plumb.
- Drill Pilot Holes: Drill pilot holes at the marked locations on the post/wall, ensuring the drill bit size is appropriate for the mounting hardware.
- Mount Hinges to Post/Wall: Attach the hinges to the post/wall using the appropriate fasteners. Do not fully tighten all fasteners until the gate swing is verified.
- Test Swing: Carefully open and close the gate to ensure it swings freely and clears the ground and surrounding structures. Adjust hinge positions if necessary.
- Install Handle and Lock: Follow the specific instructions for assembling and installing the handle and key lock mechanism onto the gate panel. Ensure the latch aligns with the strike plate on the receiving post.
- Install Stop Buffer: Mount the stop buffer on the ground or receiving post to prevent the gate from swinging past its closed position.
- Final Tightening: Once satisfied with the gate's operation, securely tighten all hinge and lock mechanism fasteners.

Figure 3: The NAZARIO gate fully installed and closed, demonstrating its appearance and fit.

Figure 4: The NAZARIO gate partially open, illustrating its inward swing capability.
4. Operating Instructions
The NAZARIO gate is designed for simple manual operation.
4.1. Opening the Gate
- Unlock: If locked, insert one of the provided keys into the lock cylinder and turn to unlock.
- Disengage Latch: Press or turn the handle to disengage the latch from the strike plate.
- Swing Open: Gently push or pull the gate to swing it open. The gate is designed to open inwards with a maximum angle of 100 degrees.
4.2. Closing the Gate
- Swing Closed: Gently pull or push the gate until it reaches the closed position against the stop buffer.
- Engage Latch: Ensure the latch mechanism engages securely with the strike plate.
- Lock: Insert the key into the lock cylinder and turn to lock the gate. Remove the key and store it in a safe place.
5. Maintenance
Regular maintenance will ensure the longevity and smooth operation of your NAZARIO gate.
- Cleaning: Clean the aluminum surfaces periodically with a soft cloth and mild soapy water. Avoid abrasive cleaners or harsh chemicals that could damage the anthracite thermolacquered finish. Rinse thoroughly with clean water and dry.
- Hinge Lubrication: Apply a silicone-based lubricant to the hinges every 6-12 months, or more frequently in harsh environments, to ensure smooth operation and prevent squeaking.
- Lock Mechanism: Periodically spray a small amount of graphite lubricant into the keyhole to maintain smooth lock operation.
- Fastener Check: Annually inspect all mounting fasteners and hinge screws. Tighten any that have become loose.
- Damage Inspection: Check for any signs of corrosion, dents, or structural damage. Address any issues promptly to prevent further deterioration.
6. Troubleshooting
This section addresses common issues you might encounter with your NAZARIO gate.
| Problem | Possible Cause | Solution |
|---|---|---|
| Gate is difficult to open or close. |
|
|
| Lock mechanism is stiff or not engaging. |
|
|
| Gate appears wobbly or unstable. |
|
|
7. Specifications
Detailed technical specifications for the Vente-unique NAZARIO aluminum swinging gate.
| Feature | Detail |
|---|---|
| Brand | Vente-unique |
| Model | NAZARIO |
| Type | Swinging Gate (Portillon battant) |
| Material | Aluminum |
| Color | Anthracite (RAL 7016) |
| Filling Type | Full (Plein) |
| Overall Length | 103 cm |
| Overall Height | 150 cm |
| Gate Panel Dimensions (L x H x D) | 100 cm x 145 cm x 4.6 cm |
| Metal Thickness | 1.2 mm |
| Weight | 21 kg |
| Opening Mechanism | Manual |
| Maximum Opening Angle | 100 degrees |
| Opening Direction | Inward |
| Included Accessories | Handle, Key Lock, Stop Buffer, 5 Keys |
8. Warranty and Support
Vente-unique products are manufactured to high-quality standards. For specific warranty details, please refer to the documentation included with your purchase or visit the official Vente-unique website.
8.1. Customer Support
If you encounter any issues or have questions regarding your NAZARIO gate, please contact Vente-unique customer support. You can find contact information on the brand's official website or through your purchase platform.
For more information about Vente-unique products, visit the Vente-unique Brand Store.


