1. Introduction
Thank you for choosing the Acekool Portable Air Conditioner. This 3-in-1 unit provides powerful cooling, dehumidifying, and fan functions, designed to create a comfortable environment in your home, office, or bedroom. With its 8000 BTU cooling capacity, it is suitable for rooms up to 350 square feet. This manual provides essential information for safe operation, installation, maintenance, and troubleshooting to ensure optimal performance and longevity of your appliance.

Image 1.1: The Acekool Portable Air Conditioner unit shown with its remote control. The unit is white, rectangular, and features a front grille and control panel on top, with wheels at the base for portability.
2. Safety Information
Please read all safety warnings and instructions carefully before using this appliance to prevent injury or damage. Keep this manual for future reference.
- Always operate the unit on a stable, level surface.
- Do not block air inlets or outlets. Maintain at least 20 cm (8 inches) clearance around the unit.
- Do not insert objects into the air vents.
- Ensure the power cord is not damaged and is properly grounded.
- Unplug the unit before cleaning or performing any maintenance.
- Do not use the unit in wet or damp environments, such as bathrooms.
- Keep children and pets away from the unit during operation.
- If the unit is damaged, do not attempt to repair it yourself. Contact qualified service personnel.
3. Product Features
- Fast Cooling: 8000 BTU cooling capacity for rooms up to 350 sq. ft. with thermostat control between 64°F and 90°F.
- 3-in-1 Functionality: Combines powerful cooling, dehumidifying, and multi-function fan modes.
- Intelligent/Sleep Mode: Maintains optimal temperature at low speeds for quiet operation.
- 24-Hour Timer: Allows setting automatic on/off times for energy saving.
- Easy Installation: Includes a window kit with slider bracket, exhaust hose, inlet/outlet hoses, locking screws, and drain hose.
- Portability: Equipped with 360° rotating castor wheels and built-in handles for easy relocation.
- Automated Dehumidify Technology: Features self-evaporation technology for automatic atomizing of condensed water, with a capacity of 39 pints per day.
- Adjustable Airflow: Directional louvers allow for 4-direction cool wind blowing.

Image 3.1: Illustration of the three operating modes: Cool (61°F-88°F), Dry (45 pints/day dehumidification), and Fan (Low/High speed). Each mode is depicted with an icon and a visual representation of airflow or moisture removal.

Image 3.2: The portable air conditioner unit with an overlay indicating its 45 pints/day dehumidification capacity, highlighting its automated dehumidify technology. A window with condensation is shown on the right, representing the "Before" state, and a clear window on the left, representing the "After" state.
4. Parts List
The following components are included with your Acekool Portable Air Conditioner:
- Portable Air Conditioner Unit
- Remote Control (1)
- Exhaust Air Duct / Exhaust Hose (1)
- Drainage Pipe / Drain Hose (1)
- Window Isolation Kit (Slider Bar x 1, Slider Bar Connector x 1)
- Exhaust Pipe Joint (2)
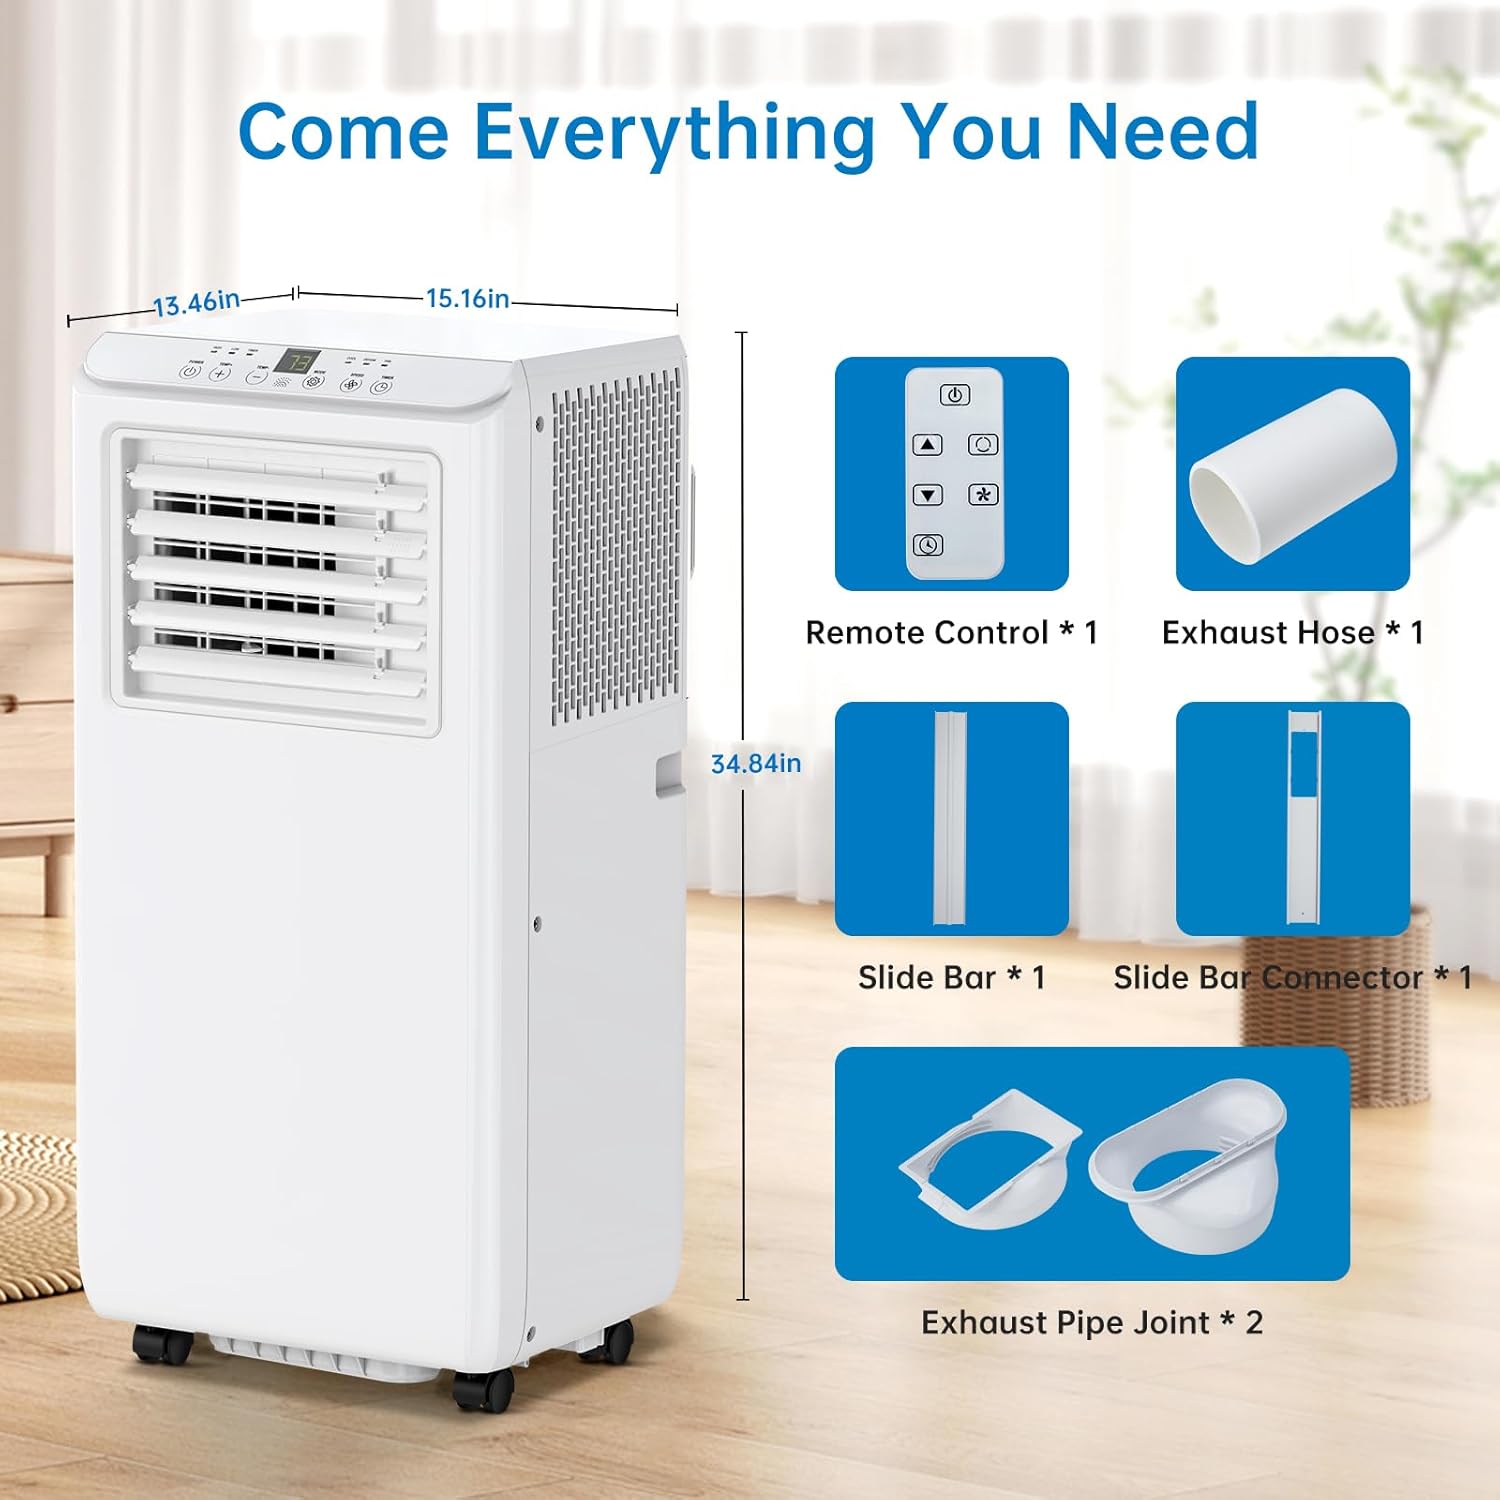
Image 4.1: A visual representation of the portable air conditioner unit with its dimensions (13.46in W x 15.16in D x 34.84in H) and all included accessories: remote control, exhaust hose, slide bar, slide bar connector, and exhaust pipe joints.
5. Setup and Installation
Follow these steps to set up your portable air conditioner for optimal performance.
5.1 Unit Placement
- Place the unit on a firm, level surface in the desired room.
- Ensure there is at least 20 cm (8 inches) of space around the unit for proper airflow.
- The unit is suitable for various locations including bedrooms, living rooms, offices, and garages.

Image 5.1: Examples of suitable locations for the portable air conditioner, including a bedroom, garage, office, and kitchen, demonstrating its versatility.
5.2 Window Kit and Exhaust Hose Installation
- Connect the exhaust hose to the exhaust pipe joint.
- Attach the other end of the exhaust hose to the air outlet on the back of the unit.
- Assemble the window slider kit by connecting the slider bar and slider bar connector. Adjust its length to fit your window opening.
- Insert the exhaust pipe joint into the opening of the window slider kit.
- Place the assembled window kit into your window frame, ensuring a secure fit to prevent air leakage.
- Extend the exhaust hose to the window kit, ensuring it is straight and not kinked to allow for efficient hot air exhaust.
- For continuous drainage in dehumidifier mode, connect the drainage pipe to the drain port on the unit and direct the other end into a suitable container or drain.

Image 5.2: A six-panel diagram illustrating the installation steps for the exhaust hose and window kit. It shows how to attach the hose to the unit, assemble the window slider, and secure the hose in the window opening.
6. Operating Instructions
Your Acekool Portable Air Conditioner can be operated using the LED touch panel on the unit or the included remote control.
6.1 Control Panel and Remote Control Overview
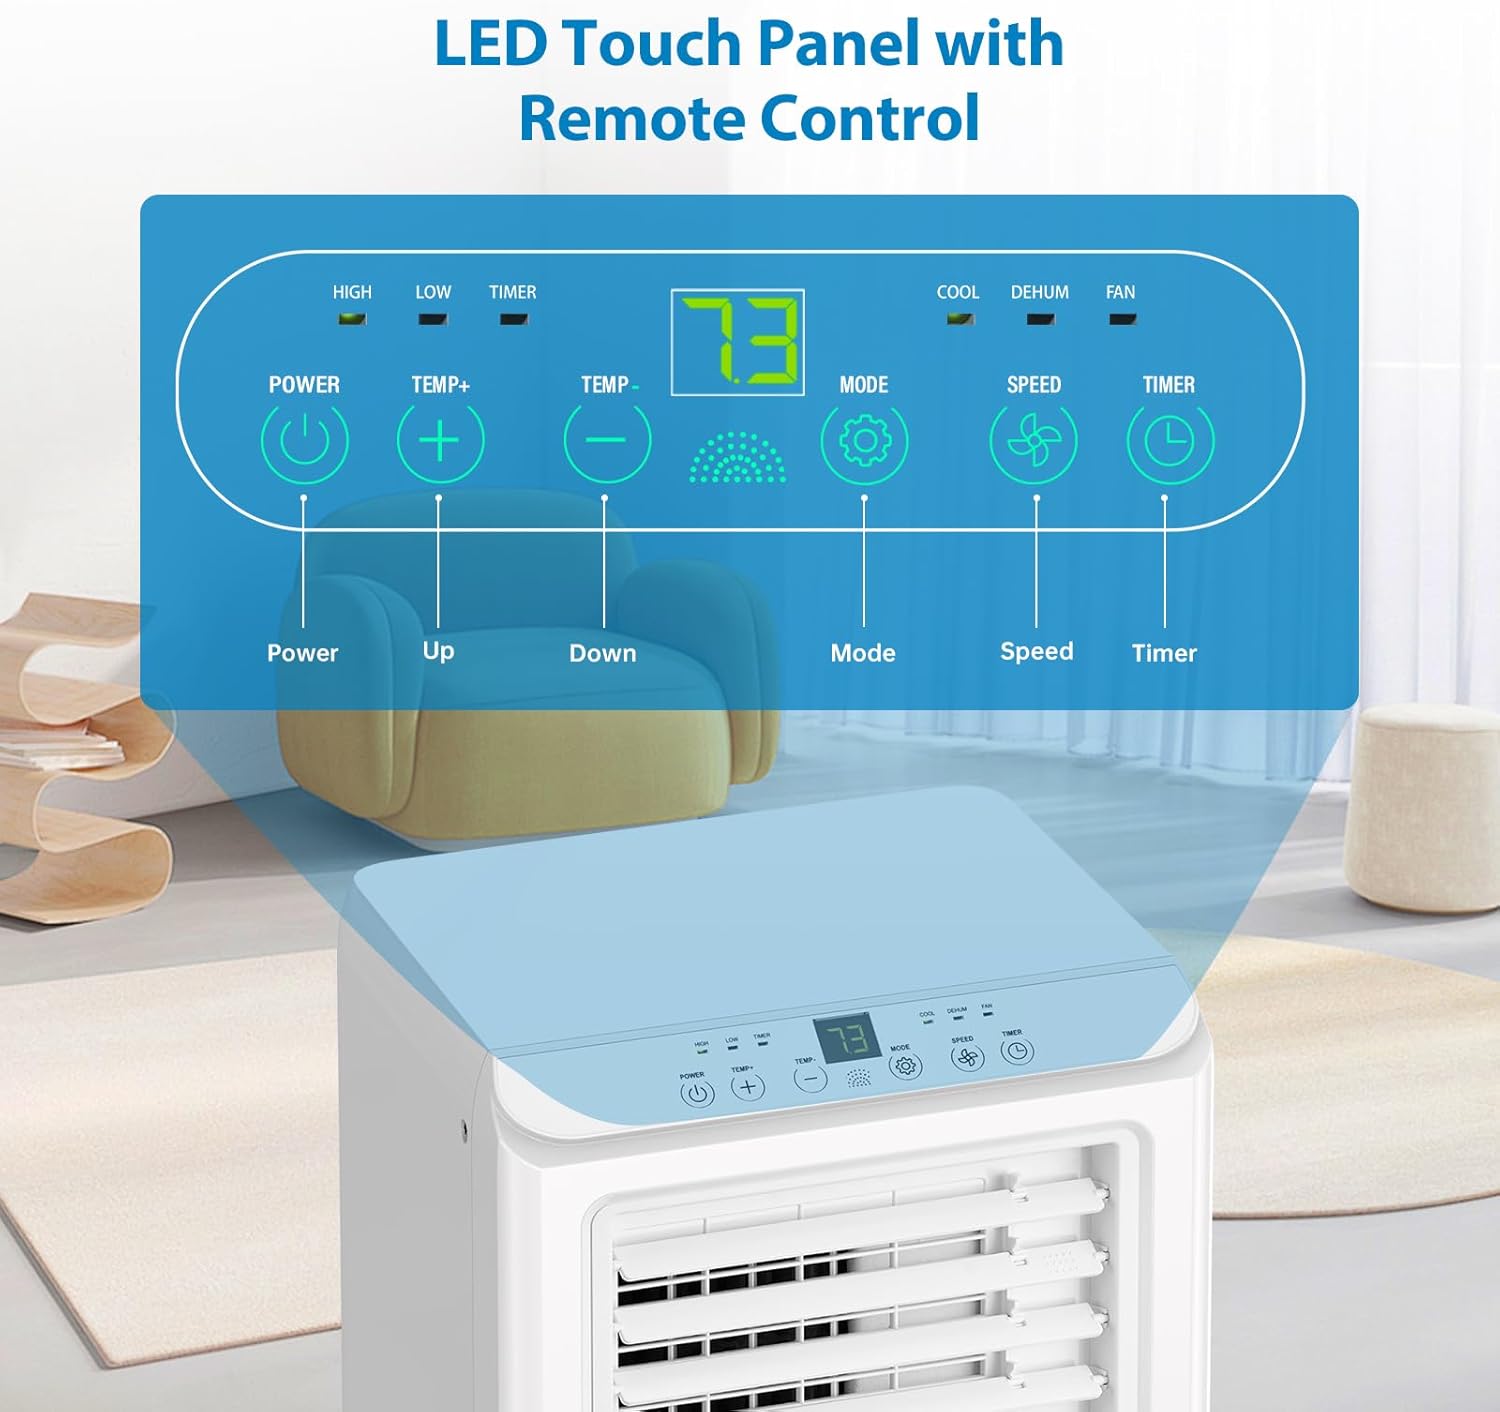
Image 6.1: A detailed view of the LED touch control panel on top of the unit, showing buttons for Power, Temperature Up/Down, Mode, Speed, and Timer. The display shows the current temperature (e.g., 73°F).
- Power Button: Turns the unit on or off.
- Temp +/- Buttons: Adjusts the desired temperature (64°F to 90°F).
- Mode Button: Cycles through Cool, Dehumidify (Dry), and Fan modes.
- Speed Button: Adjusts fan speed (Low/High).
- Timer Button: Sets the 24-hour timer for automatic on/off.
6.2 Operating Modes
- Cool Mode: Provides powerful cooling. Set your desired temperature. The unit will cool until the room reaches the set temperature.
- Dehumidify (Dry) Mode: Removes excess moisture from the air. The fan operates at a fixed low speed. Ensure the drainage pipe is connected for continuous drainage.
- Fan Mode: Circulates air without cooling. Choose between low and high fan speeds.
- Sleep Mode: Activates automatically when the timer is set for overnight operation. The unit will maintain optimal temperature at low fan speeds for quiet operation.
6.3 Adjusting Airflow Direction
The unit features adjustable louvers on the front. Manually adjust these louvers to direct the cool air in the desired direction.
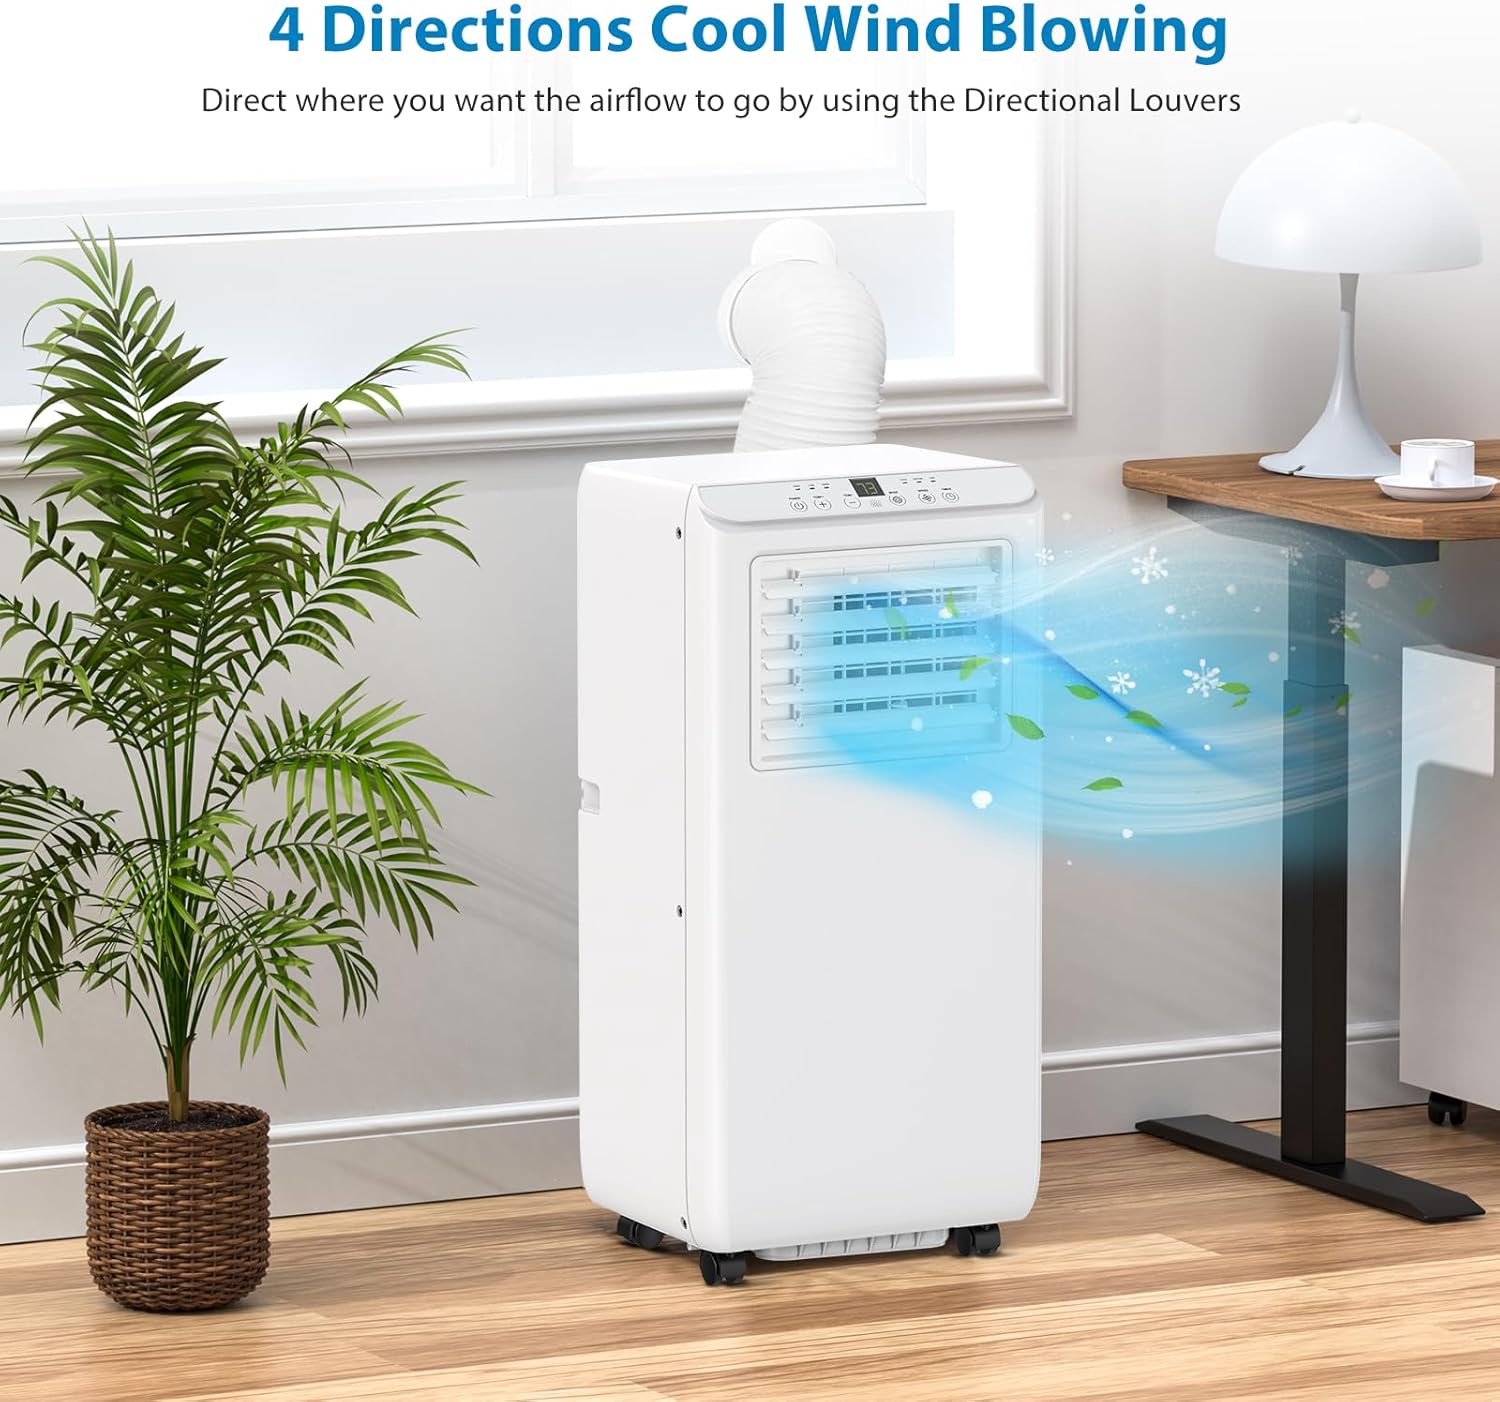
Image 6.2: The portable air conditioner unit positioned in a room, demonstrating how its directional louvers can be adjusted to blow cool air in four different directions, optimizing airflow distribution.
7. Maintenance
Regular maintenance ensures the efficiency and longevity of your air conditioner.
7.1 Cleaning the Air Filter
- The unit is equipped with a standard filter.
- Clean the air filter every two weeks or more frequently if the unit is used in a dusty environment.
- To clean, remove the filter from the back of the unit.
- Wash the filter with warm, soapy water. Rinse thoroughly and allow it to air dry completely before reinserting.
7.2 Draining Condensed Water
- In Cool mode, the unit utilizes self-evaporation technology, which atomizes condensed water and expels it with the exhaust air. This minimizes the need for manual drainage.
- In Dehumidify mode, or if the humidity is very high, the internal water tank may fill up. When the tank is full, the unit will stop operating and an indicator light may illuminate.
- To drain, turn off the unit and unplug it.
- Locate the drain port at the bottom rear of the unit.
- Place a shallow pan or tray beneath the drain port. Remove the drain plug to allow water to flow out.
- Once drained, replace the drain plug securely.
- For continuous drainage in Dehumidify mode, connect the provided drainage pipe to the drain port and direct it to a floor drain or a larger container.
7.3 Storage
- Before storing, ensure all water is drained from the unit.
- Clean the air filter.
- Unplug the power cord and coil it neatly.
- Store the unit in a cool, dry place, away from direct sunlight and extreme temperatures.
8. Troubleshooting
Refer to this section for common issues and their solutions. If the problem persists, contact customer support.
| Problem | Possible Cause | Solution |
|---|---|---|
| Unit does not turn on. | No power; power cord unplugged; circuit breaker tripped. | Ensure unit is plugged in; check power outlet; reset circuit breaker. |
| Unit is not cooling effectively. | Air filter clogged; room too large; windows/doors open; exhaust hose not properly installed or kinked; temperature setting too high. | Clean air filter; ensure room size is within specifications (350 sq. ft.); close windows/doors; check exhaust hose for proper installation and kinks; lower temperature setting. |
| Unit is leaking water. | Drain plug not secured; internal water tank full (in dehumidify mode); unit not level. | Ensure drain plug is tightly closed; drain the internal water tank; place unit on a level surface. |
| Unit is noisy. | Unit not on a level surface; fan speed too high; internal components vibrating. | Place unit on a level surface; reduce fan speed; ensure nothing is obstructing the fan. |
| Remote control not working. | Batteries dead or incorrectly inserted; remote not pointed at unit sensor. | Replace batteries; ensure correct polarity; point remote directly at the unit's sensor. |
9. Specifications
| Model Number | Portable Air Conditioners |
| Brand | Acekool |
| Cooling Power | 8000 British Thermal Units (BTU) |
| Floor Area Coverage | Up to 350 Square Feet |
| Dehumidification Capacity | 39 Pints/Day |
| Product Dimensions | 15.16"D x 13.46"W x 34.84"H |
| Item Weight | 50.4 pounds |
| Voltage | 115 Volts |
| Noise Level | 51 dB |
| Refrigerant | R 410A |
| Filter Type | Standard filter |
| Color | White |
10. Warranty and Customer Support
Your Acekool Portable Air Conditioner comes with a 1-Year Warranty from the date of purchase.
For warranty claims, technical assistance, or any questions regarding your product, please contact Acekool customer support. Refer to the contact information provided with your purchase documentation or visit the official Acekool website.
For more information, you can visit the Acekool Store on Amazon.


