1. Introduction
The GODOX Lux Master is a retro-styled camera flash that combines vintage aesthetics with modern technology. It features a full-color touchscreen, 2.4G wireless control, HSS (High-Speed Sync), TTL (Through-The-Lens) auto flash, and S1/S2 optical control. Designed for compatibility with various camera brands including Canon, Nikon, Sony, Olympus, and Fujifilm, the Lux Master offers versatile lighting solutions for photographers.
2. What's in the Box
Upon unboxing your GODOX Lux Master, please ensure all the following items are present:
- 1x Retro Flash Body
- 1x Fan Type Reflector LM-R27
- 1x Flash Bracket for Camera FB01
- 1x Triggering Cable
- 1x Charging Cable (Type-C)
- 1x Protection Cover for Flash Tube
- 1x Storage Bag
- 1x LETWING Cleaning Cloth

Image: Contents of the GODOX Lux Master package, including the flash body, fan reflector, flash bracket, cables, and storage bag.
Video: An unboxing video demonstrating the contents of the GODOX Lux Master Retro Camera Flash package.
3. Setup
3.1 Attaching the Reflector
- Remove the lamp protector from the flash tube by squeezing and spinning it off.
- Install the folding fan-type reflector (LM-R27) onto the lamp body.
- Unfold the reflector clockwise and connect the fan blades with fasteners at both ends to secure it.

Image: Visual guide for installing the fan-type reflector on the flash unit.
3.2 Mounting to Camera
The Lux Master can be mounted to your camera using the included flash bracket (FB01) or used handheld.
- Attach the flash body to one side of the FB01 bracket.
- Secure your camera to the other side of the FB01 bracket.
- Connect the triggering cable from the flash to your camera's sync port if using a film camera or for wired triggering.

Image: The GODOX Lux Master flash attached to a camera via the flash bracket.
4. Operating Instructions
4.1 Power On/Off and Touchscreen Control
Press and hold the power button to turn the unit on or off. The Lux Master features an intuitive full-color touchscreen for easy navigation and setting adjustments. Simply swipe or tap to switch between modes or modify parameters.

Image: The efficient color touchscreen of the Lux Master, demonstrating mode and setting adjustments.
4.2 Flash Modes
The Lux Master supports various flash modes to suit different photographic needs:
- Manual Mode (M): Allows precise control over flash power from 1/256 to 1/1 full power.
- Multi Mode: For stroboscopic flash, adjust power, times, and frequency.
- Auto Mode (A): Connects flash and camera with an optional Auto Sensor AS-01 to automatically calculate exposure at fundamental settings like f/2.8, ISO100.
- TTL Auto Flash Mode: Ensures effortless and accurate flash exposure by automatically adjusting flash output.

Image: The Lux Master displaying its four flash modes: Manual, Multi, Auto, and TTL.
4.3 Wireless Sync and Triggering Options
The Lux Master offers multiple ways to trigger the flash:
- 2.4G Wireless X System: Works seamlessly with Godox triggers like X3, XProII, and X2T. For X3, simply tap the wireless sync on X3 and the sync icon on Lux Master for instant pairing.
- S1/S2 Optical Control: In Manual mode, use the S1/S2 Photocell function to fire the flash as a secondary flash with another flash unit (e.g., Godox V1Pro).
- Auto Sensor AS-01 (Optional): Connects your camera and flash seamlessly for accurate and consistent exposure, especially useful for film cameras.
- PC Line Trigger: For cameras with a legacy hot shoe, a PC sync cable can be used.
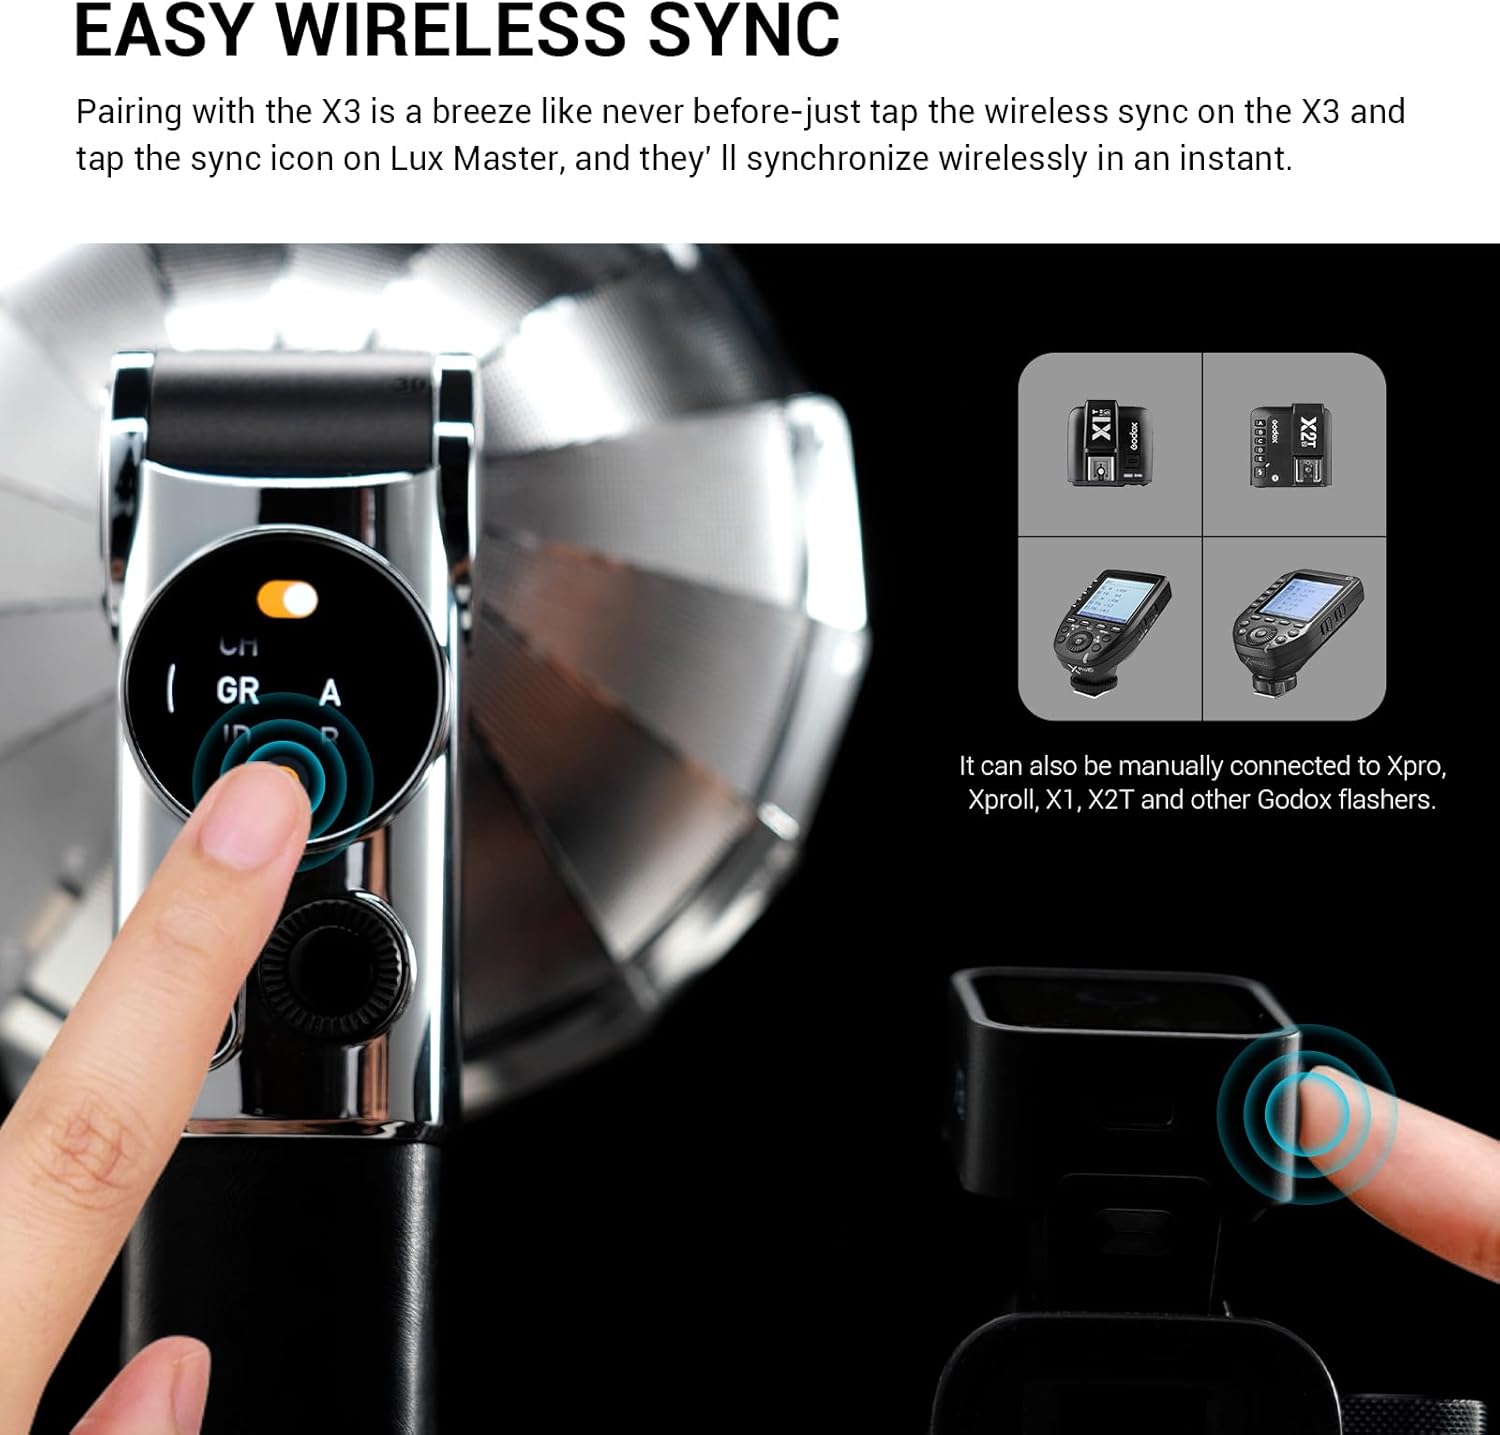
Image: The Lux Master's touchscreen showing the wireless sync function, ready to pair with a Godox X3 trigger.

Image: An overview of the versatile triggering options available for the Lux Master, including wireless, auto sensor, and PC line connections.
Video: An operation tutorial demonstrating various functions and settings of the GODOX Lux Master Retro Camera Flash, including mode selection, wireless sync, and reflector types.
4.4 Tiltable Flash Head and Reflector Types
The flash head can be tilted from 0 to 90 degrees, allowing for bounce flash effects. The unit also supports replaceable reflectors for varied lighting effects. In autoflash mode, you can tap the reflector icon to switch among four reflector types and adjust corresponding parameters.

Image: The tiltable flash head and the retro umbrella reflector in various positions.

Image: Different reflector types and attachments for the Lux Master, including the Fan Type Reflector LM-R27, Reflector LM-R28, Reflector with Dome LM-R28, and Octa Softbox LM-S25.
4.5 Battery and Charging
The Lux Master is equipped with a built-in 7.2V 2980mAh lithium battery, providing up to 460 full-power flashes. Recharging is convenient via the USB-C port, with a charging time of approximately 2 hours.
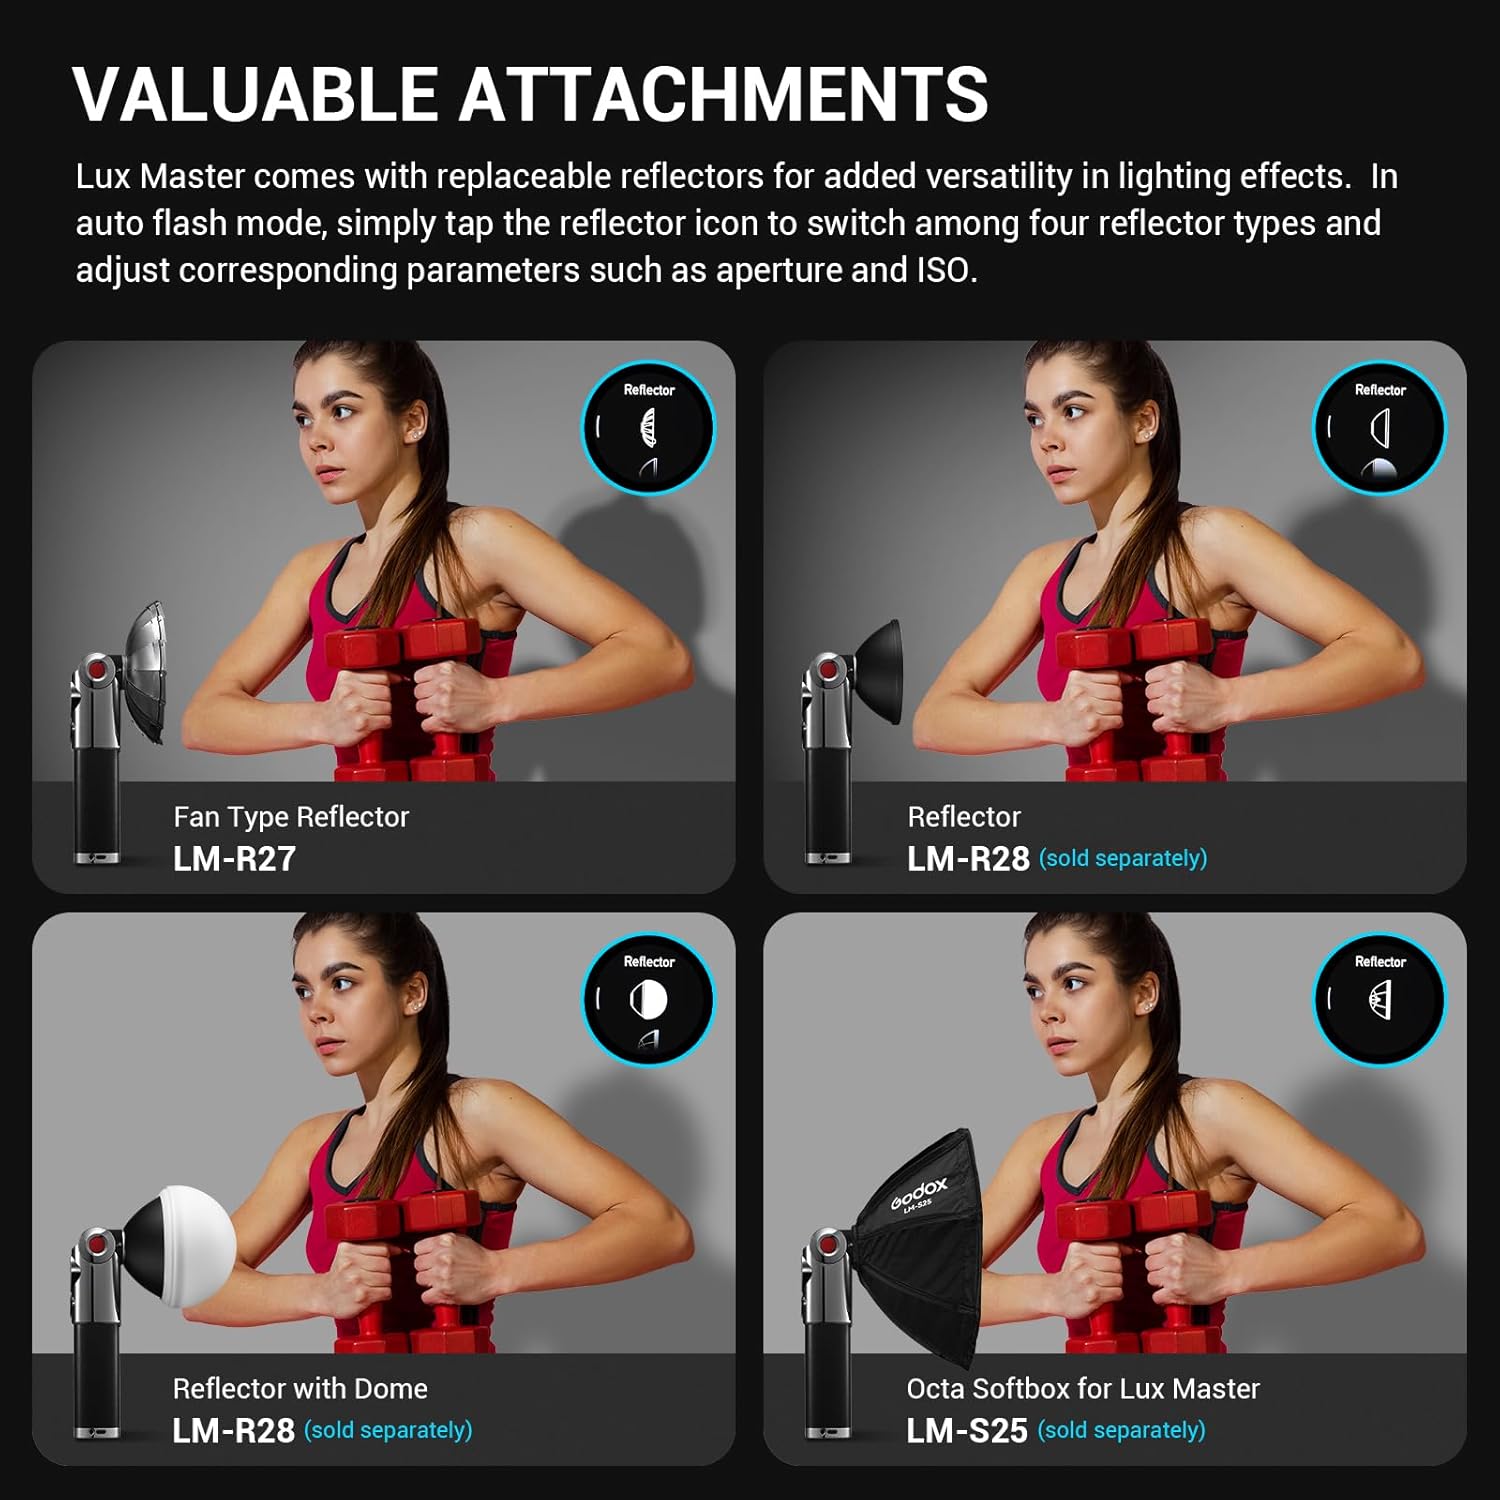
Image: Information on the powerful and convenient built-in lithium battery and Type-C charging.
5. Maintenance
To ensure the longevity and optimal performance of your GODOX Lux Master, follow these maintenance guidelines:
- Keep the flash unit clean and free from dust and moisture. Use the provided LETWING cleaning cloth for the screen and body.
- Store the flash in its protective storage bag when not in use to prevent scratches and damage.
- Avoid exposing the unit to extreme temperatures or direct sunlight for prolonged periods.
- Handle the flash tube with care, as it is a delicate component. Use the protection cover when transporting or storing.
- Charge the battery regularly, even if not in frequent use, to maintain battery health.
6. Troubleshooting
If you encounter issues with your GODOX Lux Master, consider the following common solutions:
- Flash not firing: Check battery level, ensure the flash is powered on, verify camera and flash settings (e.g., TTL, Manual, Wireless), and confirm proper connection with triggers or cables.
- Wireless sync issues: Ensure both the flash and trigger are on the same channel and ID. Re-pair the devices if necessary.
- Inconsistent exposure: In Auto mode, ensure the Auto Sensor AS-01 is correctly connected. In Manual mode, adjust power settings. In TTL mode, check for any exposure compensation settings on the camera or flash.
- Screen unresponsive: Try restarting the flash unit. If the issue persists, ensure the unit is adequately charged.
For further assistance, please refer to the official GODOX support resources or contact customer service.
7. Specifications
| Feature | Specification |
|---|---|
| Brand | GODOX |
| Model Name | Lux Master |
| Compatible Mountings | Canon, Nikon, Sony, Olympus, Fujifilm, Pentax, Leica |
| Camera Flash Type | Hotshoe/Handhold |
| Guide Number | 25 (ISO100, in meters) |
| Flash Sync Speed | 1/250s |
| Exposure Control Type | TTL, Manual, High-Speed Sync |
| Shooting Modes | Manual, Automatic, Optical (S1/S2), High-Speed Sync, Multiflash |
| Wireless Technology | 2.4G Wireless |
| Battery Type | 1 Lithium Ion battery (included) |
| Battery Life (Average) | 2 Hours (up to 460 full-power flashes) |
| Charging | Type-C Charging (approx. 2 hours) |
| Color Temperature | 6000K ± 200K |
| Item Dimensions (D x W x H) | 3.9"D x 10.24"W x 3.9"H |
8. Warranty and Support
The GODOX Lux Master Retro Camera Flash comes with a 1-Year Warranty from the manufacturer. For warranty claims, technical support, or service inquiries, please contact your retailer or visit the official GODOX website for detailed support information.
For additional resources and product information, you may visit the GODOX Store on Amazon.


