Introduction
The DigitPro RCA to USB Audio Video Converter (Model BR116) is designed to bridge the gap between your analog video devices and your computer. This device allows you to capture and convert video and audio from sources like VHS players, VCRs, DVD players, Mini DV camcorders, and Hi8 cameras into digital formats on your PC or Mac. Preserve your cherished memories and old media by digitizing them with ease.

Image: DigitPro AV to USB Converter in use, digitizing video from a DVD player to a laptop.
Package Contents
Please verify that all items are present in your package:
- DigitPro RCA to USB Audio Video Converter (Model BR116)
- USB Cable
- RCA Cables
- Software CD (for driver installation and basic capture software)
- Instruction Manual (this document)

Image: The DigitPro RCA to USB Audio Video Converter and its included accessories.
Product Features
- Universal Compatibility: Supports all video formats including DVD+/-R/RW, DVD+/-VR, DVD-Video, NTSC, and PAL. Connects to devices with RCA or S-Video connectors such as VHS, VCR, DVD players, Mini DV, and Hi8.
- High Performance Capture: Captures high-quality audio without requiring a separate sound card. Offers control over brightness, contrast, hue, and saturation.
- Easy Operation: Features a USB 2.0 interface for plug-and-play functionality. No external power supply is needed.
- Preserve Memories: Ideal for digitizing family home movies and videos, allowing you to save them on your computer or share them online.

Image: Software and OS compatibility of the DigitPro RCA to USB Converter.
Setup Instructions
1. Hardware Connection
- Connect the Converter to your Computer: Insert the USB end of the DigitPro converter into an available USB 2.0 port on your PC or Mac. The device is plug-and-play, and drivers should install automatically.
- Connect to your Analog Source Device:
- If your source device (e.g., VCR, DVD player) has RCA outputs, connect the yellow (video), white (audio left), and red (audio right) RCA cables from your source device to the corresponding inputs on the DigitPro converter.
- If your source device has an S-Video output, connect an S-Video cable from your source device to the S-Video input on the DigitPro converter. Note: S-Video provides a higher quality video signal than composite RCA video.

Image: DigitPro converter connected to a laptop, illustrating the USB and input connections.

Image: Detailed connection diagram for RCA inputs.
2. Driver Installation Verification
For most modern operating systems (Windows 10/11, macOS), the necessary drivers will install automatically upon connecting the device. You can verify the installation:
- Windows: Right-click the Windows Start button, select 'Device Manager'. Look under 'Sound, video and game controllers' and 'Cameras' for entries like 'AV TO USB2.0' or 'USB2.0 MIC'.
- Mac: Go to 'About This Mac' > 'System Report' > 'Hardware' > 'Camera' and 'Audio'. Look for 'AV TO USB2.0' and 'USB2.0 MIC'.
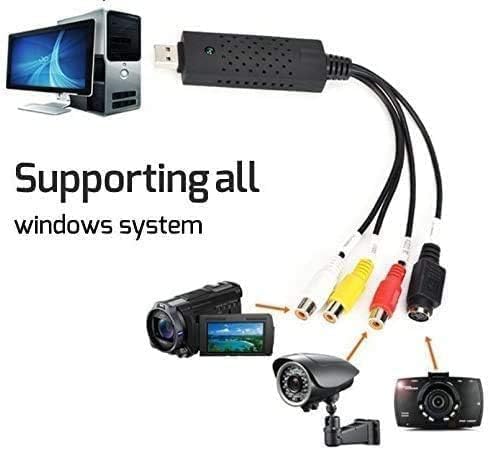
Image: The converter connected to a PC, demonstrating its use with various analog video sources.
Video: Step-by-step guide on connecting the DigitPro converter and verifying driver installation on Windows and Mac, followed by software setup.
Operating Instructions
Once the hardware is connected and drivers are installed, you can use video capture software to digitize your content. We recommend OBS Studio (free) for Windows and QuickTime Player (built-in) for Mac.
For Windows (using OBS Studio)
- Download and Install OBS Studio: If you don't have it, download OBS Studio from its official website.
- Add Video Capture Device:
- Open OBS Studio. In the 'Sources' panel, click the '+' icon.
- Select 'Video Capture Device'. Create a new source or select an existing one. Click 'OK'.
- In the properties window, select 'AV TO USB2.0' as the 'Device'.
- For 'Audio Output Mode', select 'Output desktop audio (DirectSound)' or 'Use custom audio device' and choose 'USB2.0 MIC'.
- Adjust resolution/FPS if needed (Device Default is usually sufficient). Click 'OK'.
- Start Recording: Click 'Start Recording' in the 'Controls' panel to begin capturing your video.

Image: OBS Studio setup for video capture on Windows.
For Windows (using PotPlayer - Alternative)
- Download and Install PotPlayer: If you don't have it, download PotPlayer from its official website.
- Open Device Settings:
- Open PotPlayer. Click on the PotPlayer menu (top-left corner).
- Navigate to 'Open' > 'Device Settings...' (or press Alt+D).
- In the 'Device Settings' window, go to the 'Webcam' tab.
- For 'Video capture device', select 'AV TO USB2.0'.
- For 'Audio capture device', select 'USB2.0 MIC'.
- Click 'Open device'.
- Record Video:
- Once the video feed appears, right-click on the video window.
- Go to 'Video' > 'Video Recording' > 'Record Video'.
- In the 'Video Recorder' window, choose your storage location and filename prefix.
- Click 'Start' to begin recording. Click 'Stop' when finished.
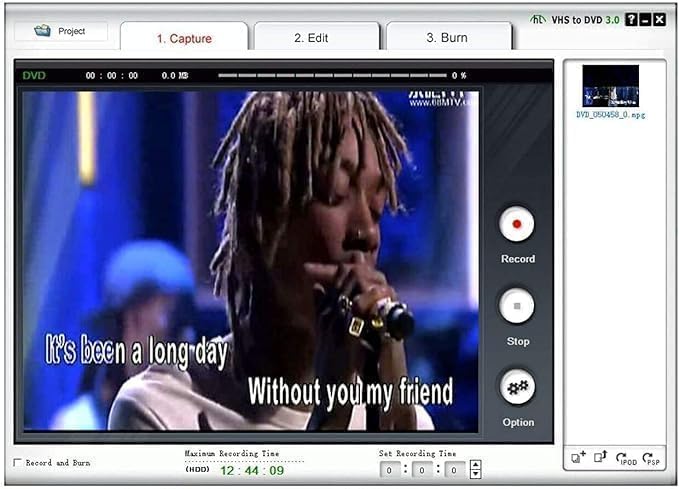
Image: Example of a video capture software interface.
For Mac (using QuickTime Player)
- Open QuickTime Player: Launch QuickTime Player from your Applications folder.
- Start New Movie Recording:
- Go to 'File' > 'New Movie Recording'.
- In the recording window, click the small arrow next to the record button.
- Select 'AV TO USB2.0' for the camera (video input).
- Select 'USB2.0 MIC' for the microphone (audio input).
- Start Recording: Click the red record button to begin capturing your video. Click it again to stop.

Image: QuickTime Player setup for video capture on Mac.
Maintenance
- Cleaning: Use a soft, dry cloth to clean the device. Avoid liquid cleaners or abrasive materials.
- Storage: Store the converter in a cool, dry place away from direct sunlight and extreme temperatures when not in use.
- Handling: Handle the device and cables with care to prevent damage to connectors or internal components.
Troubleshooting
- No Video Signal:
- Ensure all cables (USB, RCA/S-Video) are securely connected.
- Verify that your analog source device (VCR, DVD player) is powered on and playing content.
- Check that the correct video input (AV TO USB2.0) is selected in your capture software.
- Try a different USB port on your computer.
- No Audio Signal:
- Ensure the red and white RCA audio cables are correctly connected.
- Verify that 'USB2.0 MIC' or the appropriate audio input is selected in your capture software.
- Check the volume levels on your computer and within the capture software.
- Driver Issues:
- Re-connect the device to allow the operating system to attempt driver installation again.
- Consult the included software CD for manual driver installation if automatic installation fails.
- Ensure your operating system is up to date.
- Poor Video Quality:
- The output quality is dependent on the original analog source quality.
- If available, use S-Video connection instead of composite RCA for better video clarity.
- Adjust brightness, contrast, hue, and saturation settings within your capture software.
Specifications
| Model Number | BR116 |
| Brand | DigitPro |
| Interface | USB 2.0 |
| Video Input | RCA Composite, S-Video |
| Audio Input | RCA Stereo (Left & Right) |
| Supported Video Formats | NTSC, PAL, DVD+/-R/RW, DVD+/-VR, DVD-Video |
| Compatible Operating Systems | Windows, Mac OS |
| Item Weight | 2.47 ounces |
| Package Dimensions | 7.13 x 6.26 x 0.79 inches |

Image: Dimensions of the DigitPro RCA to USB Converter.
Warranty and Support
The DigitPro RCA to USB Audio Video Converter comes with a 3-Year Warranty.
For any assistance, questions, or support, please contact our customer service team:
- Email 1: orderwarranty@hotmail.com
- Email 2: orderservice1@hotmail.com
- Tel 1 (U.S.): +1 6264203418 (Mon-Fri: 9:00-17:00 PST)
- Tel 2 (U.S.): +1 6264203417 (Mon-Fri: 17:00-24:00 PST)
Please provide your Order ID when contacting support for faster service.

Image: 3-Year Warranty information.
