
Mileseey D9 PRO
Contents
MiLESEEY D9 Pro Laser Rangefinder User Manual
Model: D9 PRO
1. Introduction
Thank you for choosing the MiLESEEY D9 Pro Laser Rangefinder. This professional-grade device is designed for precise distance measurement, offering advanced features such as a dual visual alignment indicator, an IPS touch screen, and 14 versatile measurement modes. It integrates P2P technology for measuring inaccessible areas and provides live angle display, with seamless synchronization via a dedicated mobile application. This manual provides essential information for safe and effective operation of your device.
2. Safety Information
WARNING: This device contains a Class II laser with a power output of 1mW. Avoid direct eye exposure to the laser beam. Do not stare into the beam or view directly with optical instruments. Use only as described in this manual.
- Do not attempt to modify or disassemble the device.
- Keep the device out of reach of children.
- Do not use the device in explosive environments or near flammable materials.
- Ensure the device is clean and dry before use.
3. Product Overview
3.1 What's in the Box
Upon unboxing your MiLESEEY D9 Pro, please verify that all components are present:
- MiLESEEY D9 Pro Laser Rangefinder
- Protective Case
- Product Manual
- Data Cable (USB-C)
- Lanyard

Figure 3.1: Contents of the MiLESEEY D9 Pro package.
3.2 Device Components
Familiarize yourself with the key parts of your D9 Pro rangefinder:
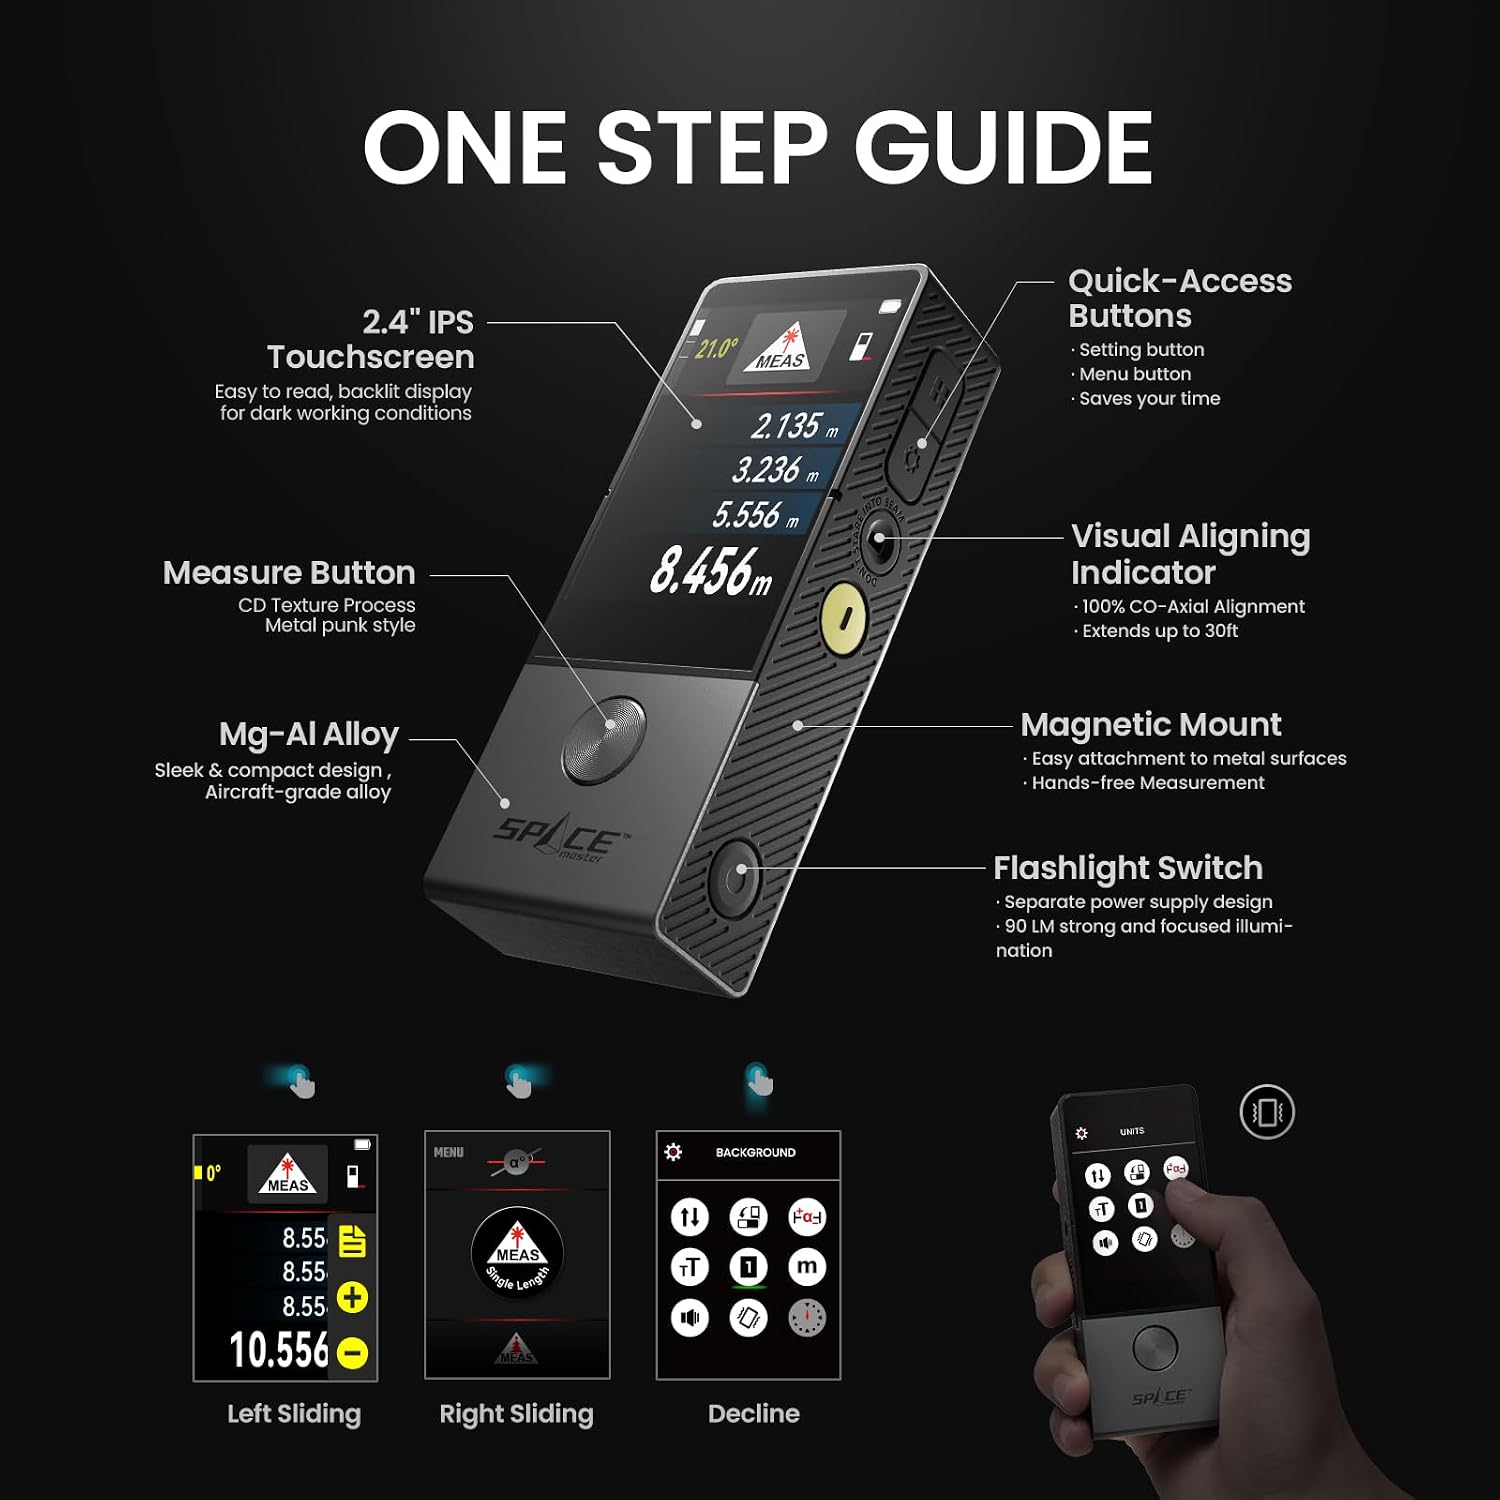
Figure 3.2: MiLESEEY D9 Pro device components and features.
- 2.4" IPS Touchscreen: High-resolution display for clear readings and intuitive navigation, even in dark conditions.
- Measure Button: Initiates measurements. Features a durable CD texture process.
- Mg-Al Alloy Body: Sleek, compact, and durable aircraft-grade design.
- Quick-Access Buttons: Dedicated buttons for settings, menu, and saving, streamlining your workflow.
- Visual Aligning Indicator: Advanced dual laser system ensuring 100% co-axial alignment, extending up to 30ft for clear visual reference.
- Magnetic Mount: Allows easy attachment to metal surfaces for hands-free measurement.
- Flashlight Switch: Activates the independent 90 LM LED spotlight for illumination.
4. Setup
4.1 Charging the Device
The D9 Pro is equipped with a long-lasting 1800 mAh rechargeable Li-ion battery. For optimal performance, fully charge the device before first use.
- Connect the provided USB-C data cable to the charging port on the device.
- Plug the other end of the cable into a 5V/2A USB power adapter (not included).
- A full charge takes approximately 3 hours, providing power for up to 30,000 measurements.
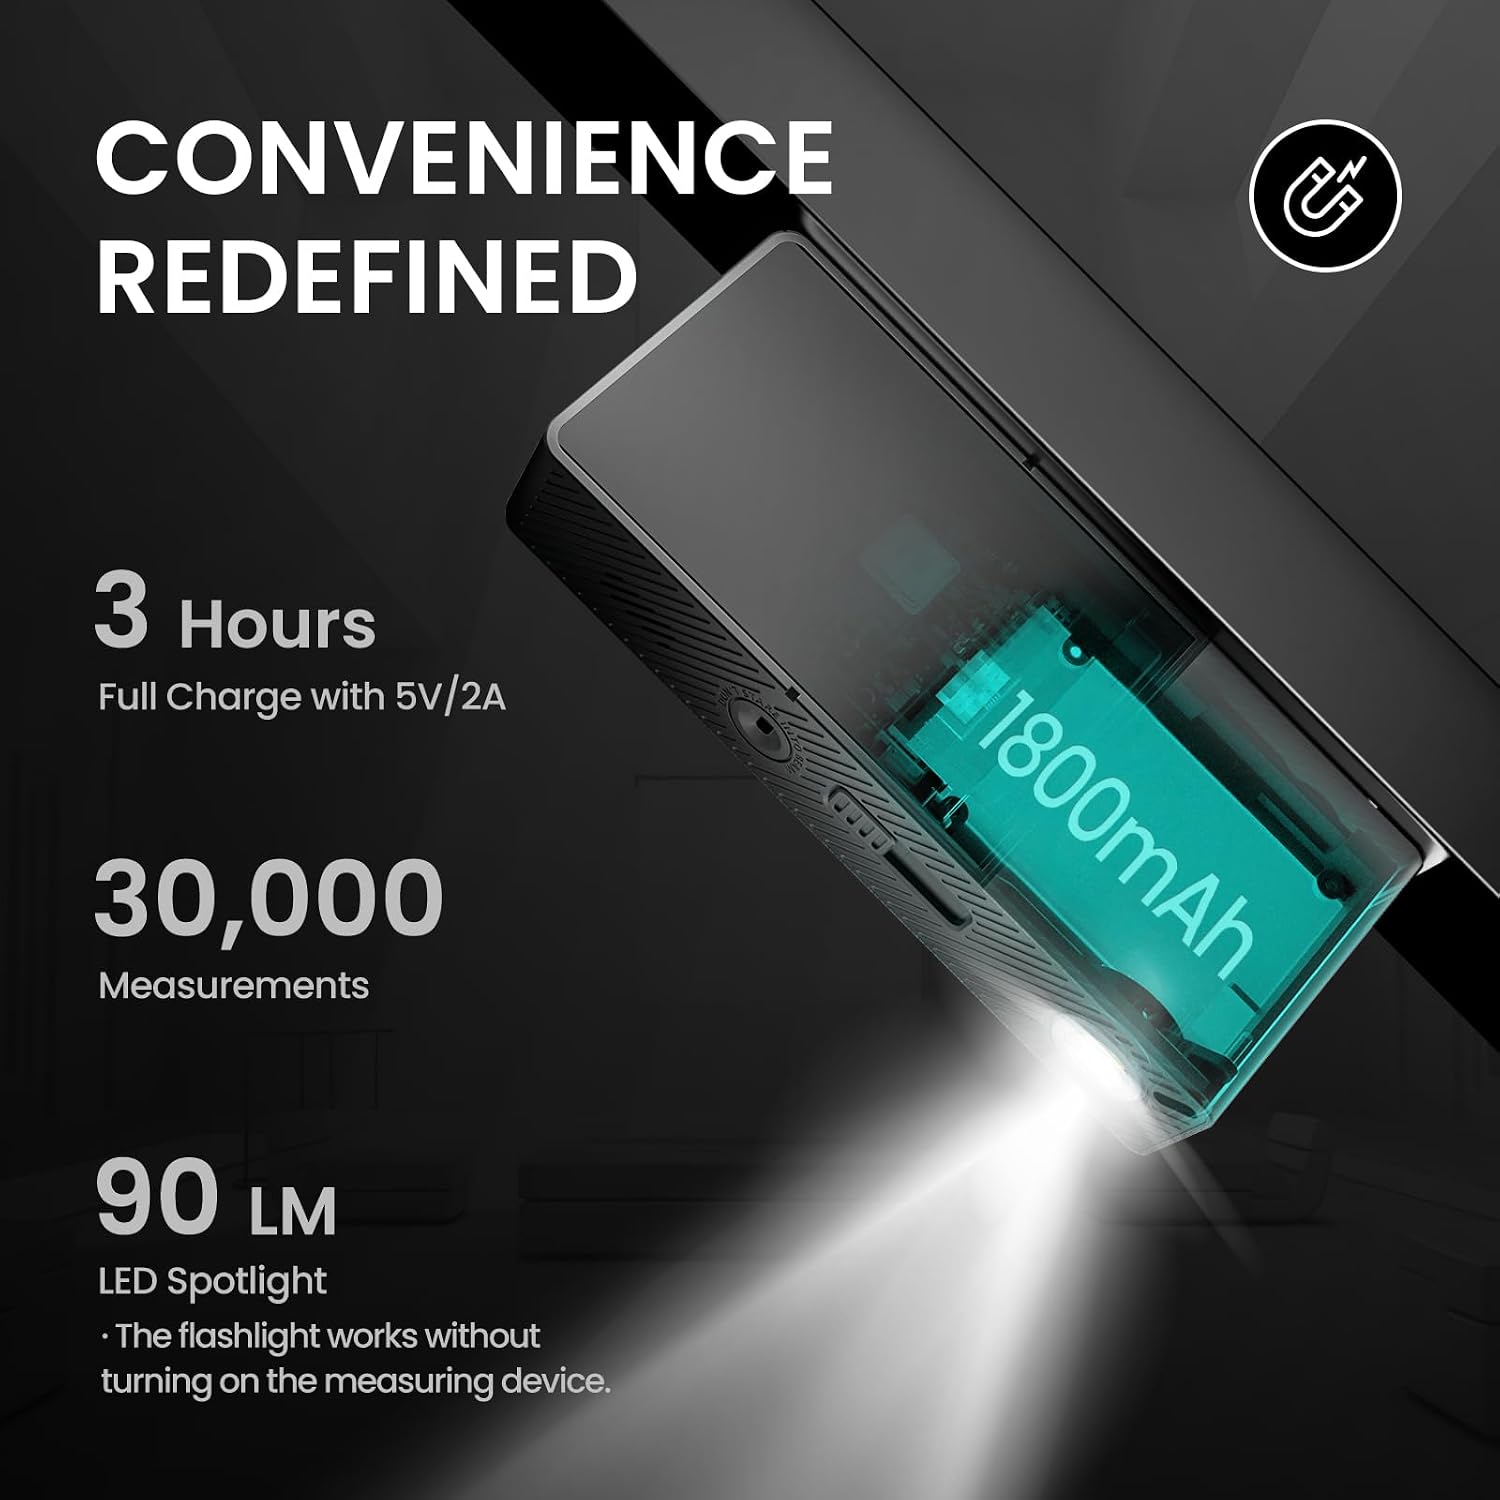
Figure 4.1: Charging the D9 Pro and battery life information.
4.2 Powering On/Off
- To Power On: Press and hold the Measure Button until the screen illuminates.
- To Power Off: Press and hold the Measure Button until the screen turns off, or the device will automatically power off after a period of inactivity to conserve battery.
5. Operating Instructions
5.1 Basic Measurement
- Point the laser at the target surface.
- Press the Measure Button once to activate the laser.
- Press the Measure Button again to take a measurement. The result will be displayed on the screen.
5.2 Screen Navigation
The 2.4-inch IPS touchscreen allows for intuitive navigation:
- Swipe Left/Right: Navigate through different measurement modes and settings.
- Tap Icons: Select functions or confirm actions.
- The screen can be locked or rotated for convenient horizontal or vertical reading.
5.3 Changing Reference Points
The D9 Pro allows you to shift the measurement reference point, ensuring accuracy from various positions:
- Front Edge: Measures from the front of the device.
- Back Edge: Measures from the back of the device.
- Aligning Laser Line: Measures from the point where the visual alignment laser originates.
- Tripod Thread Hole Center: Ideal when using a tripod for stable measurements.

Figure 5.1: Adjustable measurement reference points.
5.4 Auto-Rotating Display
The display automatically rotates to match the device's orientation, ensuring easy readability whether you hold it horizontally or vertically.

Figure 5.2: Auto-rotating display for enhanced readability.
5.5 Using the Magnetic Mount
The integrated magnetic mount allows you to securely attach the D9 Pro to metal surfaces, providing stability for hands-free measurements, especially useful in construction or workshop environments.

Figure 5.3: Magnetic mount in use.
5.6 Flashlight Function
The D9 Pro includes a powerful 90 LM LED spotlight, which can be activated independently of the measuring functions. This is useful for illuminating dark work areas.

Figure 5.4: The 90 LM flashlight in operation.
6. Measurement Modes
The D9 Pro offers an extensive range of 14 measurement functions to cover various professional and DIY needs. Below are some of the key modes:
6.1 Dual Visual Alignment
The D9 Pro features unique bilateral laser reference lines, ensuring 100% coaxial alignment. This provides a clear visual reference for horizontal or inclined alignment and marking, significantly enhancing efficiency and precision.

Figure 6.1: Dual Visual Alignment in action.
6.2 Point-to-Point (P2P) Technology
This advanced function allows you to measure the distance between any two points from a single remote location. It is ideal for safely and accurately measuring distances in hard-to-reach areas and complex situations, such as measuring frames, beams, or inclined ceilings.

Figure 6.2: P2P Technology for remote measurements.
6.3 Live Rotation Angle Display
Equipped with a 360° angle sensor, the D9 Pro provides real-time feedback and confirmation of angle measurements on any surface. This innovative feature ensures precise angle readings for various applications.

Figure 6.3: Live Rotation Angle Display.
6.4 Continuous Measurement & Stake-out
Perform continuous measurements to track distances in real-time as you move the device. The stake-out function allows you to mark specific intervals along a line, useful for precise layout tasks.

Figure 6.4: Continuous Measurement and Stake-out functions.
6.5 Alignment at Any Angle
Coupled with the live angle display, the laser marking aids in aligning decorations or objects along a line of any angle, whether straight or diagonal.

Figure 6.5: Alignment at any angle using the laser.
7. App Integration
The D9 Pro seamlessly integrates with the "SMART LIFE" application, allowing you to digitize and manage your projects efficiently.
- Data Transfer: Instantly transfer measured data to your smartphone or tablet.
- Project Digitization: Drag and drop measured data onto hand-drawn plans or uploaded photos within the app.
- Export Options: Export data for use with PC programs, send original plans to clients, or create Excel spreadsheets for future reference.

Figure 7.1: Digitalizing projects via the SMART LIFE App.
8. Maintenance
Proper maintenance ensures the longevity and accuracy of your MiLESEEY D9 Pro.
- Cleaning: Use a soft, damp cloth to clean the device. Do not use abrasive cleaners or solvents. Ensure the laser lens is free of dust and debris for accurate measurements.
- Storage: Store the device in its protective case in a cool, dry place when not in use. Avoid extreme temperatures and direct sunlight.
- Battery: If storing for extended periods, charge the battery periodically to maintain its health.
9. Troubleshooting
If you encounter issues with your D9 Pro, refer to the following common problems and solutions:
| Problem | Possible Cause | Solution |
|---|---|---|
| Device does not power on. | Low battery. | Charge the device fully. |
| Inaccurate measurements. | Laser lens obstructed; incorrect reference point; unstable surface. | Clean the laser lens; verify the selected reference point; ensure a stable measurement surface. |
| Laser beam not visible. | Bright ambient light; laser not activated. | Use in lower light conditions; press the Measure Button to activate the laser. |
| App connection issues. | Bluetooth off; app not updated; device not paired. | Ensure Bluetooth is enabled on both devices; update the "SMART LIFE" app; follow in-app pairing instructions. |
If the problem persists, please contact customer support.
10. Specifications
| Feature | Detail |
|---|---|
| Model Number | D9 PRO |
| Measurement Range | Up to 330 feet (100m) |
| Accuracy | +/- 1/16" (approx. +/- 2mm) |
| Units | cm, mm, ft, in, ft+in |
| Laser Class | Class II, <1mW |
| Display | 2.4-inch IPS Touch Screen |
| Battery Type | 1 Lithium-ion (included) |
| Battery Capacity | 1800 mAh |
| Charging Time | Approx. 3 hours (with 5V/2A adapter) |
| Measurements per Charge | Up to 30,000 |
| Material | Acrylonitrile Butadiene Styrene (ABS) |
| Color | Black |
| Water Resistance Level | Waterproof |
| Item Weight | 10.58 Ounces (approx. 299.94 grams) |
| Flashlight Output | 90 LM LED |
11. Warranty and Support
MiLESEEY products are manufactured to high-quality standards. For information regarding warranty coverage, technical support, or service, please refer to the warranty card included with your product or visit the official MiLESEEY website. Please retain your proof of purchase for warranty claims.
Ask a question about this manual
Ask about setup, troubleshooting, compatibility, parts, safety, or missing instructions. Manuals+ will review the question and use this page’s manual context to help answer it.