
1. Introduction
The Vilros Raspberry Pi 5 Starter Kit MAX provides a complete, plug-and-play solution for both beginners and advanced users. This kit includes the official 8GB RAM Raspberry Pi 5 board, a 128GB Micro SD card preloaded with Raspberry Pi OS, a passive and active cooling case, a compatible power supply, and all necessary accessories to get started with your projects immediately. The advanced cooling system ensures stable performance even during intensive tasks, making it versatile for various applications from coding lessons and retro gaming to smart home setups and robotics experiments.
2. Package Contents
Your Vilros Raspberry Pi 5 Starter Kit MAX includes the following items:
- Official Raspberry Pi 5 8GB RAM Board
- Vilros Black Passive Cooling Case for the Raspberry Pi 5 (with pre-installed fan)
- 128GB Micro SD with Raspberry Pi OS (preloaded)
- USB-C Raspberry Pi 5 Compatible Power Supply (27W, 5V/5A)
- 2 x Micro HDMI to HDMI Cables (5 foot, supports up to 4K 60p)
- Micro SD to USB Adapter/Reader
- Camera Module Adapter Cable
- Vilros Quickstart Guide (Updated for Pi 5)
- Neoprene Storage Bag

Image: All components included in the Vilros Raspberry Pi 5 Starter Kit MAX, neatly arranged.
3. Setup Guide
Follow these steps to assemble your Vilros Raspberry Pi 5 Starter Kit:
- Prepare the Raspberry Pi 5 Board: Carefully remove the Raspberry Pi 5 board from its packaging.
- Install the Cooling Case: The Vilros case is designed for passive and active cooling. It includes a pre-installed fan and thermal pads. Place the Raspberry Pi 5 board into the bottom part of the case, ensuring all ports align correctly with the case openings. Connect the fan cable to the appropriate header on the Pi board. Secure the top part of the case. The kit includes small screws and a screwdriver for assembly.
- Insert Micro SD Card: The 128GB Micro SD card comes preloaded with Raspberry Pi OS. Insert it into the Micro SD card slot on the Raspberry Pi 5 board.
- Connect Peripherals:
- Display: Use the provided Micro HDMI to HDMI cables to connect your Raspberry Pi 5 to a monitor or TV. The Raspberry Pi 5 supports dual 4K 60p displays.
- Keyboard and Mouse: Connect your USB keyboard and mouse to the USB ports on the Raspberry Pi 5.
- Power: Connect the USB-C power supply to the Raspberry Pi 5's power input port and then to a wall outlet. The board should power on automatically.
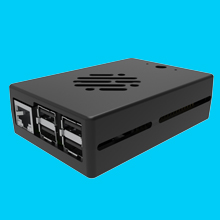
Image: The Vilros Black Passive Cooling Case, designed for optimal heat dissipation.
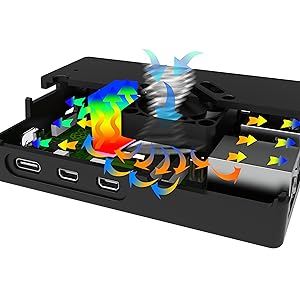
Image: Close-up of the aluminum cooling fan and heat sinks integrated into the case for the Raspberry Pi 5.
Video: A user demonstrates the assembly process of the Vilros Raspberry Pi 5 kit, including installing the board into the case and connecting peripherals.
4. Operating Instructions
Your Raspberry Pi 5 comes with Raspberry Pi OS preloaded on the Micro SD card, making the initial setup straightforward. Upon first boot, you will be guided through a setup wizard to configure basic settings such as language, keyboard layout, time zone, and network connectivity. You will also be prompted to create a user account and password.
- First Boot: After connecting all components and power, the Raspberry Pi 5 will boot up. The Raspberry Pi OS desktop environment will appear.
- Initial Configuration: Follow the on-screen prompts to complete the initial setup. This includes connecting to your Wi-Fi network.
- Exploring Raspberry Pi OS: Once configured, you can explore the various applications and tools available in Raspberry Pi OS, a Linux-based operating system. This includes programming environments, internet browsers, and multimedia tools.
Video: An overview of the Vilros Raspberry Pi 5 Starter Kit MAX, demonstrating the initial boot-up and the Raspberry Pi OS desktop environment.
5. Specifications
| Feature | Detail |
|---|---|
| Brand | Vilros |
| Model Name | Raspberry Pi 5 8GB - MAX |
| RAM Memory Installed Size | 8 GB LPDDR4X |
| Memory Storage Capacity | 128 GB Micro SD |
| CPU Model | Broadcom BCM2712 quad-core Arm Cortex A76 processor (2.4 GHz) |
| Operating System | Raspberry Pi OS |
| Connectivity Technology | Bluetooth 5.0, Ethernet, GPIO, HDMI, I2C, 802.11ac Wireless |
| Total USB Ports | 4 |
| Item Dimensions (L x W x H) | 7"L x 5"W x 2"H |
6. Maintenance
To ensure the longevity and optimal performance of your Vilros Raspberry Pi 5 Starter Kit, consider the following maintenance tips:
- Keep it Clean: Regularly clean the case and fan vents to prevent dust buildup, which can hinder cooling efficiency. Use compressed air or a soft brush.
- Proper Shutdown: Always shut down the Raspberry Pi OS gracefully through the software interface before disconnecting power. Abrupt power cuts can corrupt the Micro SD card.
- Software Updates: Periodically check for and install updates for Raspberry Pi OS to ensure you have the latest features and security patches.
- Cable Management: Keep cables organized and free from kinks or excessive tension to prevent damage to the ports.
7. Troubleshooting
If you encounter issues with your Raspberry Pi 5, try the following common troubleshooting steps:
- No Display Output: Ensure all HDMI cables are securely connected to both the Raspberry Pi and the display. Verify the display is set to the correct input source.
- Power Issues: Check that the USB-C power supply is correctly plugged into the Raspberry Pi and a working wall outlet. The power supply is specifically designed for the Raspberry Pi 5's requirements.
- OS Not Booting: If the Raspberry Pi OS fails to boot, try re-inserting the Micro SD card. If the issue persists, you may need to re-flash the OS onto the Micro SD card using the Raspberry Pi Imager tool (instructions available in the Quickstart Guide or online).
- Overheating: Ensure the cooling fan is properly connected and functioning. Check that the case vents are not obstructed.
- Peripheral Not Responding: Verify that USB devices (keyboard, mouse) are securely plugged into the correct USB ports.
8. Warranty and Support
The Vilros Raspberry Pi 5 Starter Kit MAX comes with a 1-Year Manufacturer Warranty. For technical support, troubleshooting assistance, or warranty claims, please visit the official Vilros website or contact their customer support team. The Quickstart Guide included in your kit also provides valuable resources for common questions and setup procedures.