
1. Introduction
This manual provides essential information for the safe and efficient operation of your Y&H MPPT-40A Solar Charge Controller. This device is designed to manage power flow from your solar panels to your battery bank, ensuring optimal charging and extending battery life. It features 100% MPPT technology, a high-power DSP controller, and automatic voltage switching for 12V, 24V, 36V, or 48V battery systems.
2. Safety Information
Please read all safety instructions carefully before installation and operation. Failure to follow these instructions may result in electric shock, fire, or serious injury.
- Ensure all wiring is performed by qualified personnel and complies with local electrical codes.
- Always disconnect the solar panel and battery power before installing or adjusting the controller.
- Do not disassemble or attempt to repair the controller yourself. Contact customer support for assistance.
- Install the controller in a well-ventilated area, away from flammable materials and direct sunlight.
- Ensure correct polarity when connecting batteries and solar panels to prevent damage to the controller and other components.
- Use appropriate wire gauges for all connections to handle the rated current.
3. Product Overview
3.1 Key Features
- 100% MPPT Technology: Maximizes power harvest from solar panels.
- Automatic Voltage Switching: Compatible with 12V, 24V, 36V, and 48V battery systems.
- 3-Stage Charging: Optimizes battery performance and extends lifespan.
- Built-in DSP Controller: Ensures high performance and reliability.
- Comprehensive Protections: Includes overload, PV input reverse polarity, limited output current, and over-temperature protection.
- Versatile Battery Compatibility: Supports sealed lead-acid, gel, flooded, and lithium batteries.
- Programmable Parameters: Allows customization of charge and discharge settings.
- Excellent Heat Dissipation: Designed for stable operation.
3.2 Protection Features
The Y&H MPPT-40A controller incorporates multiple protection mechanisms to ensure system safety and longevity:

The controller offers comprehensive protection, including safeguards against PV overcurrent, PV short circuit, PV reverse polarity, battery over-discharge, battery over-voltage, load overcurrent, load short circuit, and over-temperature conditions.
- PV Over Current Protection
- PV Short Circuit Protection
- PV Reverse Polarity Protection
- Battery Over Voltage Protection
- Battery Over Discharge Protection
- Load Over Current Protection
- Load Short Circuit Protection
- Over Temperature Protection
3.3 Advanced MPPT Technology

Showcasing the advanced MPPT technology with 98% tracking efficiency and 99% peak conversion efficiency. The controller supports various battery types including Flooded (FLD), Sealed Lead-Acid (SLD), Gel, Lithium (LI), AGM, and user-defined settings.
The controller utilizes advanced Maximum Power Point Tracking (MPPT) technology to ensure your solar panels operate at their peak power point, maximizing energy harvest. It achieves a tracking efficiency of 98% and a peak conversion efficiency of 99%.
4. Setup and Installation
4.1 Installation Location
- Mount the controller vertically on a non-flammable surface.
- Ensure adequate airflow around the controller for proper heat dissipation.
- Avoid direct sunlight, high temperatures, and humid environments.
4.2 Wiring Diagram
Follow the wiring diagram carefully to ensure correct and safe installation. Always connect the battery first, then the solar panels, and finally the load.
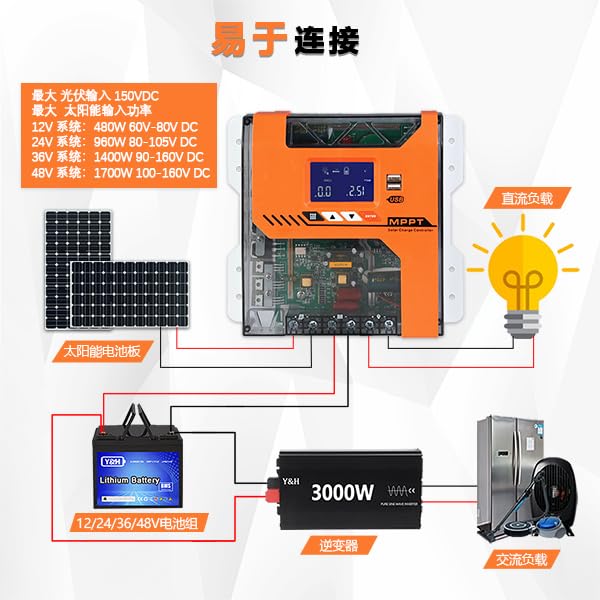
Detailed wiring diagram illustrating how to connect the MPPT solar charge controller to solar panels, a battery bank, an inverter, and various AC loads. It also shows maximum PV input voltage and power for 12V, 24V, 36V, and 48V systems.
- Connect the Battery: Connect the positive and negative terminals of the battery to the corresponding battery terminals on the controller. Ensure correct polarity.
- Connect the Solar Panels: Connect the positive and negative terminals of the solar panels to the corresponding PV input terminals on the controller. Ensure correct polarity.
- Connect the DC Load (Optional): Connect the positive and negative terminals of your DC load to the corresponding load terminals on the controller.
Recommended Solar Input Voltage and Power:

An illustration of the Y&H MPPT 40A solar controller, detailing the recommended solar input voltage ranges and corresponding maximum solar power for 12V (60-80V DC, 480W), 24V (80-105V DC, 960W), 36V (90-150V DC, 1400W), and 48V (100-160V DC, 1700W) battery systems.
- 12V Battery System: Recommended PV input voltage range DC 60V-80V; Max Solar Power 480W.
- 24V Battery System: Recommended PV input voltage range DC 80V-105V; Max Solar Power 960W.
- 36V Battery System: Recommended PV input voltage range DC 90V-150V; Max Solar Power 1400W.
- 48V Battery System: Recommended PV input voltage range DC 100V-160V; Max Solar Power 1700W.
5. Operating Instructions
5.1 Display Interface and Parameter Settings
The controller features a clear display for monitoring system status and adjusting parameters. Use the buttons to navigate through the menu and set desired values.
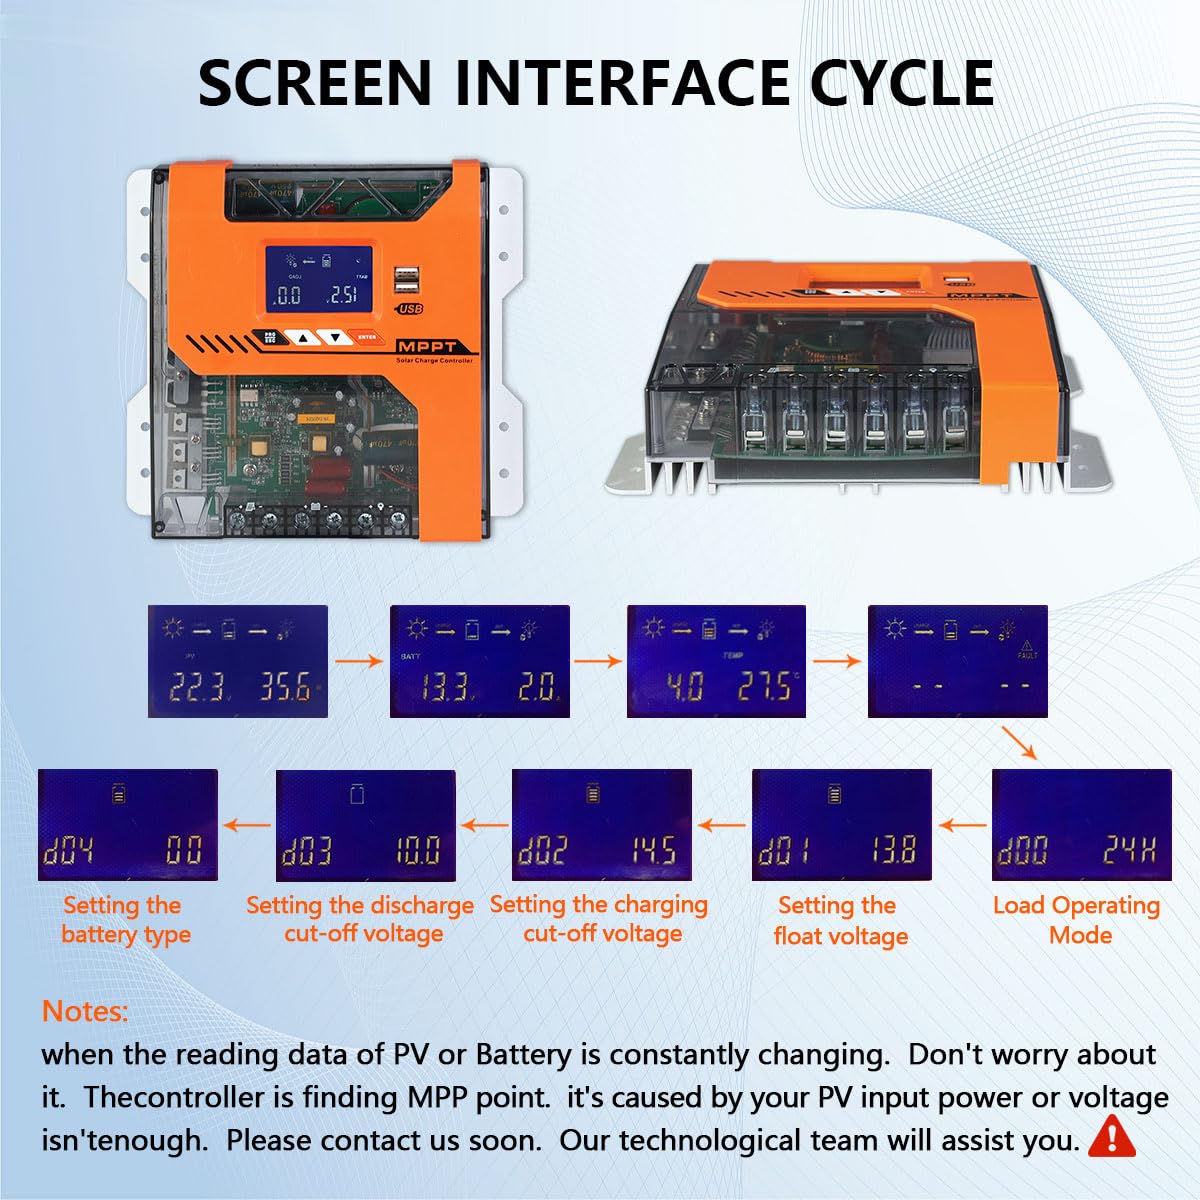
This diagram explains the display interface cycle, guiding users through setting critical parameters such as battery type, discharge cut-off voltage, charging cut-off voltage, float voltage, and load operating mode. It also notes that fluctuating readings indicate the controller is finding the Maximum Power Point (MPP).
Notes: If the reading data of PV or Battery is constantly changing, it indicates the controller is actively finding the Maximum Power Point (MPP). This is normal operation, especially if your PV input power or voltage is not consistently stable. If issues persist, contact technical support.
5.2 Charging Modes
The controller employs a 3-stage charging algorithm to optimize battery health and performance:

This graph illustrates the 4-stage MPPT charging process: Bulk Charge, Constant Charging, and Float Charge. It explains how this method, including equalization, prolongs battery life by reversing sulfation and increasing battery capacity.
- Bulk Charge: Charges the battery at its maximum current until voltage rises to the absorption level.
- Constant Charging (Absorption): Maintains a constant voltage while the current gradually decreases.
- Float Charge: Reduces the voltage to a lower level to maintain the battery at full charge, compensating for self-discharge.
For certain battery types, an equalization charge may be performed to reverse sulfation and improve battery capacity.
5.3 Load Control Modes
The controller offers various load control modes:
- 24-Hour Operation: The load output is continuously on.
- Light Control: The load output turns on at dusk and off at dawn.
- Light Duration Control: The load output turns on at dusk and stays on for a set number of hours.
6. Maintenance
Regular maintenance ensures optimal performance and longevity of your solar charge controller:
- Check Connections: Periodically inspect all wiring connections for tightness and corrosion. Tighten any loose connections.
- Clean the Controller: Keep the controller clean and free from dust and debris. Use a dry cloth to wipe the surface. Ensure ventilation openings are not blocked.
- Inspect for Damage: Check for any visible signs of damage to the casing, wires, or terminals.
- Monitor Performance: Regularly check the display for normal operation and expected charging/discharging values.
7. Troubleshooting
The controller includes a troubleshooting assistance function. Refer to the display for error codes or unusual readings. Here are some common issues and potential solutions:
| Problem | Possible Cause | Solution |
|---|---|---|
| No display/Controller not powering on | Battery not connected or low voltage; reverse polarity. | Check battery connections and voltage. Ensure correct polarity. Charge battery if too low. |
| Battery not charging | Solar panels not connected; low solar input; PV reverse polarity; battery full. | Check solar panel connections and ensure sufficient sunlight. Verify PV polarity. Battery may be fully charged. |
| Load not working | Load disconnected; overcurrent protection; battery low voltage; load control mode settings. | Check load connections. Reduce load if overcurrent. Check battery voltage. Adjust load control mode settings. |
| Over-temperature warning | Insufficient ventilation; high ambient temperature; excessive load. | Ensure proper ventilation. Reduce ambient temperature if possible. Reduce load. |
If the issue persists after attempting these solutions, please contact Y&H customer support.
8. Specifications

Physical dimensions of the Y&H MPPT Solar Charge Controller, measuring 24 cm in length, 18.8 cm in width, and 7.49 cm in height.
| Specification | Value |
|---|---|
| Model | MPPT-40A |
| Rated Charge Current | 40A |
| System Voltage | 12V/24V/36V/48V Auto |
| Max PV Input Voltage | 150VDC |
| Max Charge Conversion Efficiency | 97% |
| Tracking Efficiency | 98% |
| Battery Types Supported | Sealed Lead-Acid, Gel, Flooded, Lithium |
| Display Type | LED or basic display |
| Material | Aluminum |
| Color | Orange |
| Product Dimensions (L x W x H) | 24 x 18.8 x 7.5 cm |
| Item Weight | 1.1 Kilograms |
| Manufacturer | Y&H |
| UPC | 716963424851 |
| GTIN | 716963424851 |
9. Warranty and Support
For warranty information and technical support, please refer to the documentation provided with your purchase or contact the seller directly. Keep your purchase receipt as proof of purchase.


