
GEEKOM GEEKOM A9 Max
Contents
GEEKOM A9 Max AI Mini PC User Manual
Model: GEEKOM A9 Max
1. Product Overview
The GEEKOM A9 Max AI Mini PC redefines high-performance computing in a compact form factor. Powered by the AMD Ryzen AI 9 HX 370 processor and Radeon 890M graphics, this mini PC is engineered for demanding AI workloads, intensive multitasking, and immersive 1080p to 2K gaming. It is an ideal solution for power users, gamers, AI developers, and creative professionals seeking robust desktop performance in a portable design.
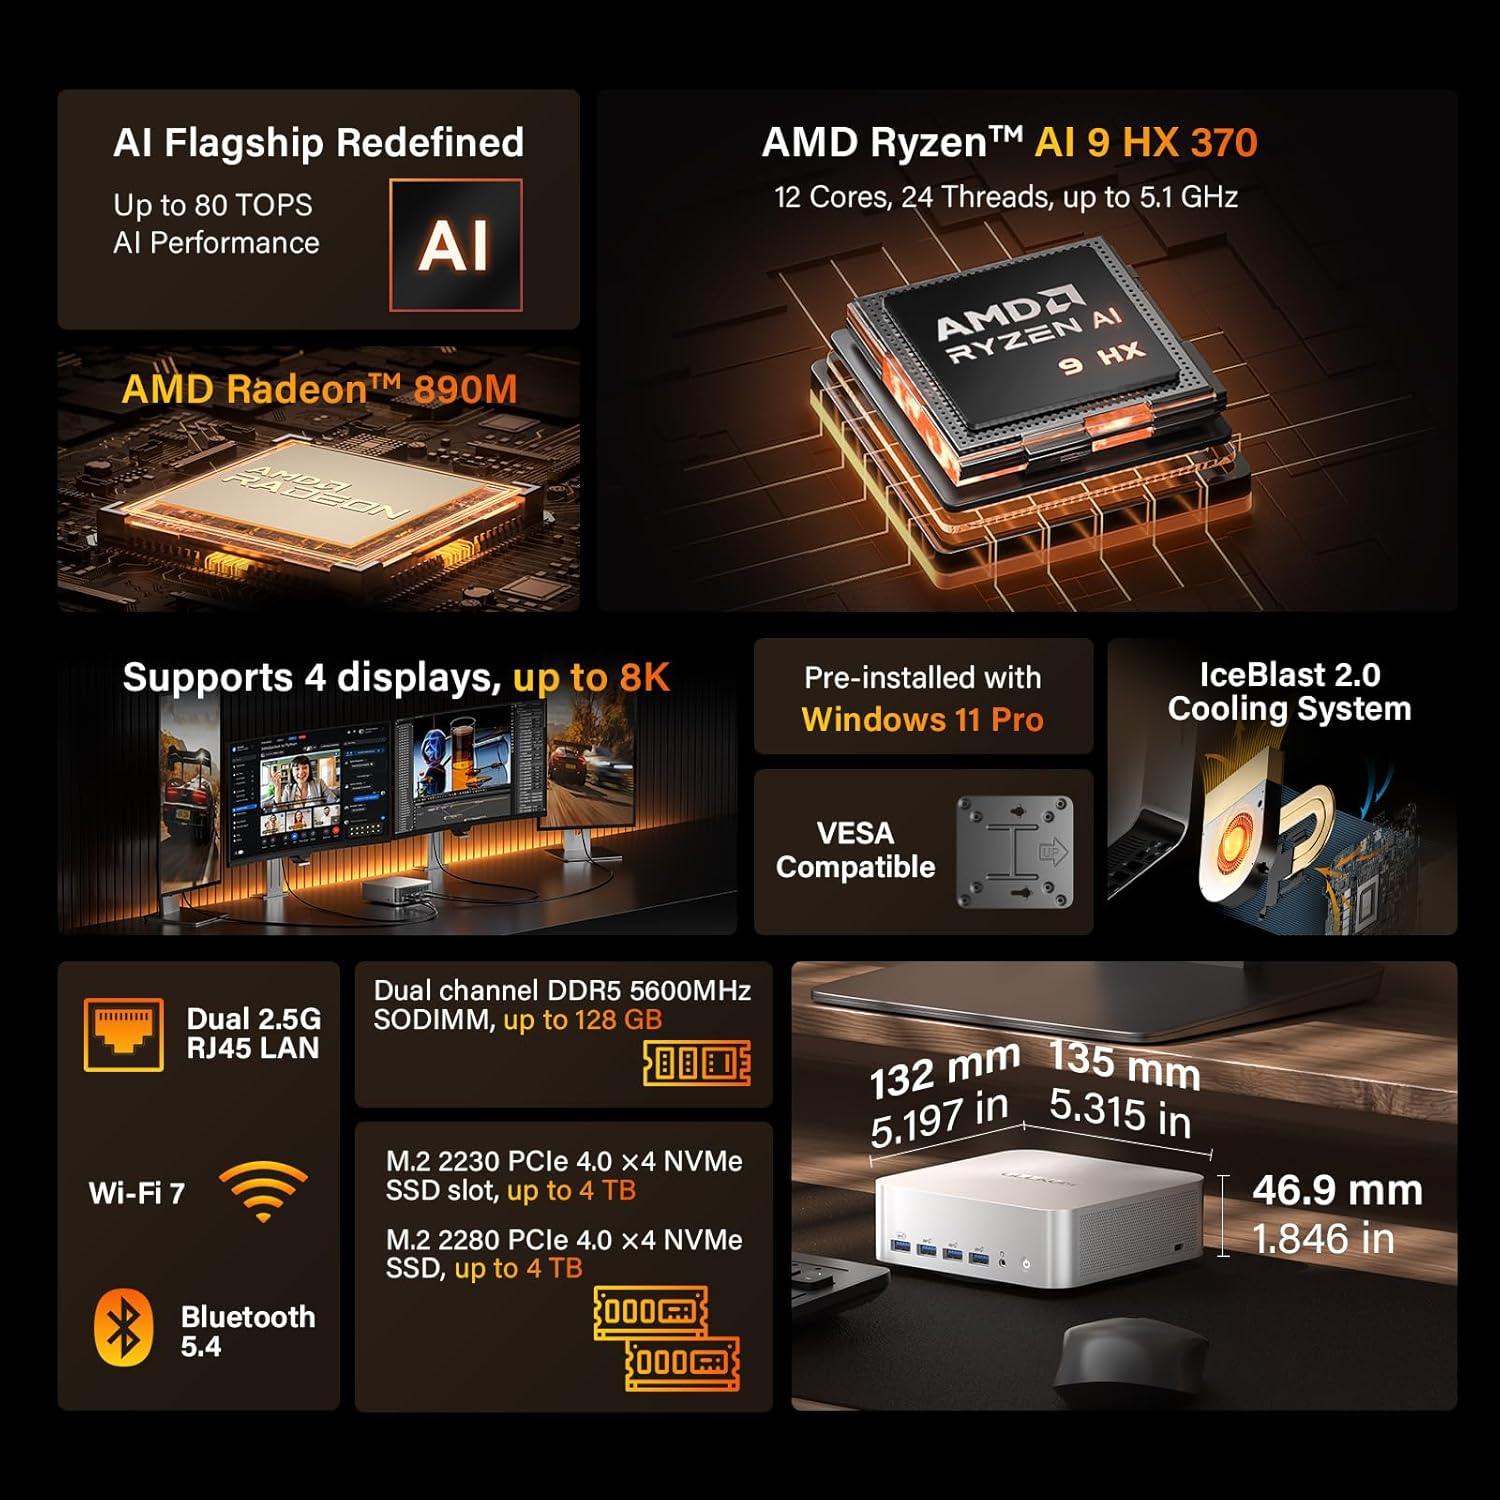
Figure 1: GEEKOM A9 Max Key Features. This image highlights the AMD Ryzen AI 9 HX 370 processor, Radeon 890M graphics, support for up to four 8K displays, pre-installed Windows 11 Pro, IceBlast 2.0 Cooling System, dual 2.5G RJ45 LAN, Wi-Fi 7, Bluetooth 5.4, dual-channel DDR5 SODIMM up to 128GB, and M.2 PCIe 4.0 NVMe SSD slots up to 4TB.
Key Features:
- Unrivaled AI Performance: Equipped with the AMD Ryzen AI 9 HX 370 processor, featuring 80 TOPS of total AI acceleration and a next-gen XDNA 2 AI engine with 50 TOPS of dedicated NPU performance for seamless Copilot+ experiences and local AI model deployment.
- Integrated Gaming Power: Features AMD Radeon 890M integrated graphics with 16 RDNA 3.5 compute units, delivering performance comparable to entry-level discrete GPUs for 1080p gaming and 4K video playback.
- Professional-Grade IceBlast 2.0 Cooling: Advanced thermal system with an oversized copper heatsink, dual heat pipes, and a high-performance fan to prevent overheating and thermal throttling during intense workloads.
- Desktop-Class Memory & Storage: Supports up to 128GB of ultra-fast DDR5-5600 MHz RAM and two PCIe Gen4 NVMe SSD slots (1 x M.2 2280 + 1 x M.2 2230), each expandable up to 4TB.
- Advanced I/O & Expandability: Includes two USB4 ports (40Gbps with PD charging and display support), five USB-A 3.2 Gen2 ports, two HDMI 2.1 outputs, two 2.5GbE Ethernet ports, and an SD 4.0 card reader.
- Compact & Powerful Design: Measuring only 135mm x 132mm x 45.6mm, it houses a flagship 54W TDP processor with up to 12 high-performance cores. Features a premium all-metal construction and VESA mount compatibility.
- Secure, Stable, and Durable: Pre-installed with Windows 11 24H2, with full compatibility for Ubuntu, Manjaro, and Android x86. Includes TPM 2.0 encryption, Kensington Lock support, and rigorous component testing for long-term reliability.
2. Product Components and Ports
Familiarize yourself with the physical layout and available ports on your GEEKOM A9 Max Mini PC. Understanding the port configuration is essential for proper setup and connectivity.

Figure 2: GEEKOM A9 Max Port Layout. This diagram illustrates the location and type of all available ports on the mini PC, including USB, HDMI, LAN, and power inputs.
Front Panel:
- Power Button: Used to turn the device on or off.
- 3.5mm Headphone Jack: For audio output to headphones or external speakers.
- USB 3.2 Gen 2 Type-A Ports (x4): High-speed USB ports for connecting peripherals like keyboards, mice, and external drives.
- SD Card 4.0 Reader: For reading and writing to SD memory cards.
Rear Panel:
- DC In: Power input port for the included power adapter.
- HDMI 2.1 Ports (x2): For connecting displays, supporting up to 4K@120Hz or 8K resolution.
- USB 4.0 Type-C Ports (x2): Versatile ports supporting 40Gbps data transfer, Power Delivery (PD-in on one port), and DisplayPort Alt Mode for external displays or eGPUs.
- 2.5G RJ45 LAN Ports (x2): High-speed Ethernet ports for wired network connectivity.
- USB 2.0 Type-A Port (x1): Standard USB port for general peripherals.
- USB 3.2 Gen 2 Type-A Port (x1): High-speed USB port.
- Kensington Lock Slot: For securing the device with a compatible lock.
3. Setup Guide
Follow these steps to set up your GEEKOM A9 Max Mini PC for the first time.
3.1 Unboxing and Initial Inspection
- Carefully remove the GEEKOM A9 Max Mini PC and all accessories from the packaging.
- Check for any visible damage to the device or its components. If any damage is found, contact customer support immediately.
- Ensure all listed accessories are present: Mini PC unit, power adapter, HDMI cable, VESA mount kit (if included).
3.2 Connecting Peripherals
- Connect Display: Connect your monitor(s) to the HDMI 2.1 ports or USB4 Type-C ports using appropriate cables. The GEEKOM A9 Max supports up to four displays simultaneously.
- Connect Keyboard and Mouse: Plug your USB keyboard and mouse into any of the available USB Type-A ports on the front or rear panel.
- Connect Network (Optional): For wired internet access, connect an Ethernet cable from your router or modem to one of the 2.5G RJ45 LAN ports. For wireless, Wi-Fi 7 is supported and can be configured after initial setup.
- Connect Audio (Optional): If using wired headphones or external speakers, connect them to the 3.5mm headphone jack on the front panel.
3.3 Powering On
- Connect the power adapter to the DC In port on the rear of the Mini PC.
- Plug the power adapter into a wall outlet.
- Press the Power Button on the front panel. The power indicator light will illuminate, and the system will begin to boot.
3.4 Initial Windows 11 Setup
Upon the first boot, you will be guided through the Windows 11 setup process. Follow the on-screen instructions to:
- Select your region and keyboard layout.
- Connect to a Wi-Fi network (if not using wired Ethernet).
- Accept the license agreement.
- Create or sign in with a Microsoft account.
- Set up a PIN or password.
- Configure privacy settings.
Once the setup is complete, your GEEKOM A9 Max Mini PC will be ready for use.
4. Operating Instructions
This section provides guidance on operating your GEEKOM A9 Max Mini PC for various tasks.
4.1 Basic Operation
- Power On/Off: Press the power button to turn on. To shut down, use the Windows Start menu > Power > Shut down. A short press of the power button can put the system to sleep.
- Restart: Use the Windows Start menu > Power > Restart.
- Sleep Mode: The system can enter sleep mode automatically after a period of inactivity or by selecting 'Sleep' from the Windows Start menu. Press any key or move the mouse to wake it up.
4.2 Network Connectivity
- Wi-Fi 7: To connect to a wireless network, click the Wi-Fi icon in the Windows taskbar, select your desired network, enter the password, and click Connect.
- 2.5G LAN: If an Ethernet cable is connected to one of the 2.5G RJ45 LAN ports, the system will automatically detect and connect to the wired network.
- Bluetooth 5.4: To pair Bluetooth devices, go to Windows Settings > Bluetooth & devices, turn on Bluetooth, and click 'Add device'.
4.3 Multi-Display Setup
The GEEKOM A9 Max supports up to four displays simultaneously, offering extensive screen real estate for productivity and entertainment.

Figure 3: 8K Multi-Display Support. This image demonstrates the capability of the GEEKOM A9 Max to connect to multiple high-resolution displays via USB4 Type-C and HDMI 2.1 ports, suitable for design, gaming, movie watching, and office work.
- Connect your displays to the available HDMI 2.1 ports and USB4 Type-C ports.
- In Windows, right-click on the desktop and select 'Display settings'.
- Here you can detect, arrange, and configure the resolution and orientation for each connected display. You can choose to extend, duplicate, or show only on one display.
4.4 Performance Optimization
The GEEKOM A9 Max is designed for high performance, especially in AI and gaming tasks.

Figure 4: Ryzen AI 9 HX 370 Performance. This image details the specifications of the AMD Ryzen AI 9 HX 370 processor, including core/thread count, clock speed, cache size, manufacturing process, and TDP, along with performance comparisons in Cinebench R23.

Figure 5: AI Computing Capabilities. This image emphasizes the GEEKOM A9 Max's AI performance, highlighting its 80 TOPS total AI performance and 50 TOPS dedicated NPU for advanced AI processing.

Figure 6: IceBlast 2.0 Cooling System. This diagram illustrates the internal cooling components, including the large copper heatsink, dual heat pipes, and high-performance fan, designed to maintain optimal temperatures and prevent thermal throttling.
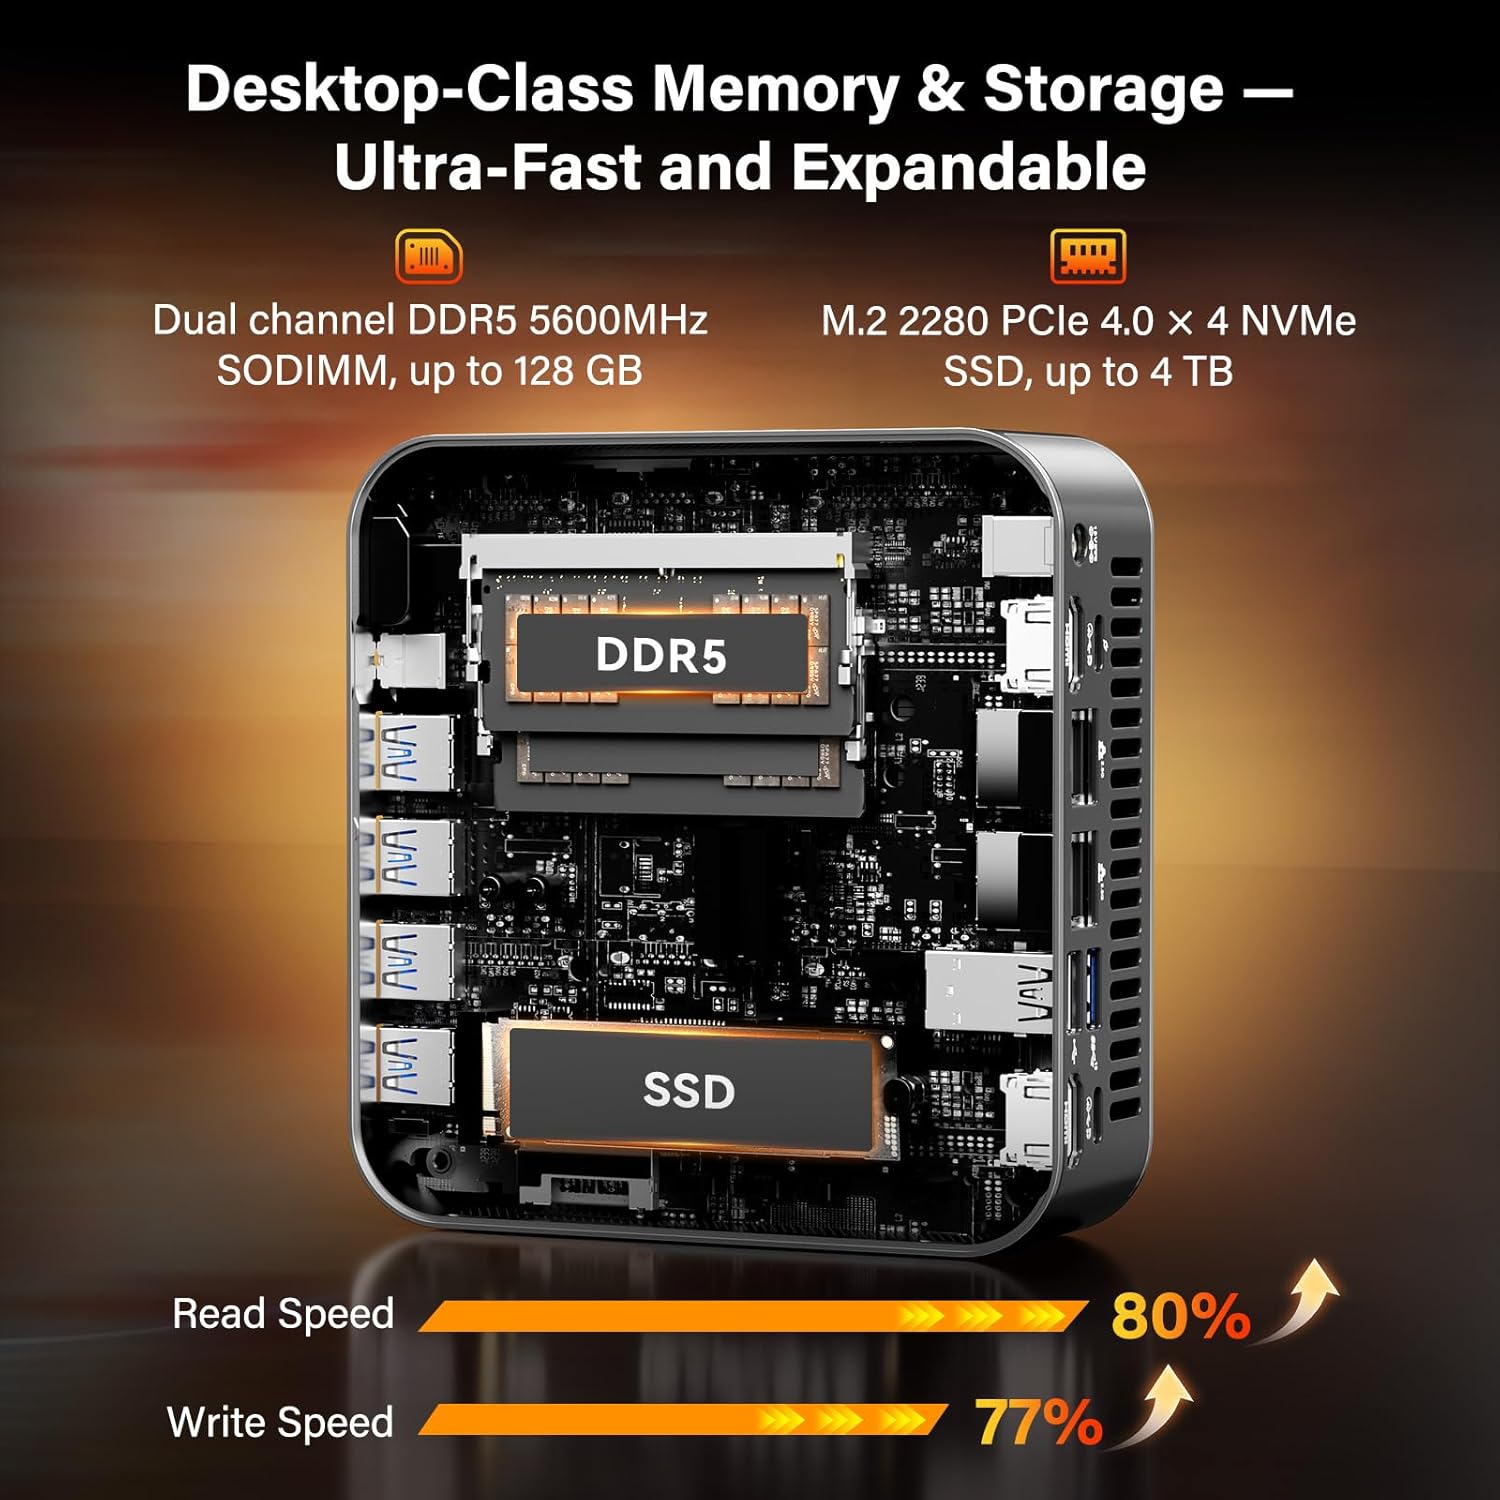
Figure 7: Memory and Storage Configuration. This image provides a visual representation of the internal memory (DDR5 SODIMM) and storage (NVMe SSD) slots, highlighting their expandability and high-speed capabilities.
- Ensure your system drivers are up to date for optimal performance. Windows Update will typically handle this, but you can also check the GEEKOM support website.
- For demanding applications or games, ensure the system has adequate ventilation. The IceBlast 2.0 cooling system is highly efficient, but proper airflow is still important.
- Close unnecessary background applications to free up system resources for critical tasks.
5. Maintenance
Regular maintenance helps ensure the longevity and optimal performance of your GEEKOM A9 Max Mini PC.
5.1 Cleaning
- Exterior: Use a soft, lint-free cloth slightly dampened with water or a mild cleaning solution to wipe down the exterior. Avoid harsh chemicals.
- Ventilation Ports: Periodically use compressed air to clear dust from the ventilation openings to maintain efficient cooling. Do this in a well-ventilated area.
- Ports: Gently clean dust from USB, HDMI, and other ports using compressed air or a soft brush.
5.2 Software Updates
- Windows Updates: Regularly check for and install Windows updates via Settings > Windows Update. These updates include security patches, bug fixes, and performance improvements.
- Driver Updates: While Windows Update handles many drivers, occasionally check the GEEKOM official website for the latest drivers for your specific model, especially for graphics and chipset.
5.3 Storage Expansion
The GEEKOM A9 Max offers expandable storage options.
- The Mini PC features two PCIe Gen4 NVMe SSD slots: one M.2 2280 and one M.2 2230. Each can be expanded up to 4TB.
- To install or upgrade an SSD, refer to the detailed instructions provided on the GEEKOM support website or consult a qualified technician. Ensure the device is powered off and unplugged before opening the chassis.
6. Troubleshooting
This section addresses common issues you might encounter with your GEEKOM A9 Max Mini PC and provides potential solutions.
6.1 No Power
- Check Power Connection: Ensure the power adapter is securely connected to both the Mini PC's DC In port and a working wall outlet.
- Test Outlet: Try plugging another device into the wall outlet to confirm it has power.
- Power Adapter: Verify the power adapter is not damaged. If possible, test with a known good, compatible power adapter.
- Power Button: Ensure the power button is fully pressed.
6.2 No Display Output
- Check Cable Connections: Ensure HDMI or USB-C display cables are securely connected to both the Mini PC and the monitor.
- Monitor Input: Verify that your monitor is set to the correct input source (e.g., HDMI 1, HDMI 2, USB-C).
- Test Monitor/Cable: Try connecting the Mini PC to a different monitor or using a different display cable to rule out faulty peripherals.
- Restart: Perform a hard restart by holding the power button for 10 seconds, then power on again.
6.3 Slow Performance
- Close Background Apps: Too many applications running simultaneously can consume resources. Close unnecessary programs.
- Check Disk Usage: High disk usage can slow down the system. Check Task Manager (Ctrl+Shift+Esc) for processes consuming high disk resources.
- Dust Accumulation: Excessive dust in the cooling system can lead to overheating and throttling. Refer to the Maintenance section for cleaning instructions.
- Windows Updates: Ensure Windows and drivers are up to date.
- Malware Scan: Run a full system scan with reputable antivirus software.
6.4 Network Connectivity Issues
- Wired (LAN): Ensure the Ethernet cable is properly connected and the router/modem is working. Check network adapter status in Windows Device Manager.
- Wireless (Wi-Fi): Verify Wi-Fi is enabled. Restart your router/modem. Ensure you are within range of the Wi-Fi signal. Re-enter the Wi-Fi password.
- Driver Issues: Check network adapter drivers in Device Manager. Reinstall or update if necessary.
If these troubleshooting steps do not resolve your issue, please contact GEEKOM customer support for further assistance.
7. Specifications
Detailed technical specifications for the GEEKOM A9 Max AI Mini PC.
| Feature | Specification |
|---|---|
| Brand | GEEKOM |
| Model Number | GEEKOM A9 Max |
| Operating System | Windows 11 Pro |
| Processor Brand | AMD |
| Processor Type | Ryzen AI 9 HX 370 |
| Processor Speed | 5.1 GHz (Max Boost) |
| Number of Cores | 12 |
| Max Memory Supported | 128 GB DDR5-5600 MHz |
| Hard Drive Size | 2 TB NVMe SSD (expandable up to 4TB per slot) |
| Hard Drive Interface | PCIe x4 (M.2 2280, M.2 2230) |
| Graphics Chipset Brand | AMD |
| Graphics Card Description | Integrated |
| GPU | AMD Radeon 890M |
| Graphics RAM Type | DDR5 SDRAM (Shared) |
| Max Display Resolution | 7680 x 4320 (8K) |
| Connectivity Type | Wi-Fi 7, Bluetooth 5.4 |
| Hardware Interface | USB4 (x2), HDMI 2.1 (x2), 2.5G LAN (x2), USB 3.2 Gen 2 (x5), USB 2.0 (x1), SD Card 4.0 |
| Product Dimensions (L x W x H) | 13.5 x 13.2 x 4.6 cm; 1.63 kg |
8. Warranty and Support
GEEKOM is committed to providing high-quality products and excellent customer service.
8.1 Limited Warranty
GEEKOM offers a 3-year limited warranty on each Mini PC from the date of purchase. This warranty covers defects in design and manufacturing. Please retain your proof of purchase for warranty claims.
8.2 Customer Support
If you encounter any issues or have questions regarding your GEEKOM A9 Max Mini PC that are not covered in this manual, please contact GEEKOM's professional after-sales team. You can typically find contact information (email, support portal, or phone number) on the official GEEKOM website.
For the most up-to-date support resources, FAQs, and driver downloads, please visit the official GEEKOM support page.
Ask a question about this manual
Ask about setup, troubleshooting, compatibility, parts, safety, or missing instructions. Manuals+ will review the question and use this page’s manual context to help answer it.