
BOSGAME P2
BOSGAME P2 Pro Mini PC User Manual
Model: P2
Brand: BOSGAME
Introduction
This user manual provides comprehensive instructions for setting up, operating, and maintaining your BOSGAME P2 Pro Mini PC. Designed for high performance in a compact form factor, this mini PC is equipped with a 12th Gen Intel Core i9-12900H processor, 32GB DDR4 RAM, and a 1TB PCIe SSD, making it suitable for various applications from office work to entertainment.

Figure 1: The BOSGAME P2 Pro Mini PC, showcasing its compact design and various ports.
What's in the Box
Upon unboxing your BOSGAME P2 Pro Mini PC, please verify that all the following items are included:
- BOSGAME P2 Pro Mini PC Unit
- Power Cable
- HDMI Cable
- VESA Mount with Screws
- User Manual (this document)
- Power Adapter

Figure 2: Included accessories with the BOSGAME P2 Pro Mini PC.
Product Overview
Compact Design and Dimensions
The P2 Pro Mini PC is designed for minimal desk footprint, measuring approximately 5.12 x 5.08 x 1.81 inches (130 x 129 x 46 mm). Its compact size allows for versatile placement options, including VESA mounting behind a monitor.

Figure 3: Dimensions of the BOSGAME P2 Pro Mini PC, highlighting its compact form factor.
Processor and Performance
The mini PC is powered by the 12th Gen Intel Core i9-12900H processor, featuring 14 cores and 20 threads with a maximum boost clock of 5.0GHz. This processor provides robust performance for demanding applications and multitasking.

Figure 4: Overview of the Intel Core i9-12900H processor specifications.
Memory and Storage
It comes equipped with 32GB of dual-channel DDR4 4800MHz SODIMM memory and a 1TB M.2 2280 NVMe PCIe 4.0 SSD, ensuring fast boot times, quick application loading, and ample storage for your files.

Figure 5: Visual representation of the high-speed DDR5 memory and NVMe SSD components.
Efficient Heat Dissipation
The P2 Pro features an efficient and stable heat dissipation system, designed to maintain optimal operating temperatures and ensure quiet performance even under load.

Figure 6: Internal cooling system for effective heat management.
Connectivity and Ports
The mini PC offers a rich set of interfaces for various connectivity needs:
- Front Ports: 2x USB 3.2 Gen2 (10Gbps), 1x Thunderbolt 4, 1x Audio Jack, Power Button.
- Back Ports: DC Power Input, 2x 2.5G RJ45 LAN, 1x HDMI 2.0 (4K@60Hz), 1x DisplayPort (4K@60Hz), 2x USB 3.2 Gen2 (10Gbps).
It also supports Wi-Fi 6E and Bluetooth 5.2 for robust wireless connectivity.

Figure 7: Detailed view of the front and back ports on the mini PC.
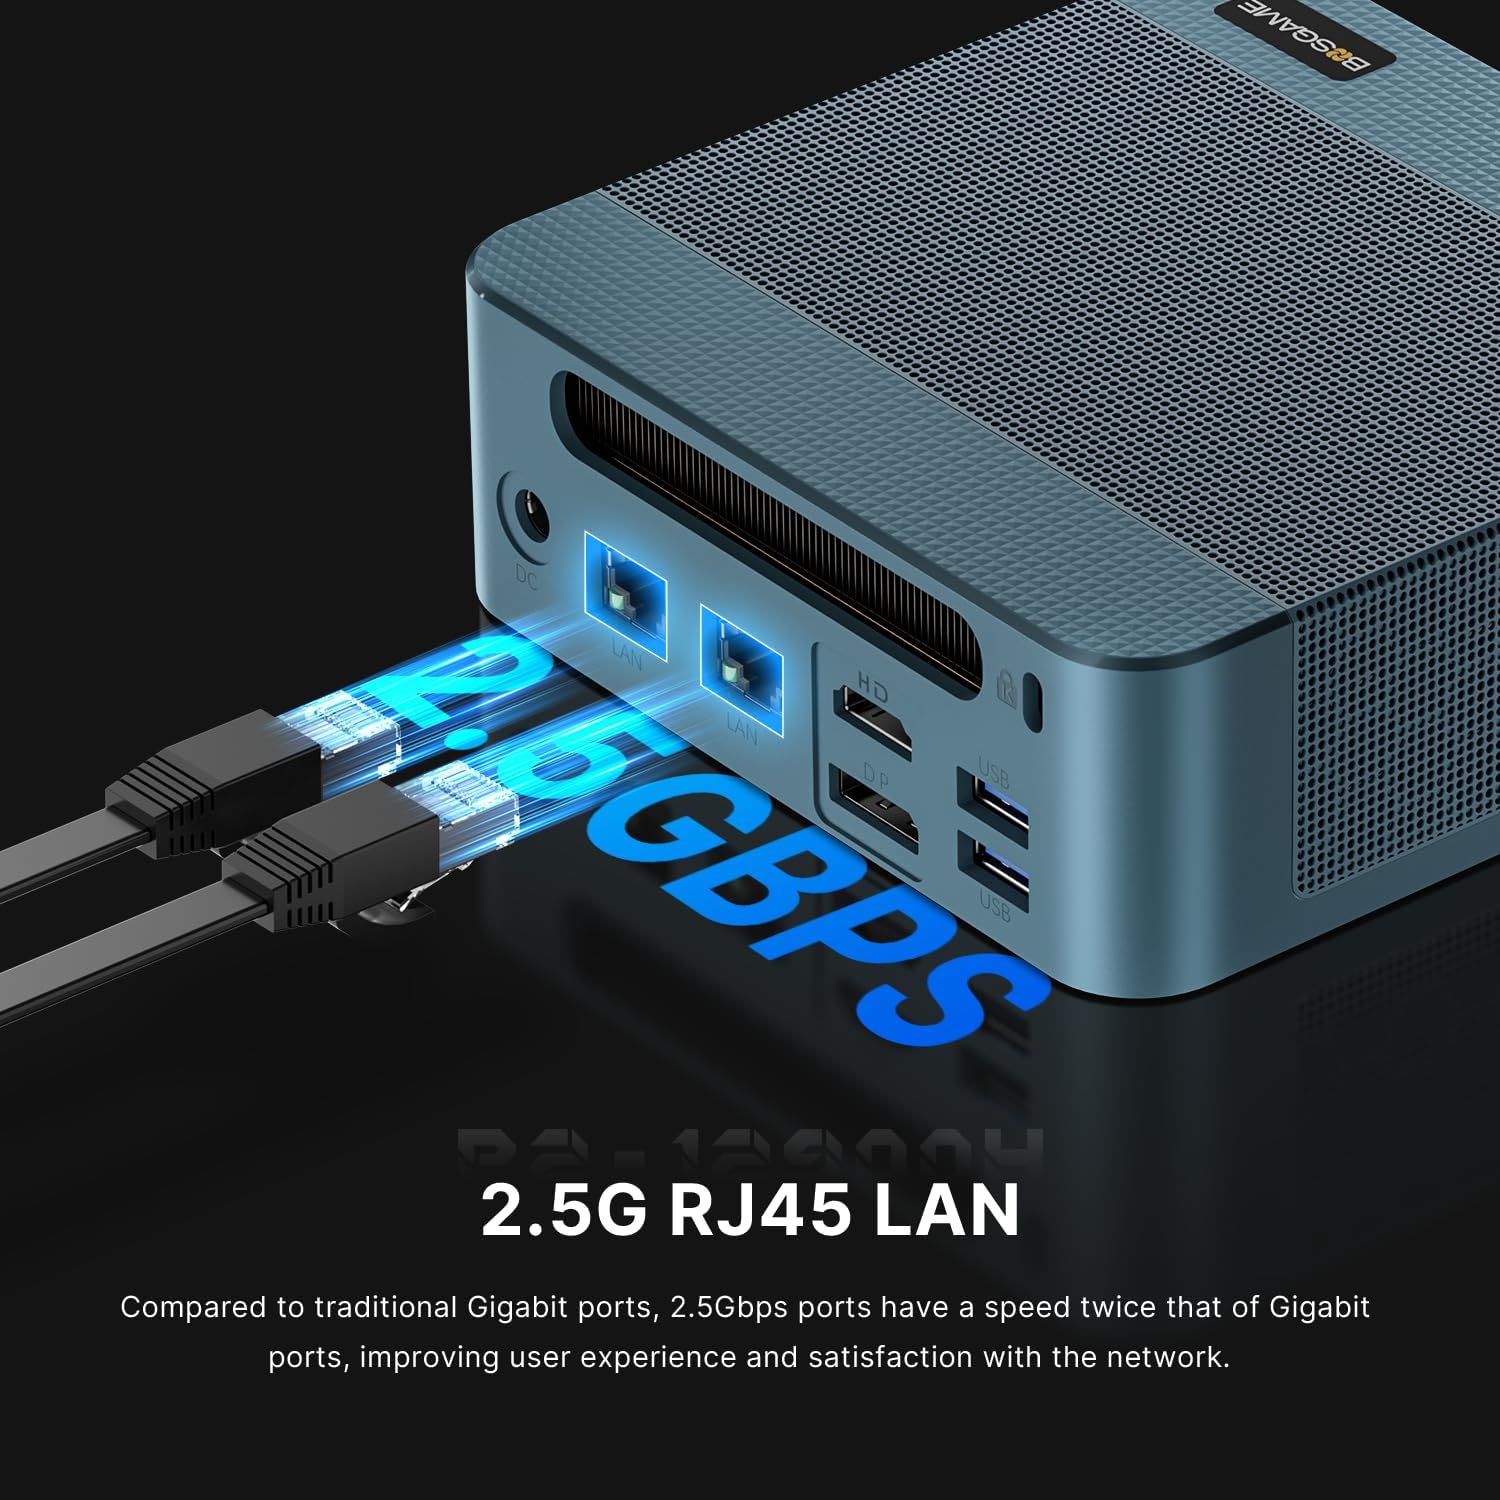
Figure 8: The 2.5G RJ45 LAN ports provide high-speed wired network access.

Figure 9: The Thunderbolt 4 connector supports PD 3.0 power supply, 8K@60Hz video output, and 40Gbps data transmission.
Setup Guide
1. Connecting Peripherals
- Connect Display: Use the provided HDMI cable or a DisplayPort cable to connect your monitor(s) to the corresponding ports on the back of the mini PC. The device supports triple display output via HDMI, DisplayPort, and Thunderbolt 4.
- Connect Keyboard and Mouse: Plug your USB keyboard and mouse into any of the available USB ports (USB 3.2 Gen2) on the front or back of the mini PC.
- Connect Network (Optional): For wired internet access, connect an Ethernet cable from your router or modem to one of the 2.5G RJ45 LAN ports on the back. For wireless connectivity, ensure your Wi-Fi network is available during OS setup.
- Connect Power: Connect the power adapter to the DC power input port on the back of the mini PC, then plug the power cable into a wall outlet.
2. Initial Power On and Operating System Setup
- Press the power button located on the front of the mini PC. The power indicator light will illuminate.
- Your monitor should display the boot screen. Follow the on-screen instructions to complete the operating system setup (e.g., Windows 11, Ubuntu, Linux).
- Ensure all necessary drivers are installed. The system typically comes with pre-installed drivers.
3. VESA Mount Installation (Optional)
The BOSGAME P2 Pro Mini PC includes a VESA mount for convenient attachment to the back of a compatible monitor or wall.
- Attach the VESA bracket to the mini PC using the provided screws.
- Securely fix the bracket to the VESA mounting holes on the back of your display or a wall mount using the remaining screws.

Figure 10: Steps for VESA mount installation.
Operating Instructions
Triple Screen Display Support
The P2 Pro Mini PC supports connecting up to three displays simultaneously, enhancing productivity and entertainment experiences. Utilize the HDMI, DisplayPort, and Thunderbolt 4 outputs for this configuration.

Figure 11: The BOSGAME logo.
Video 1: An overview of the BOSGAME P2 Mini PC, demonstrating its features and capabilities, including triple screen display support and compact design.
For optimal display settings, configure your operating system's display preferences to extend or duplicate screens as needed.
Power Delivery via USB-C
The Thunderbolt 4 port supports PD 3.0 power supply, allowing the mini PC to be powered by compatible USB-C power sources, offering flexibility for portable setups.
Maintenance
Cleaning
To ensure longevity and optimal performance, regularly clean the exterior of the mini PC with a soft, dry cloth. Avoid using liquid cleaners directly on the device. Periodically, use compressed air to clear dust from the ventilation grilles to maintain efficient heat dissipation.
Software Updates
Keep your operating system and drivers updated to the latest versions. This ensures system stability, security, and optimal performance. Refer to your operating system's documentation for instructions on checking and installing updates.
Hardware Upgrades
The mini PC supports upgrades for RAM and M.2 NVMe SSD. If you plan to upgrade, ensure you use compatible SODIMM DDR4 memory modules and M.2 2280 NVMe PCIe SSDs. Consult a qualified technician if you are unsure about the upgrade process.
Troubleshooting
| Problem | Possible Cause | Solution |
|---|---|---|
| No power / System does not turn on | Power cable loose; Power adapter faulty; Power outlet issue | Check power cable connections. Try a different power outlet. Ensure the power adapter is functioning correctly. |
| No display on monitor | Display cable loose; Incorrect input source on monitor; Monitor faulty | Ensure display cables (HDMI/DP/Thunderbolt) are securely connected. Select the correct input source on your monitor. Test with a different monitor or cable if possible. |
| No internet connection (wired) | Ethernet cable loose; Router/modem issue; Network driver issue | Check Ethernet cable connection. Restart your router/modem. Verify network drivers are installed and updated in your OS. |
| No internet connection (wireless) | Wi-Fi disabled; Incorrect Wi-Fi password; Router/modem issue; Wi-Fi driver issue | Ensure Wi-Fi is enabled in your OS. Re-enter Wi-Fi password. Restart your router/modem. Verify Wi-Fi drivers are installed and updated. |
| System runs slow or freezes | Too many applications running; Insufficient RAM; Overheating; Malware | Close unnecessary applications. Check system resource usage. Ensure proper ventilation and clean dust. Run a malware scan. |
Specifications
| Feature | Detail |
|---|---|
| Model | P2 |
| Processor | 12th Intel Core i9-12900H (14C/20T, up to 5.0GHz) |
| Graphics Coprocessor | Integrated Intel Iris Xe Graphics |
| RAM | 32GB DDR4 (SODIMM) |
| Hard Drive | 1TB PCIe SSD (M.2 2280 NVMe PCIe 4.0) |
| Operating System | Support Win/Ubuntu/Linux |
| Wireless Type | 802.11ax (Wi-Fi 6E), Bluetooth 5.2 |
| LAN Ports | 2x 2.5G RJ45 LAN |
| USB Ports | 4x USB 3.2 Gen2 (10Gbps) |
| Video Output | 1x HDMI 2.0 (4K@60Hz), 1x DisplayPort (4K@60Hz), 1x Thunderbolt 4 (8K@60Hz) |
| Audio | 3.5mm Combo Jack |
| Dimensions (L x W x H) | 5.12 x 5.08 x 1.81 inches (130 x 129 x 46 mm) |
| Item Weight | 3.65 pounds |
| Power Adapter | 19V-6.3A Certification |
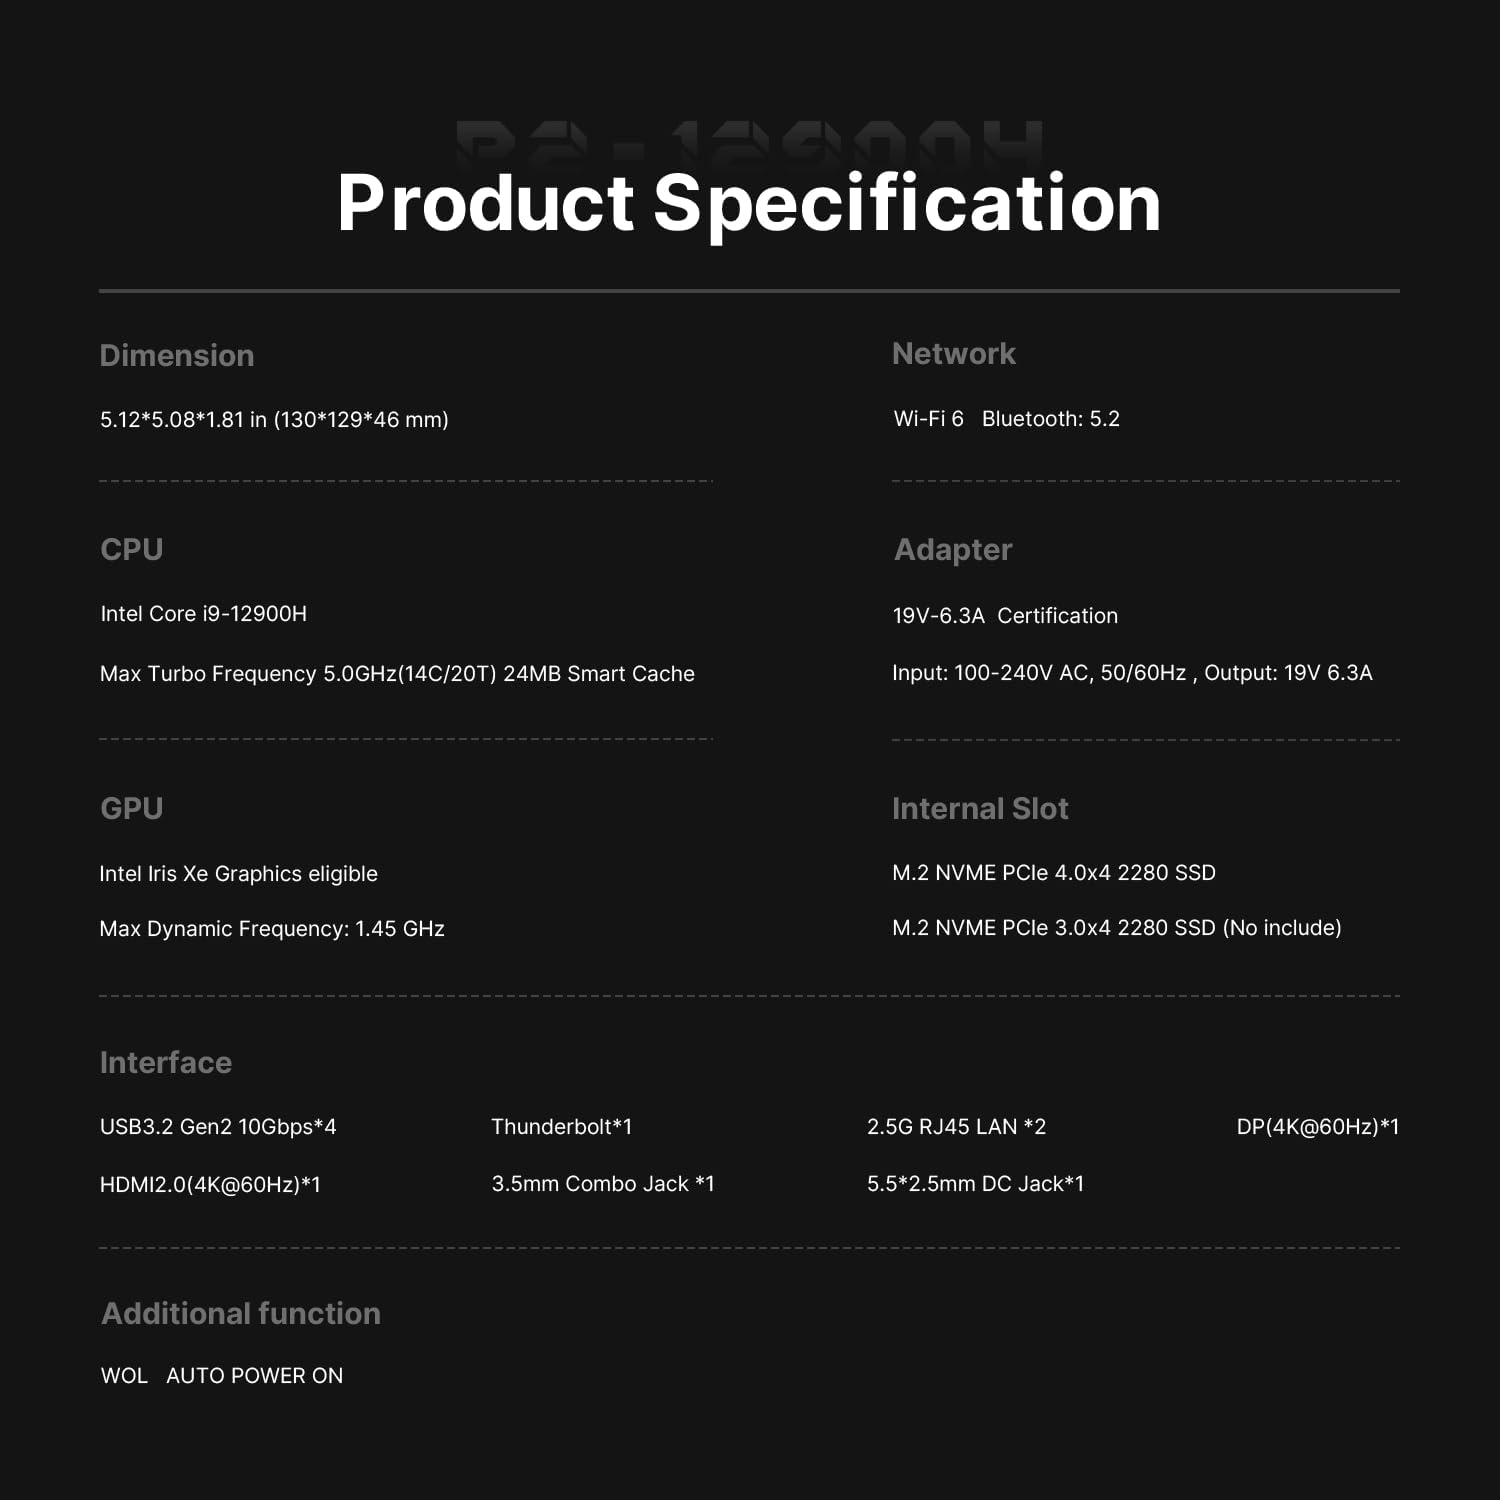
Figure 12: Summary of the BOSGAME P2 Pro Mini PC's technical specifications.
Warranty and Support
BOSGAME is committed to providing excellent customer service and technical support for your Mini PC.
- Warranty: The product typically comes with a 12-month satisfying service warranty.
- Technical Support: Lifetime technical support is provided.
Contacting Support
For any technical issues or inquiries, you can reach out to BOSGAME support through the following methods:
- Online: Log in to your Amazon account, navigate to "Your Orders," and select "Ask Product Question" for the BOSGAME P2 Pro Mini PC.
- Email: You can also contact support directly via email at support@bosgamepc.com.


Figure 13: BOSGAME support and service commitments.
Ask a question about this manual
Ask about setup, troubleshooting, compatibility, parts, safety, or missing instructions. Manuals+ will review the question and use this page’s manual context to help answer it.