1. Safety Information
WARNING: This product requires a 220V electrical connection. It does not include a plug and requires self-wiring. Improper installation can lead to serious injury or death. Always consult a professional electrician for proper installation of electrical circuits and components.
- Read all instructions carefully before assembly and operation.
- Ensure the work area is clean, well-lit, and free from obstructions.
- Keep children and unauthorized personnel away from the equipment during operation.
- Wear appropriate personal protective equipment (PPE), including safety glasses and gloves, during assembly and maintenance.
- Do not operate the dryer near flammable materials.
- Always disconnect power before performing any maintenance or adjustments.
- Do not touch heating elements with bare hands, as this can shorten their lifespan.
2. Product Overview
The VEVOR Pro Flash Dryer is a high-performance infrared drying unit designed for screen printing applications. It features a powerful heating system, a large drying area, and smart controls for efficient and consistent results.
Key Features:
- 6000W High Power: Equipped with a 6000W heating element and infrared glass tubes for rapid heating, reaching operational temperature in approximately 20 seconds.
- Large Drying Area: A generous 19"x21" (485mm x 540mm) heating area accommodates large prints and oversized garments.
- Infrared Sensing: An integrated infrared sensor automatically activates the dryer when clothing is detected, streamlining the drying process.
- Precise Temperature Control: Features a built-in time controller for accurate management of drying temperature and duration.
- Adjustable Height: The unit's height can be adjusted from approximately 32" (820mm) to 45" (1160mm) to suit various working positions (sitting or standing).
- Dual Fan Cooling: Incorporates dual fans to prevent overheating during continuous operation, ensuring longevity and consistent performance.
- Sturdy Construction: Built with a durable steel structure and surface coating resistant to rust.
- Mobile Design: Features wheels for easy repositioning, with two lockable wheels for stability during use.

Figure 1: VEVOR Pro Flash Dryer with included assembly tools.
3. Assembly Instructions
Assembly typically takes 20-30 minutes. Follow these steps carefully:
3.1. Unpacking and Preparation
- Carefully remove all components from the packaging.
- Verify all parts are present against the packing list (refer to Figure 7 for included tools).
- Prepare a clean, flat, and stable work surface.
3.2. Base Assembly
- Attach the casters to the bottom base of the stand. Use a 12mm wrench (or the provided wrench) to tighten them securely.
- Install the bottom tube support to the base using the provided hex nuts and bolts. Hand-tighten first, then use the provided hex key to fully secure.

Figure 2: Visual guide for assembly steps, including attaching casters and securing the stand.
3.3. Heating Element Installation
- Carefully remove the heating elements from their protective bubble wrap. IMPORTANT: Do not handle the heating elements with bare hands; use rubber gloves to prevent oils from shortening their lifespan.
- Place the heating elements inside the head unit. The ceramic ends of the elements fit into the metal clips.
- Connect the white wires from the element ends into the ceramic housing. You may need to slightly unscrew the posts to insert the wires, then tighten the screws to secure them. Gently pull to ensure a firm connection.

Figure 3: Close-up view of the 6000W infrared glass heating tubes.
3.4. Attaching the Head Unit
- Lay the head unit (the orange top section) upside down on a stable countertop or elevated surface.
- Wheel the assembled base underneath the head unit. Adjust the height of the base to align with the head unit's connection points.
- Secure the head unit to the base using the provided hand bolts.
- Install the sensor on the side of the head unit by unscrewing the two protruding screws, placing the bracket, and re-securing the screws.
- If the head unit appears to slant slightly downward, tighten the top bolt on the connection point with the included wrench to ensure it is level.
3.5. Electrical Wiring
This unit requires a 220V power supply and does not come with a pre-installed plug. You must wire it yourself. It is strongly recommended to have this step performed by a qualified and licensed electrician to ensure safety and compliance with local electrical codes. The unit is rated at 6000W, which typically requires a dedicated 28-amp circuit (verify with a professional).
4. Operation
4.1. Powering On
- After proper electrical installation, ensure all connections are secure.
- Flip the main power switch on the control panel to the 'ON' position.

Figure 4: Control panel with temperature display and power switches.
4.2. Adjusting Height
- Loosen the adjustment knobs on the vertical support pole.
- Raise or lower the head unit to the desired working height (between 32" and 45").
- Tighten the adjustment knobs firmly to secure the height.
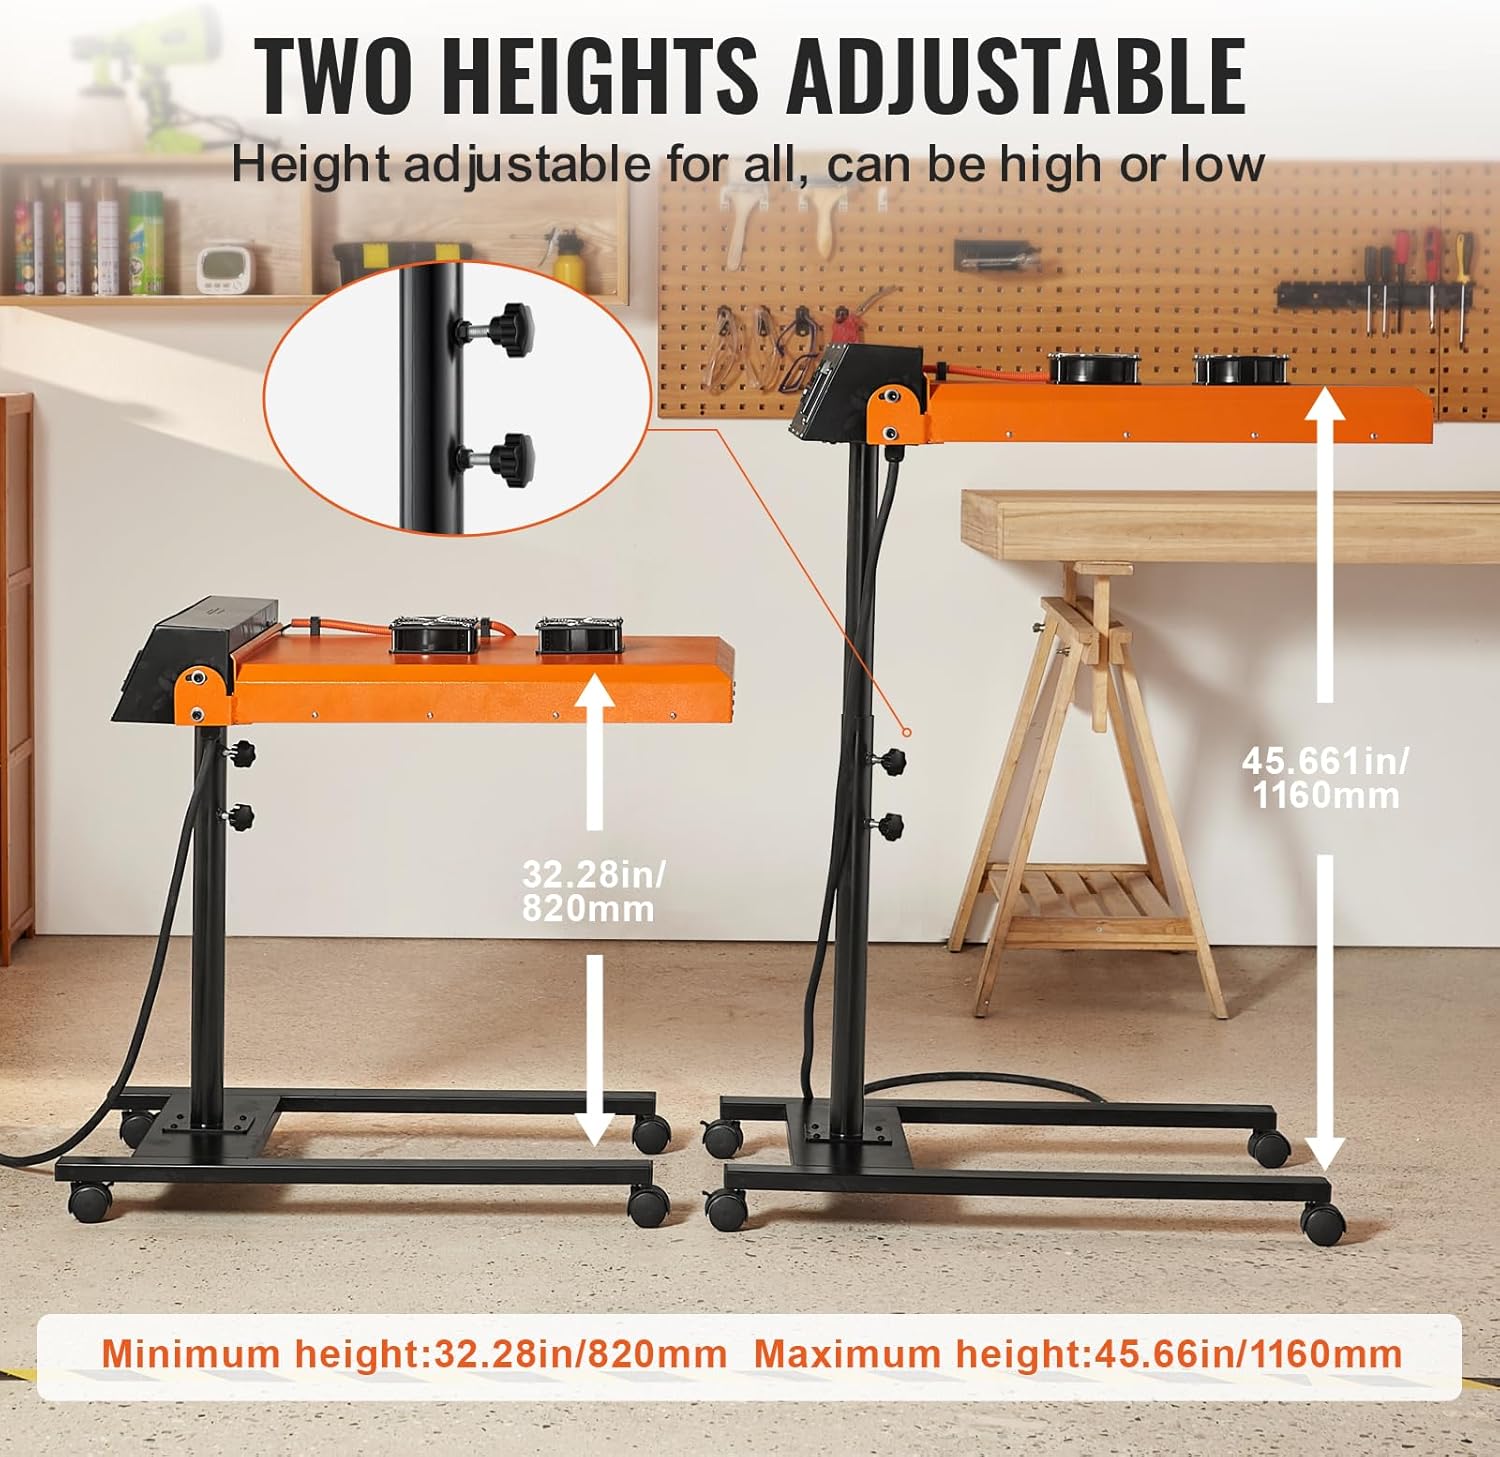
Figure 5: The dryer's adjustable height feature, ranging from 32.28 inches to 45.66 inches.
4.3. Temperature and Time Control
- Use the precise time controller on the control panel to set the desired drying temperature (0-399°C / 0-750°F) and duration.
- The infrared sensor will automatically activate the heating elements when a garment is placed under the dryer, according to the set time.

Figure 6: Illustration of the smart infrared motion sensing feature, showing automatic activation.
4.4. Dual Fan Cooling
- The integrated dual fans operate to maintain optimal temperature and prevent overheating during extended use.

Figure 7: Close-up of the dual fan cooling system for continuous operation.
5. Maintenance
- Cleaning: Regularly wipe down the exterior surfaces with a dry, soft cloth. Ensure the unit is unplugged and cool before cleaning.
- Heating Elements: Inspect heating elements periodically for damage. If replacement is needed, ensure the unit is unplugged and cool. Handle new elements with gloves.
- Fan Vents: Keep the fan vents clear of dust and debris to ensure proper airflow and cooling.
- Electrical Connections: Periodically check all electrical connections for tightness and signs of wear. If any issues are found, consult a qualified electrician.
- Casters: Ensure casters roll freely and are securely attached. Lockable casters should engage properly.
6. Troubleshooting
| Problem | Possible Cause | Solution |
|---|---|---|
| Unit does not power on. | No power supply; loose wiring; tripped circuit breaker. | Check power source and wiring. Reset circuit breaker. Consult an electrician for wiring issues. |
| Heating elements not heating or inconsistent temperature. | Faulty heating element; incorrect temperature setting; thermostat malfunction. | Verify temperature settings. Inspect heating elements for visible damage. If issues persist, contact VEVOR support or a qualified technician. |
| Unit overheats or runs too hot. | Incorrect temperature setting; thermostat malfunction. | Adjust temperature settings. If the issue persists, the thermostat may be faulty and require professional inspection. |
| Unit slants or is unstable. | Loose connection between head unit and stand; casters not locked. | Tighten the top bolt connecting the head unit to the stand. Ensure lockable casters are engaged. |
| Fans not operating. | Power issue; fan malfunction. | Check power to the unit. Inspect fan connections. If fans are faulty, contact VEVOR support. |
7. Specifications
| Feature | Detail |
|---|---|
| Model Number | QYZDGYSHGJV1 |
| Power | 6000W |
| Voltage Requirement | 220V (Self-wiring required) |
| Drying Area | 19 x 21 inches (485 x 540 mm) |
| Adjustable Height Range | Approx. 32.28 - 45.66 inches (820 - 1160 mm) |
| Product Dimensions (Min. size after assembly) | 35.43 x 19.69 x 32.28 inches (900 x 500 x 820 mm) |
| Product Dimensions (Max. size after assembly) | 35.43 x 19.69 x 45.66 inches (900 x 500 x 1160 mm) |
| Item Weight | 56.4 pounds (24 kg including accessories) |
| Manufacturer | VEVOR |
| Batteries Required | No |

Figure 8: Detailed product dimensions and specifications.
8. Warranty & Support
For technical support, warranty information, or to register your product, please visit the official VEVOR support website:
Please have your model number (QYZDGYSHGJV1) and purchase details ready when contacting support.