1. Introduction
This manual provides essential instructions for the safe and effective use of your MUNEFE Earth Auger Post Hole Digger. Please read this manual thoroughly before operation and retain it for future reference. Proper understanding and adherence to these instructions will ensure optimal performance and longevity of the tool.
2. Product Overview
The MUNEFE Earth Auger is a versatile tool designed for various digging tasks, including planting, fence post installation, and soil aeration. It features a single-blade design for efficient soil penetration and removal.
2.1 Key Features
- Versatile Compatibility: Designed to connect to standard 20mm shafts, making it compatible with most rear hole excavators.
- Efficient Design: Single-blade auger for effective and rapid digging.
- Portable: Lightweight construction for easy transport and handling.
- Multi-purpose: Suitable for planting bulbs, shrubs, trees, fence posts, and deep water aeration.
2.2 Components
The MUNEFE Earth Auger consists of a manganese steel shaft with a spiral auger blade and a digging tip. The top features a connection point for power tools.

Figure 1: The MUNEFE Earth Auger Post Hole Digger, showing its full length and spiral blade design.
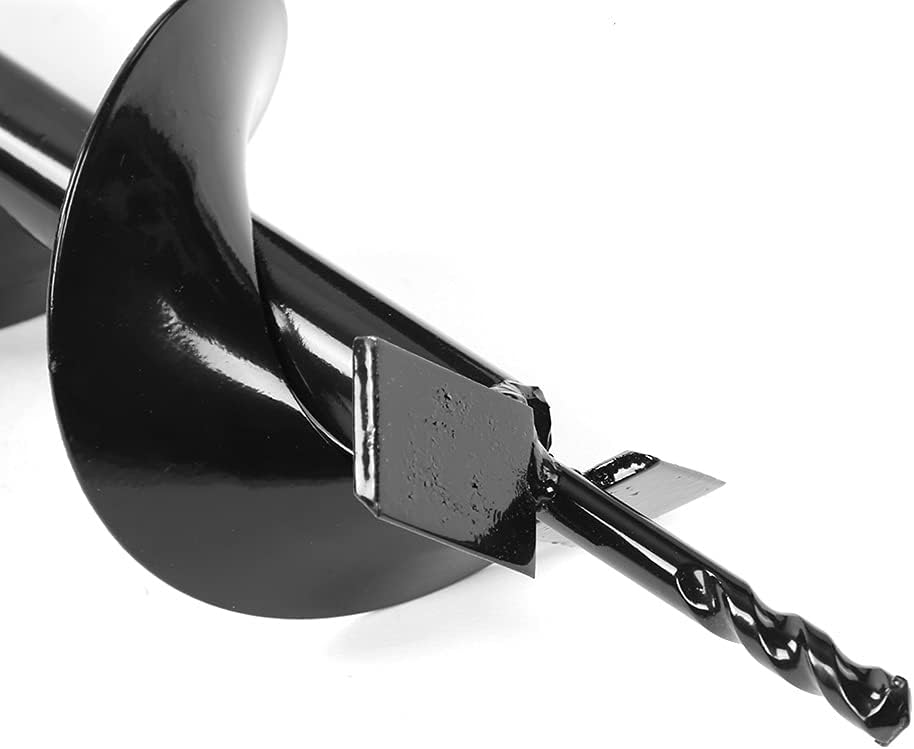
Figure 2: Close-up view of the auger's digging blade and tip, designed for efficient soil penetration.
3. Specifications
| Item Type | Earth Auger |
| Material | Manganese Steel |
| Total Length | Approximately 80 cm (31.5 inches) |
| Digging Length | Approximately 75 cm (29.53 inches) |
| Blade Diameter | Approximately 10 cm (3.94 inches) |
| Weight | 2.05 Kilograms |
| Compatible Shaft Diameter | 20 mm (standard) |
Note: Blade size error is ±2mm, length error is ±2cm.

Figure 3: Diagram illustrating the key dimensions of the MUNEFE Earth Auger.
4. Safety Information
Always prioritize safety when operating any power tool. Failure to follow safety instructions can result in serious injury.
- Personal Protective Equipment (PPE): Always wear safety glasses, gloves, and sturdy footwear. Consider hearing protection if using with a loud power drill.
- Secure Attachment: Ensure the auger is securely attached to your power drill or excavator shaft before operation.
- Clear Work Area: Keep the work area clear of bystanders, pets, and obstacles.
- Identify Underground Utilities: Before digging, always check for underground cables, pipes, or other utilities. Contact local utility companies if unsure.
- Maintain Control: Hold the power tool firmly with both hands. Be prepared for sudden jolts if the auger encounters roots, rocks, or hard soil.
- Proper Posture: Maintain a balanced stance to prevent loss of control.
- Avoid Overheating: Do not continuously operate the auger for extended periods without breaks, especially in hard soil, to prevent overheating of the power tool.
- Storage: Store the auger in a dry, secure place out of reach of children.
5. Setup
The MUNEFE Earth Auger is designed for easy attachment to compatible power tools.
- Select Power Tool: Choose a power drill or rear hole excavator with a standard 20mm shaft connection. Ensure the power tool has sufficient torque for the intended digging task.
- Attach Auger: Insert the shaft of the MUNEFE Earth Auger into the chuck of your power tool.
- Secure Connection: Tighten the chuck securely to ensure the auger is firmly held and will not slip during operation. Verify the connection by gently pulling on the auger.
- Pre-Digging Check: Before starting, ensure the area is free of obstructions and underground utilities.
6. Operating Instructions
Follow these steps for effective and safe operation of your earth auger.
- Positioning: Place the tip of the auger at the desired digging location.
- Start Slowly: Begin drilling at a slow speed to allow the auger to bite into the soil. Gradually increase speed as the auger penetrates.
- Maintain Verticality: Keep the auger as vertical as possible for a straight hole.
- Clear Soil: As the auger digs, it will bring soil to the surface. Periodically lift the auger slightly to clear accumulated soil from the hole and the blades.
- Deep Holes: For deeper holes, repeat the process of drilling and clearing soil until the desired depth is reached.
- Obstructions: If the auger encounters a significant obstruction (e.g., large rock, thick root), stop immediately. Do not force the auger, as this can damage the tool or cause injury. Remove the obstruction manually if possible, or relocate the digging site.
- Finishing: Once the hole is complete, slowly withdraw the auger while it is still rotating to help clear any remaining soil.

Figure 4: The earth auger attached to a power drill, demonstrating its use for digging holes.

Figure 5: The auger effectively digging into the ground, creating a clean hole.

Figure 6: Examples of the auger's versatile applications, including planting, ice fishing, and installing fence posts.
7. Maintenance
Regular maintenance ensures the longevity and performance of your earth auger.
- Cleaning: After each use, clean all soil and debris from the auger blades and shaft. A stiff brush and water can be used. Ensure it is thoroughly dried to prevent rust.
- Inspection: Regularly inspect the auger for signs of wear, damage, or bending. Check the digging tip and blades for excessive dullness or chips.
- Rust Prevention: Apply a light coat of oil or rust-inhibiting spray to the metal parts, especially if storing for extended periods or in humid conditions.
- Storage: Store the auger in a dry, protected area, away from direct sunlight and moisture.
8. Troubleshooting
| Problem | Possible Cause | Solution |
|---|---|---|
| Auger not digging effectively | Dull blades, hard soil, insufficient power from drill, obstruction. | Inspect blades for sharpness. Use a more powerful drill. Clear obstructions. Apply downward pressure. |
| Auger getting stuck | Encountering roots, rocks, or very dense soil. | Stop immediately. Reverse the drill to extract. Clear obstruction manually or choose a new digging spot. |
| Excessive vibration or wobbling | Auger not securely attached, bent shaft, unbalanced rotation. | Ensure chuck is tightened properly. Inspect auger for damage. If bent, replace the auger. |
9. Warranty and Support
For information regarding warranty coverage or technical support, please refer to the retailer where the product was purchased or visit the official MUNEFE website. Keep your purchase receipt as proof of purchase.