
1. Introduction
Welcome to the user manual for your new RICOH GR IIIx HDF Digital Compact Camera. This manual provides essential information for setting up, operating, and maintaining your camera to ensure optimal performance and longevity. The GR IIIx HDF is an expansion model of the existing GR Series, featuring a built-in Highlight Diffusion Filter (HDF) for enhanced creative expression.
The Highlight Diffusion Filter (HDF) diffuses highlights for softer light, enabling the creation of more expressive images with a sense of depth and emotion. This special-effect filter diffuses highlight areas and creates a blurred effect along the image’s edges, allowing for nostalgic images reminiscent of film photography or vintage movies. The camera also offers the option to capture high-resolution, high-contrast images for precision, providing versatile creative control.

This image displays the front of the RICOH GR IIIx HDF camera, highlighting its compact design and the prominent GR lens.
2. Setup
2.1 Unpacking and Initial Inspection
Carefully unpack your camera and ensure all components are present. The package should contain:
- Camera Unit
- Battery
- USB Cable
Inspect the camera for any visible damage. If any items are missing or damaged, please contact your retailer or Ricoh customer support.
2.2 Charging the Battery
- Insert the provided battery into the camera.
- Connect the camera to a power source using the supplied USB cable.
- The charging indicator will illuminate. Allow the battery to fully charge before first use.
2.3 Inserting a Memory Card (Sold Separately)
The camera requires an SD, SDHC, or SDXC memory card for storing images and videos. Open the memory card slot cover, insert the card with the contacts facing the correct direction, and close the cover securely.
3. Operating the Camera
3.1 Powering On/Off
Press the ON/OFF button located on the top of the camera to power it on or off.
3.2 Basic Photography
To take a picture, compose your shot using the LCD screen, then gently press the shutter-release button halfway to focus. Once focused, press the shutter-release button fully to capture the image.

This image focuses on the top of the camera, showcasing the distinctive dark silver shutter-release button and the mode dial, which differentiates this model.
3.3 Using the Highlight Diffusion Filter (HDF)
The RICOH GR IIIx HDF features a built-in Highlight Diffusion Filter. This function can be quickly toggled ON or OFF using the Fn (Function) button. The label "HDF" is printed on the back near the Fn button for easy identification.

A detailed view of the camera's rear controls, specifically showing the Fn (Function) button with 'HDF' printed nearby, indicating its default assignment for the Highlight Diffusion Filter.
When the HDF is active, it diffuses highlights and creates a blurred effect along the image’s edges, resulting in softer, more emotional, and affective expressions. This allows for a creative shift from sharp, high-contrast images to a more nostalgic, cinematic aesthetic.
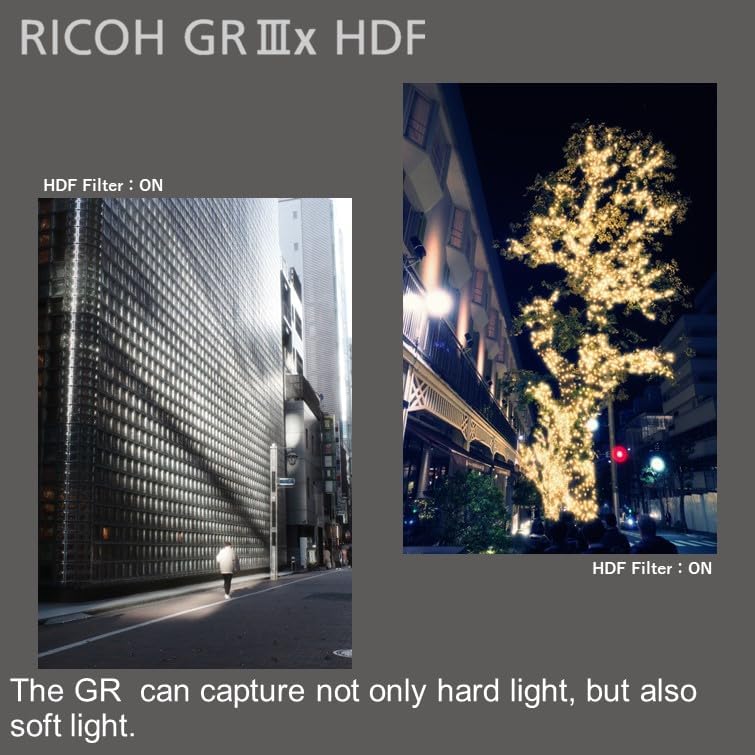
Two comparative images illustrating the effect of the Highlight Diffusion Filter. One image shows the scene with the HDF off, displaying sharp highlights, while the other shows the same scene with the HDF on, exhibiting diffused highlights and a softer, more cinematic appearance.
3.4 Other Controls and Settings
Refer to the camera's on-screen menu for detailed settings adjustments, including ISO, white balance, exposure compensation, and various shooting modes. The mode dial on the top plate allows for quick selection of different shooting programs.
4. Maintenance
4.1 Cleaning the Camera
- Use a soft, lint-free cloth to clean the camera body.
- For the lens, use a lens brush or a blower to remove dust, then gently wipe with a specialized lens cleaning cloth and solution if necessary.
- Avoid using harsh chemicals or abrasive materials.
4.2 Battery Care
- Store the battery in a cool, dry place when not in use.
- Avoid fully discharging the battery frequently to prolong its lifespan.
- If storing for extended periods, charge the battery to approximately 50% capacity.
4.3 Storage
When not in use, store the camera in a protective case or bag to prevent dust and scratches. Avoid exposing the camera to extreme temperatures, high humidity, or direct sunlight for prolonged periods.
5. Troubleshooting
This section addresses common issues you might encounter with your RICOH GR IIIx HDF camera.
5.1 Camera Does Not Power On
- Ensure the battery is fully charged and correctly inserted.
- Try using a different, fully charged battery if available.
- Check the battery contacts for any dirt or corrosion.
5.2 Images Are Blurry
- Check if the lens is clean and free from smudges.
- Ensure the camera is properly focused before taking the shot.
- Verify that the shutter speed is appropriate for the lighting conditions to avoid camera shake. Consider using a tripod in low light.
- If the HDF is active, images will have a softer, diffused look. If you desire sharp images, ensure the HDF is turned OFF.
5.3 Memory Card Error
- Ensure the memory card is inserted correctly.
- Try reformatting the memory card (note: this will erase all data).
- Test with a different, compatible memory card.
For further assistance, please refer to the official Ricoh support resources.
6. Specifications
Below are the key technical specifications for the RICOH GR IIIx HDF Digital Compact Camera:

An overview of the RICOH GR IIIx HDF camera, detailing its core specifications such as 40mm focal length, 24.2MP still image resolution, 3-axis 4-steps image stabilization, approximately 200 images battery life, FHD/60P movie capability, and ISO 102400 maximum sensitivity.
| Model Name | RICOHGRIII |
| Item Model Number | S0001289 |
| Product Dimensions | 4.33 x 1.34 x 2.44 inches |
| Item Weight | 10.6 ounces |
| Photo Sensor Size | APS-C |
| Maximum Webcam Image Resolution | 24 MP |
| Maximum Focal Length | 26.1 Millimeters (approx. 40mm in 35mm format) |
| Image Stabilization | Sensor-shift (3-axis, 4-steps) |
| Supported File Format | DNG |
| Photo Sensor Technology | CMOS |
| Aspect Ratio | 3:2 |
| Compatible Mountings | RICOH GR FIXED MOUNT |
| Batteries | 1 Lithium Ion battery (included) |
7. Support and Warranty
For detailed warranty information, please refer to the warranty card included with your product or visit the official Ricoh website. Ricoh provides customer support for technical assistance, repairs, and general inquiries.
You can find more information and support resources by visiting the Official Ricoh Store on Amazon or the main Ricoh support website.